Quickstart: your first scene
This walkthrough runs a single scene from a flat image to a layered PSD, taking each step's default the whole way. You bring in a scene, let the AI name and cut out its objects, let it repaint the art behind them, decide which sprites need rebuilding, and export a layered Photoshop file that opens in anything.
Every screenshot below comes from one real project — "Pixelburg", a 1288 × 794 isometric medieval town that Pixploder cut into 154 elements under 24 tags, eleven of them filed into two folders. The numbers in the text are that scene's numbers, so you can compare them against your own as you go.
New here? What is Pixploder explains the pipeline in a page, and Features overview maps out what each step can do once you want more than the defaults.
Costs. Everything that spends credits prints its price on its own button before you press it. In this run that is Find Objects in Step 3 (1 credit on the default AI model), the Segment button under the chips (1 credit per tag), the optional Sweep Leftovers · SAM 2 below it (a flat 3 credits), Generate take in Step 4 (10 credits on the default model) and its optional Generate this region touch-ups (10 credits each), and ⚡ Generate in Step 5 (10 credits per call on the default model). A Use {n} credits? dialog confirms every spend — Cancel is the button that has focus, and Don't ask again this session turns the dialog off for the rest of the visit. Everything else this walkthrough asks you to do is free: bringing art in, cropping, approving and un-approving sprites, comparing and applying versions, shadows, Final Polish, and every export. A run that fails comes back to your balance — in full when the AI was never reached, minus a single credit when it had already started. On the Free plan you buy a credit pack before you start — see Credits & plans.
Before you start
- Sign in. On the landing page press
Sign inif you already have an account, orCreate a free accounton the Free pricing card if you do not. Behind the dialog waits aSign in to startpage with oneSign in / Create accountbutton. There is no anonymous editor. The nav'sStart free trialis a way in as well, but it carries the 3-day Pro trial with it and puts that offer in front of you the moment you are signed in — see Credits & plans. - Open a project. Pixploder is project-first: the
Your projectsscreen appears before the canvas does. If the trial offer is over it,Continue with Free — you can start the trial later from Plans & credits, the ✕ orEscputs it away and the trial stays available. Type a name intoNew project name…, pressNew, and the editor opens on Step 1. From then on the header prints a save state rather than a Save button — editing the project is saving it. See Projects & autosave.
The header stays with you the whole way: your project name and its save state, a Projects button, an Upgrade button (it reads Plans & Credits once you are on a paid plan), and your account chip with the credit balance. Under it sits the eight-step bar — 1. Source Art through 8. Preview & Export. A completed step wears a check, and once your scene is loaded every node on the bar is clickable, so you can hop back at any time.
Step 1 · Source Art
- Drop your art on the canvas. The left pane is one big dashed panel headed
Upload your 2D game art, and the line under it names what it expects:Drag & drop or click to select a background or sprite-sheet image. PNG, JPG or layered PSD.Bringing art in is free. - Read the review panel. The right panel becomes
Source Art Review.Dimensionsprints the size in pixels —1288 x 794 pxfor Pixelburg — andElementsreadsUncalculateduntil objects are found. Source art is capped at 4096 px on its longest side; a bigger file is refused with a notice rather than loaded. - Move on. Press
Continue to Extend Canvas.Skip — go straight to Find & Cutjumps past the next step entirely, and↺ Replace imagestarts over with a different file (it asks first, underReplace image — start over?).
The one decision here: none. This step exists so you can check the art you are about to cut up.
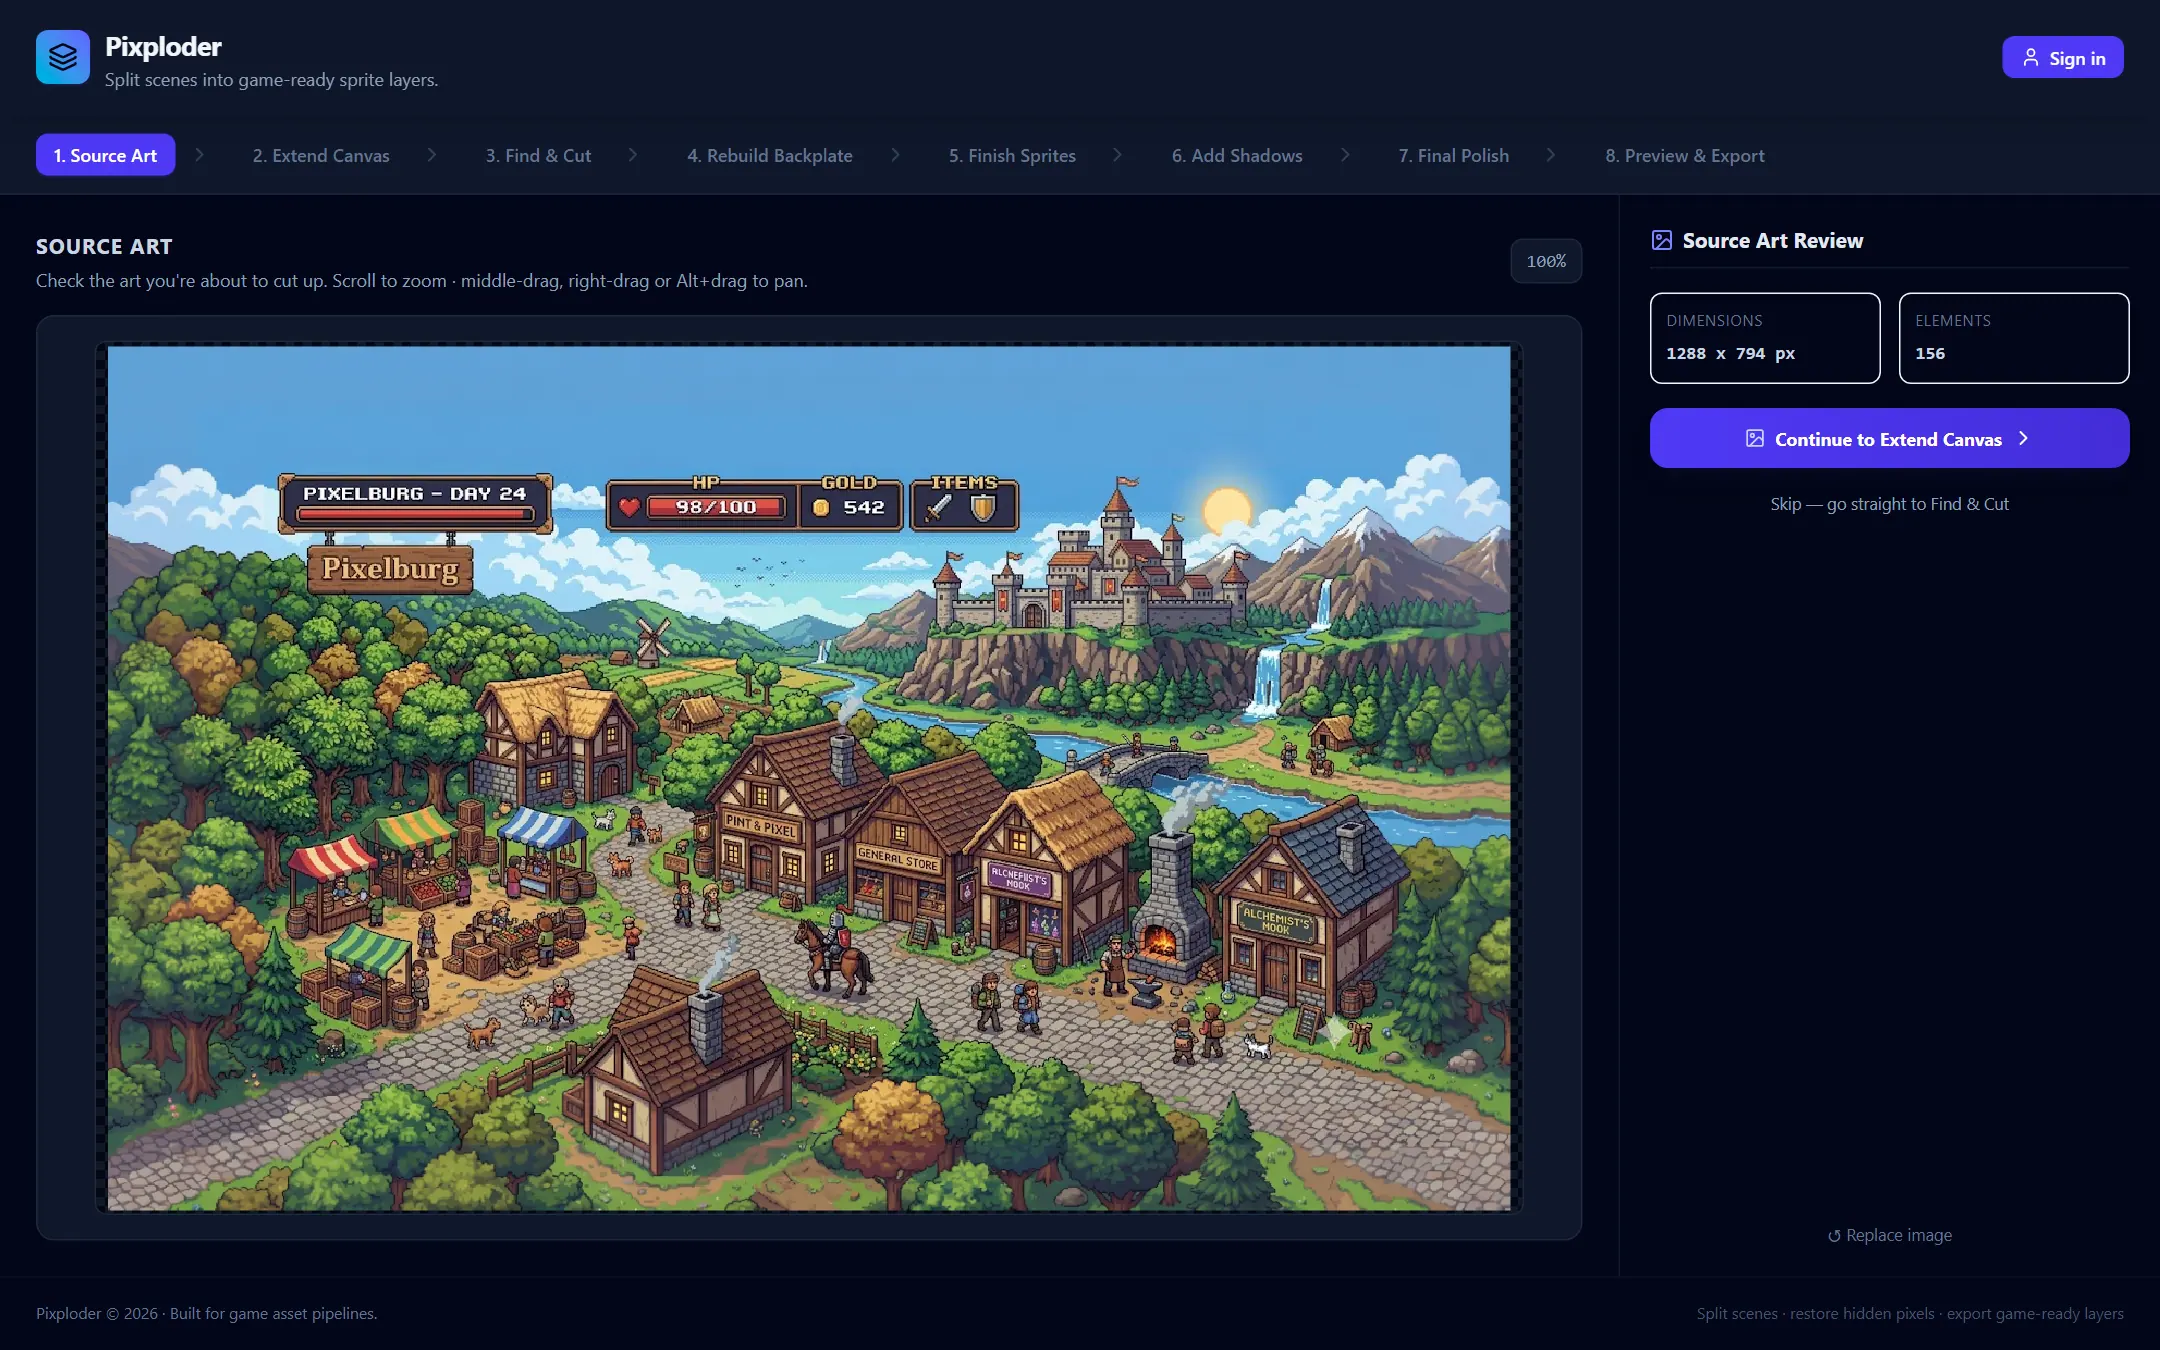
Tip. Two shortcuts instead of uploading. Describe a scene under Generate a scene with AI in the right panel and press Generate · 10 credits — a roll usually takes 10 to 30 seconds, and Use this image loads the one you picked. Or drop a .psd / .psb straight on the upload box: each layer becomes a sprite, no AI is involved, and the editor opens Step 5 · Finish Sprites.
Step 2 · Extend Canvas
The panel is headed Extend Canvas (optional), and on a first scene that parenthesis is the whole story — the frame you brought in is almost always the frame you want.
- Leave the frame alone. Eight handles ring the canvas,
Canvas size — px per sideholds the four margin fields with an anchor pad between them, andSnap to ratiooffers presets. Growing the canvas is an AI fill and its button prices itself asExtend canvas · {n} credits; dragging a handle inward crops instead, and the same button readsApply crop (free). - Press
Continue to Find & Cut. Your pixels arrive at Step 3 untouched.
The one decision here: whether your scene needs room it does not have. If it does not, skip.
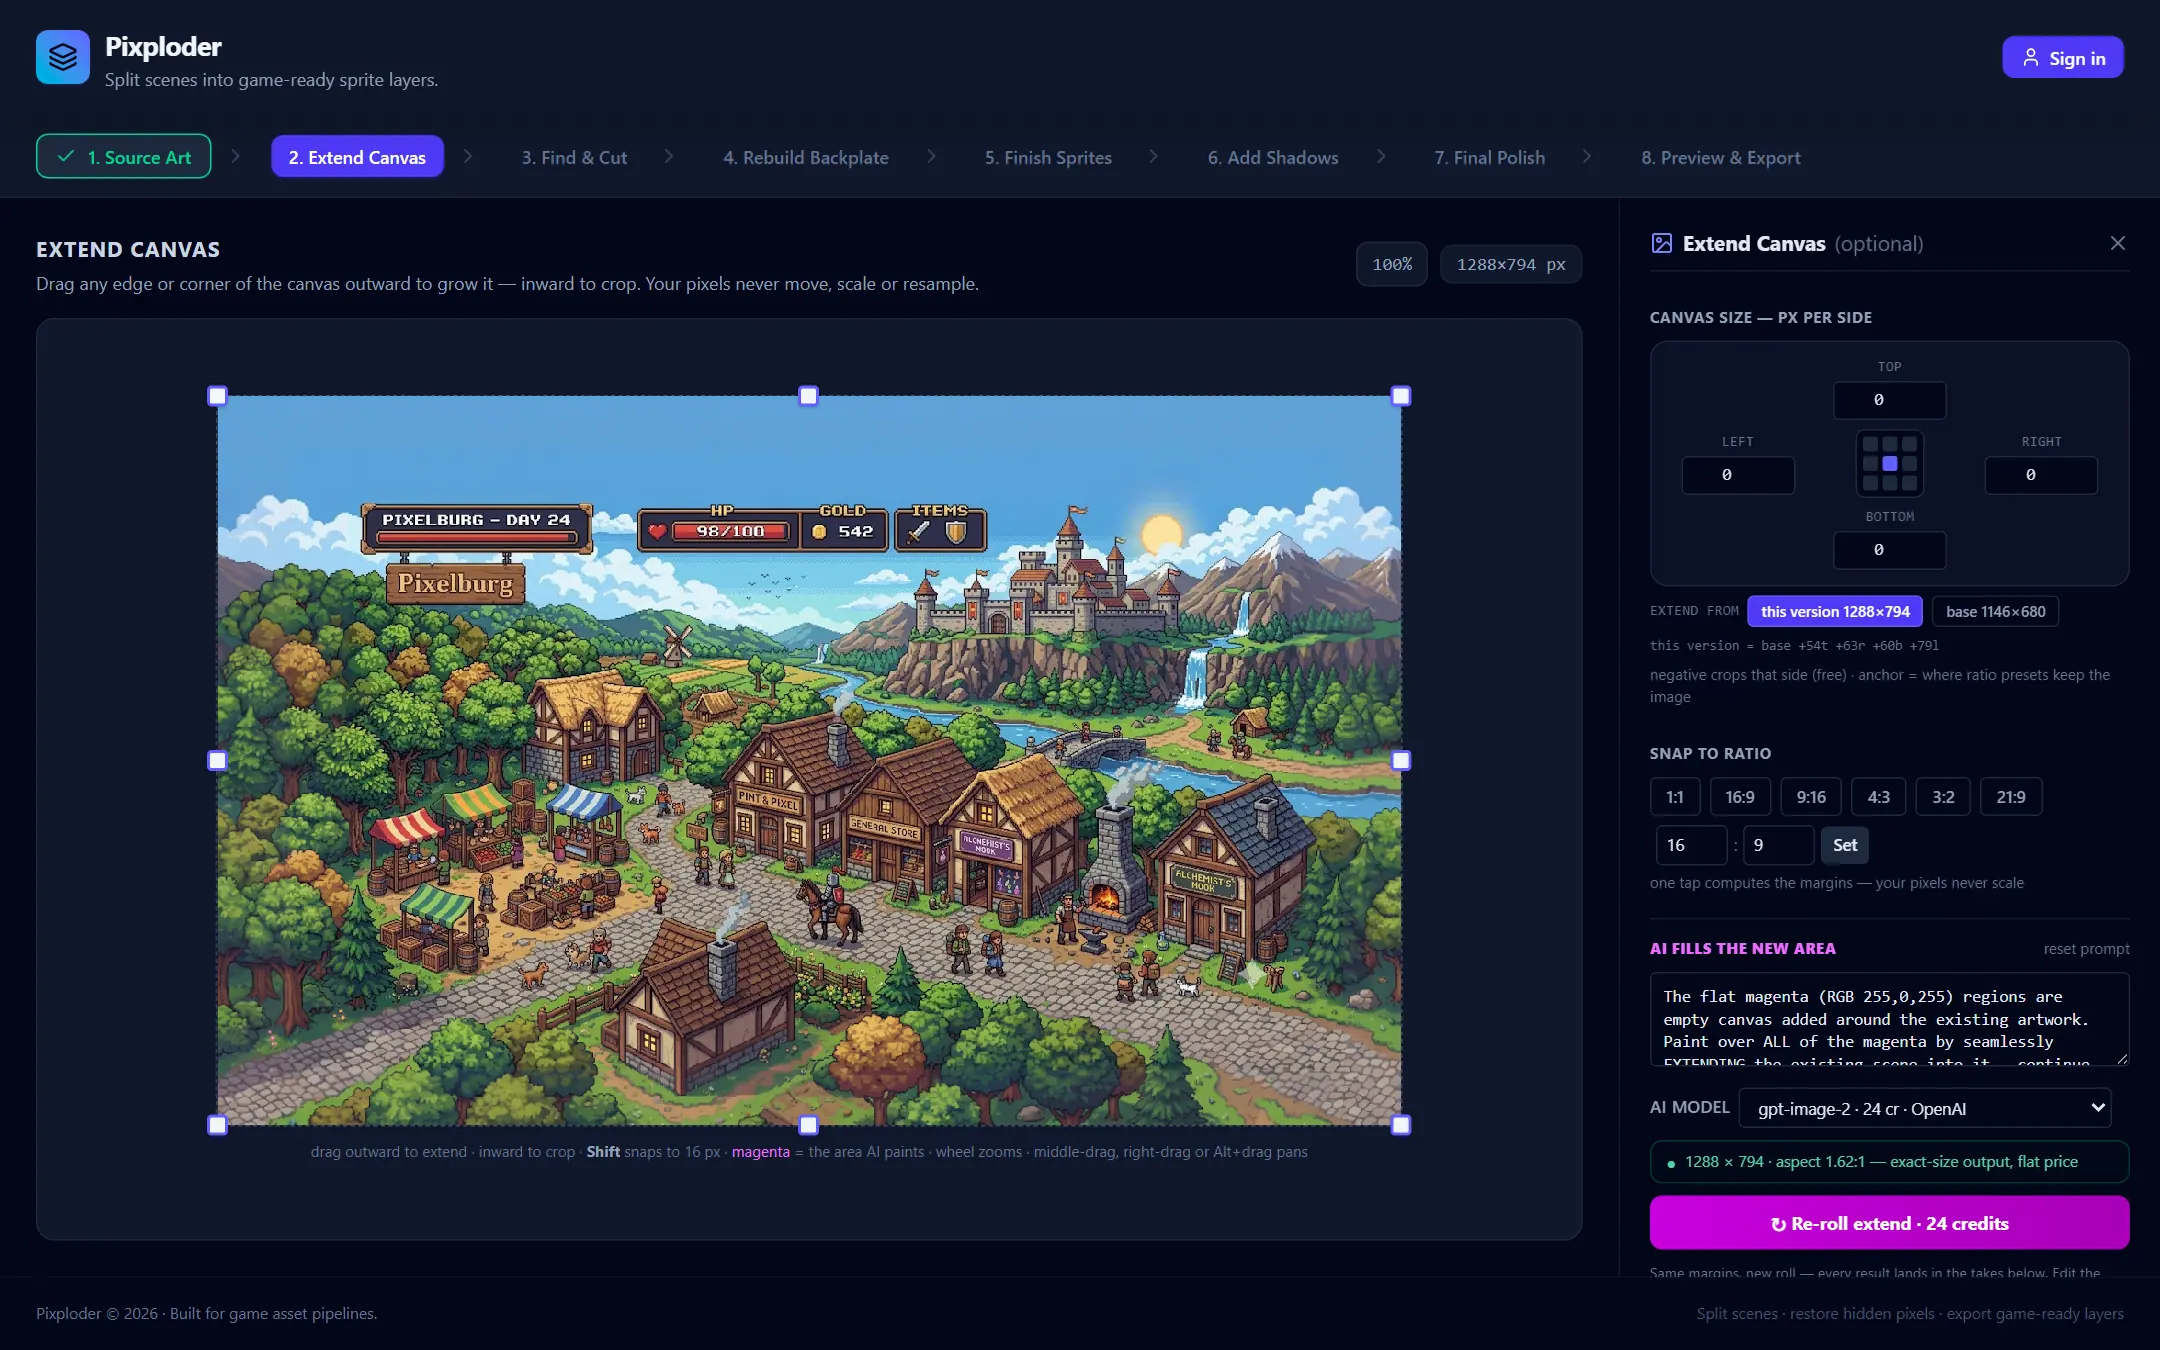
Note. Every extend you run is kept in Extend takes on this panel — click one to make it the current canvas, ↻ buys a fresh roll of the same margins at the same per-image price, and ↺ Undo extend reverts the last one. Nothing is generated until you press a button that prints a price. Step 2 · Extend Canvas covers margins, anchors and re-rolls in full.
Step 3 · Find & Cut
The FIND & SEGMENT card in the right rail holds two paid actions, and they do different jobs: the first one names what is in the picture, the second one cuts it out.
- Press
Find Objects. It sits at the top of the card with its price beside it —1 cron the default AI model. The AI reads your scene and fills the card with tag chips, one per thing it recognizes. Pressing it again later readsFind More Objects. This spends credits. - Curate the chips. A hollow chip has not been segmented yet. Click a chip to highlight its masks on the canvas, Ctrl-click for several, and use the cross on a chip to drop a tag — it takes every element that tag has already found with it, and
Ctrl+Zbrings them back. Only the first 24 enabled tags are segmented in one run, and the card says so when you have more. Curating is free. - Press the Segment button under the chips. It names its own plan and its own price: on a first pass over Pixelburg's 24 tags it reads
Segment 24 tags (24 cr)— one credit per tag. Each tag becomes one or more elements with a real mask, the elements land inFOUND ELEMENTS, and the chip over the canvas counts them as{n} Sprites Found. After a pass the same button renames itself toFind more · all tags ({n} cr)— orFind more "{tag}" ({n} cr)with a tag selected — because a second run hunts for what the first one missed. This spends credits. - Optionally sweep.
Sweep Leftovers · SAM 2under it segments everything that is not an element yet and adds the pieces toFOUND ELEMENTS. It is a flat3 crper sweep whatever its own settings gear says. This spends credits. - Glance down
FOUND ELEMENTS. Hovering a row previews that element's mask on the canvas.New elementarms a one-shot box you draw on the image by hand, the undo arrow beside the heading steps the whole list back, and the dashedBackgroundrow at the bottom is the live bottom layer —scene − {n} elements. - Press
Confirm & Proceed. That takes you to Step 4 · Rebuild Backplate.
The one decision here: how many tags you keep. Each enabled tag costs a credit and turns into one or more sprites you will have to judge on Step 5.
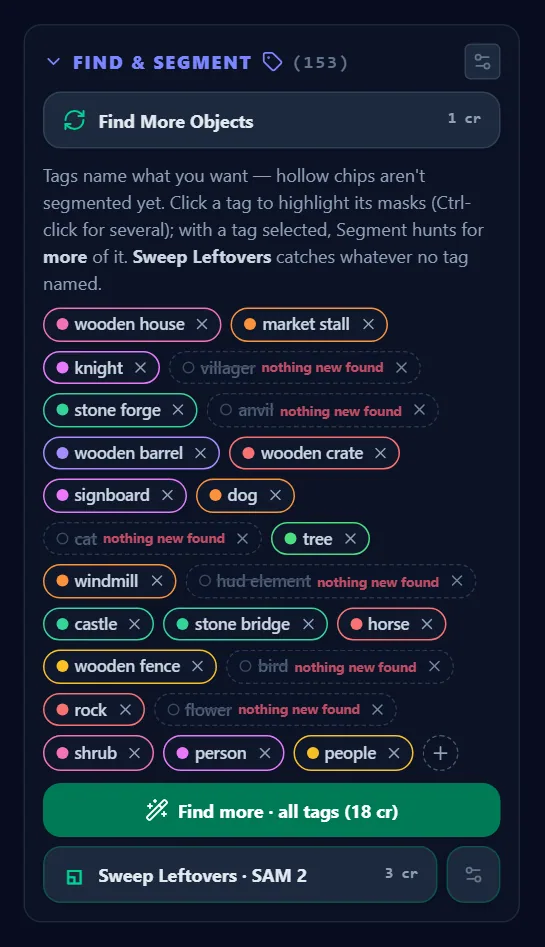
Tip. This is also where grouping happens: Ctrl-click a few rows in FOUND ELEMENTS and press the button that appears above the list — Group {n} elements. Groups become folders in your PSD, and they arrive at Step 6 · Add Shadows as ready-made shadow groups. Pixelburg ships 11 grouped sprites this way. Step 3 · Find & Cut covers manual boxes, re-masking and the sweep in full, and Mask editor owns the workspace behind Mask — {name}.
Step 4 · Rebuild Backplate
Cutting the objects out left holes. This step paints them in, and the heading says so: REBUILD BACKPLATE — FILL THE HOLES, THEN REFINE. The right rail is two numbered stages, and you only need the first.
- Press
Generate take · {n} crin stage ①FILL HOLES— 10 credits on the default model. The AI repaints the holes, the result lands as a tile in the grid headedTAKES — CLICK TO USE · CLICK THE ACTIVE ONE TO PEEK THE HOLES, and it installs itself as the backdrop on the spot. This spends credits. - Roll a second one with the dashed
+ take · {n} crtile beside the first. Same price, new roll. - Click the take you want. Selecting is installing, and the tile's footer turns emerald:
✓ In use · Whole image. That take's full frame becomes your background — there is no mode to pick. Clicking the active tile again peeks at the original with its holes showing. Clicking any tile is free. - Press
Continue to Finish Sprites.
The one decision here: which take. It is the whole background frame, not a patch, so pick the one whose repaint you would be happy to see behind every sprite.
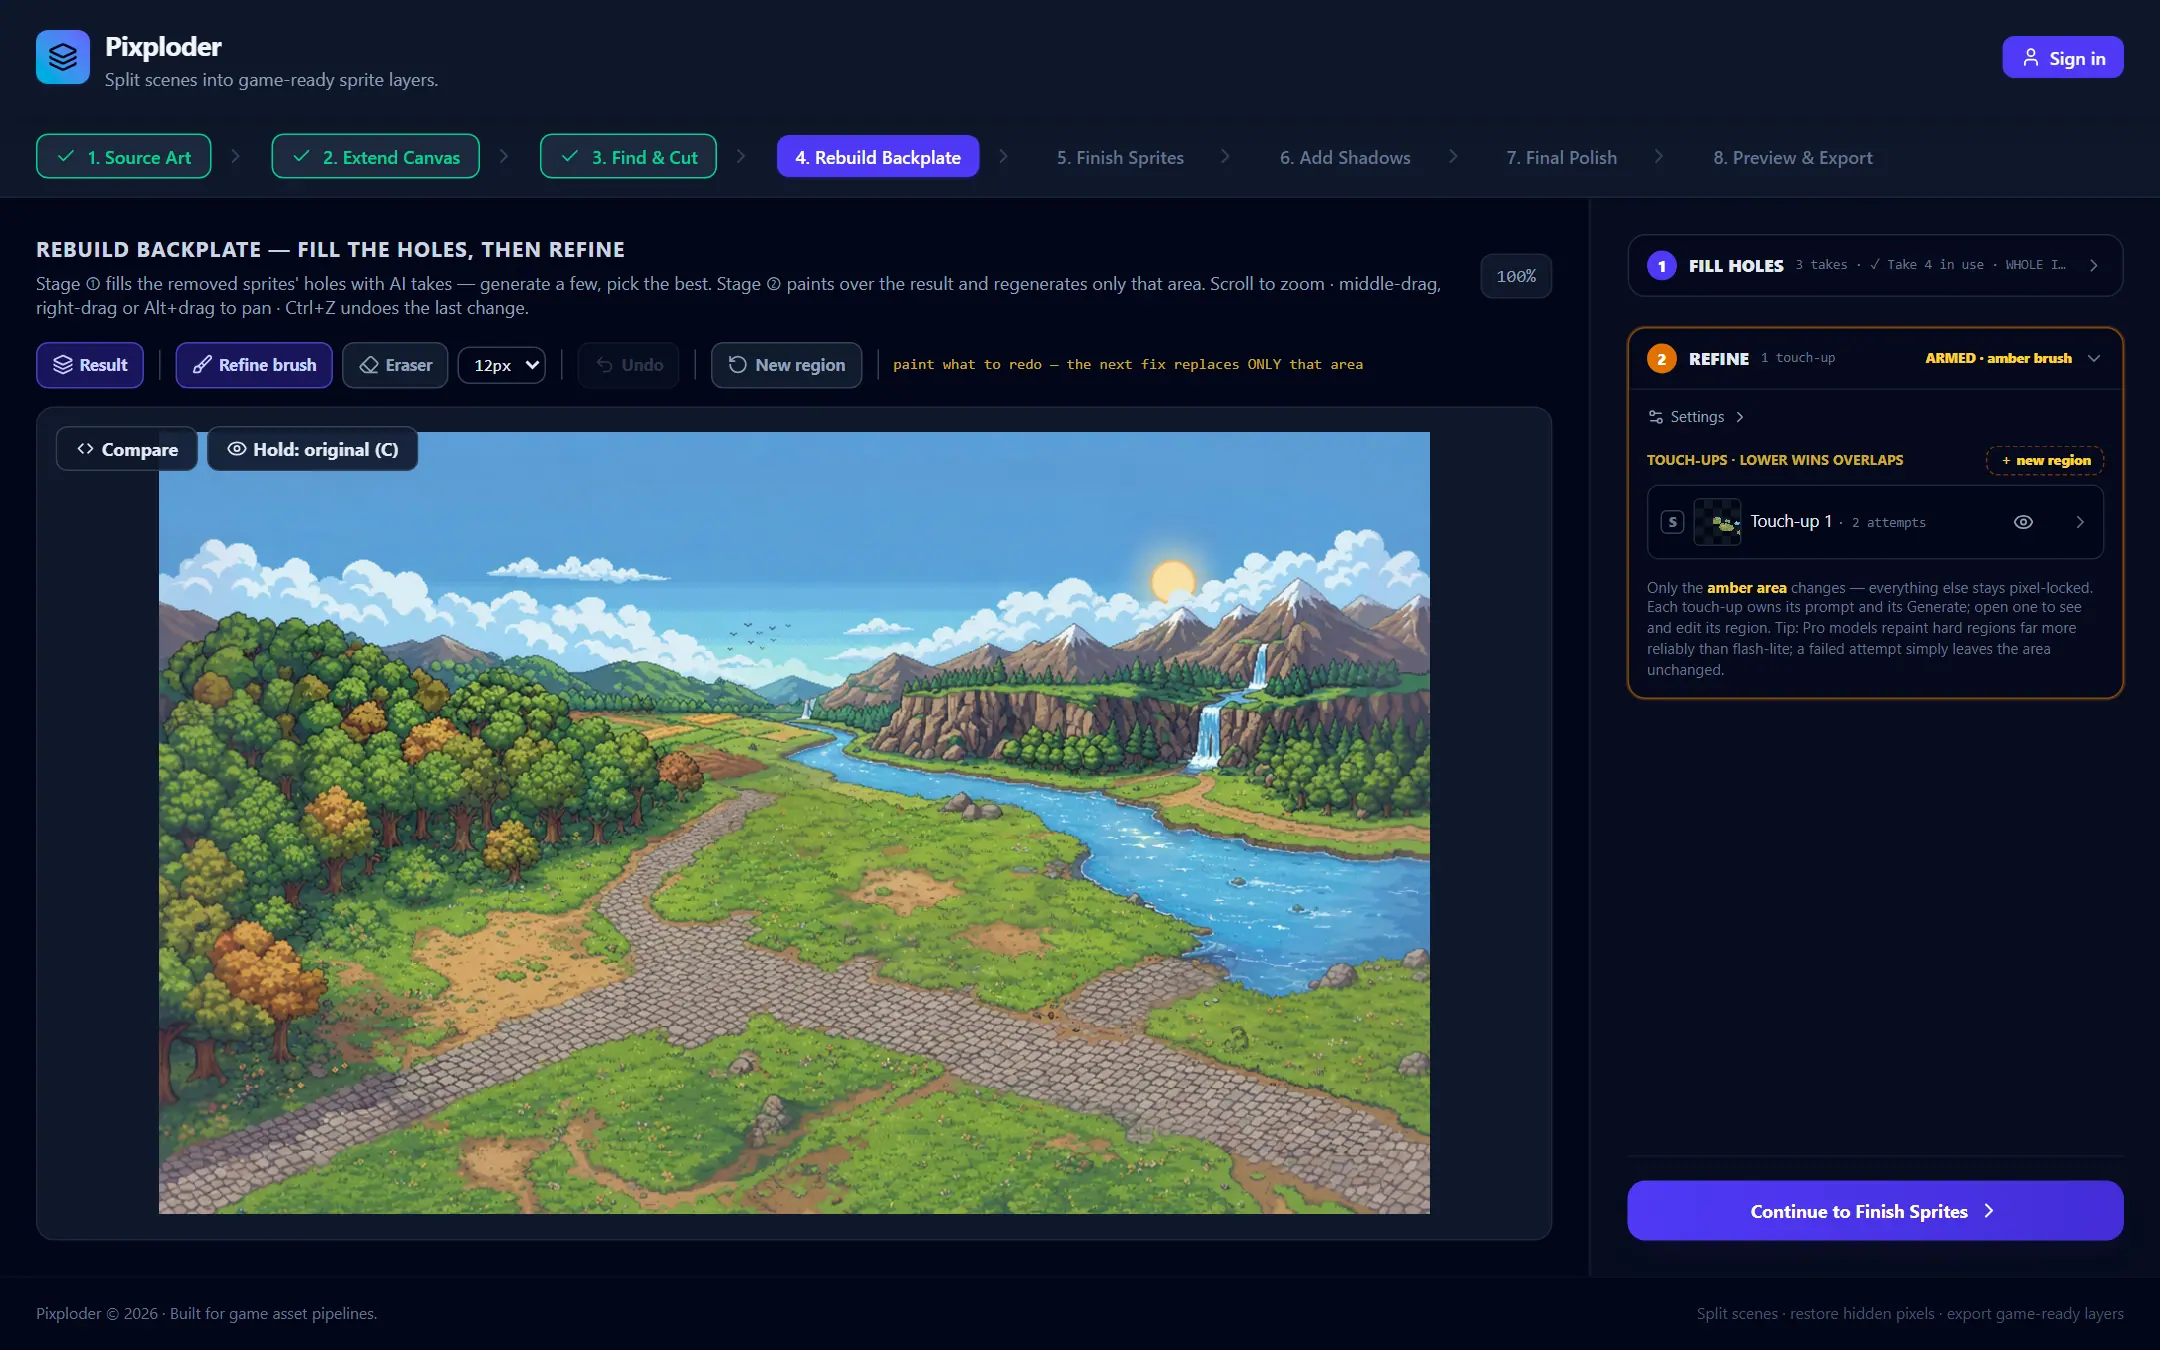
Note. Stage ② REFINE stays shut until a take is in use — its header reads locked — pick a take first. Once one is installed you can paint over any patch of the result and repaint only that patch, stacked as touch-ups; each attempt is its own paid call and prices itself as Generate this region · {n} cr. Pixelburg's backplate carries eight of them. Skip it on a first run; Step 4 · Rebuild Backplate walks through it.
Step 5 · Finish Sprites
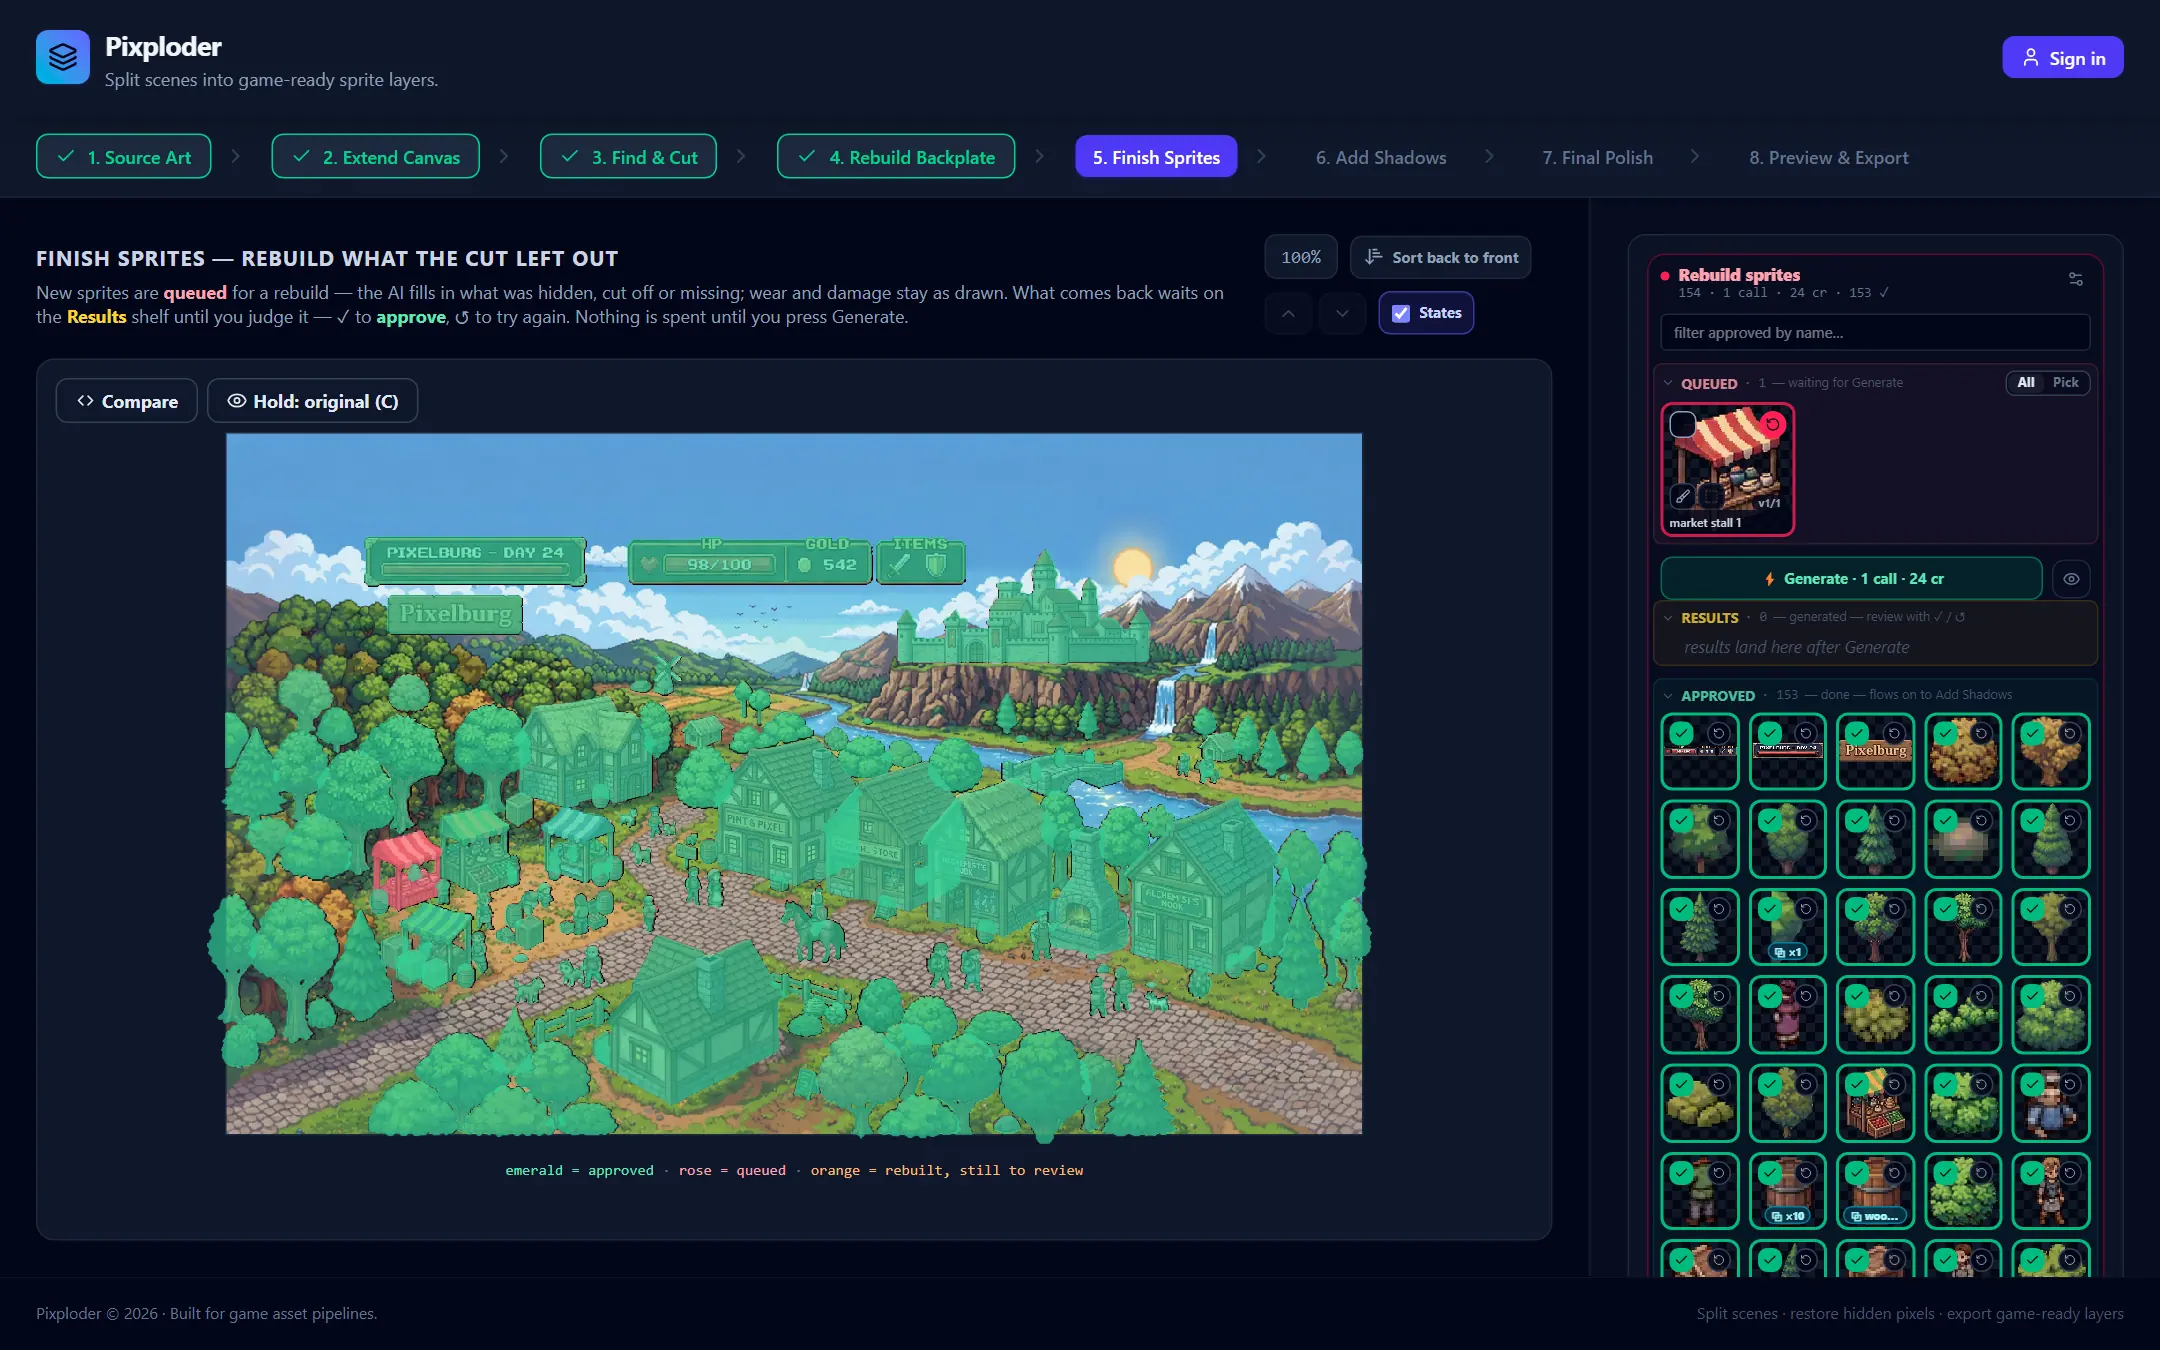
Here each object becomes a finished sprite on transparent alpha. The scene sits on the left; the right rail holds one panel, Rebuild sprites, with three shelves — QUEUED, RESULTS, APPROVED — and the shelf a sprite sits on is the decision you are making about it.
Every sprite that has never been through a call is lined up on QUEUED the moment you open the step. Pixploder's assumption is that such a sprite still needs rebuilding, so approving is the decision here, not the default. For a 154-sprite town that means the queue starts full and your job is to empty it.
- Read the header. It counts the section in one line: how many sprites it holds, then
{n} calls · {n} crfor what is queued,{n} ✓for what is done, and{n} to reviewin amber for results waiting on you. The shelf captions say the same thing in words —waiting for Generate,generated — review with ✓ / ↺,done — flows on to Add Shadows. - Approve everything the cut already got right. The
✓in a tile's top-left corner takes that sprite out of the queue and ontoAPPROVED; the price on the Generate button falls in the same frame. Tick theStatescheckbox above the scene to see the same thing on the artwork — every silhouette is tinted emerald for approved, rose for queued, orange for rebuilt and still to review. Approving is free. - Leave the damaged ones queued. A sprite whose cut-out has a bite taken out of it — because something was standing in front of it when the mask was cut — is exactly what this step rebuilds. If you approve one by mistake,
↺in its top-right corner un-approves it and queues another try. Both directions are free. Once the section holds more than six sprites afilter approved by name…box appears above the shelves; it narrows theAPPROVEDpile only. - Press
⚡ Generate · {n} calls · {n} crunder theQUEUEDshelf. Queued sprites are packed together into calls: one call is 10 credits on the step's default model and holds up to 20 sprites, and the packer splits a call whose sheet would come out too large.⚡ Generate all · {n} calls · {n} crat the foot of the rail is the same run through a second door — same list, same price, one confirmation. Confirm theUse {n} credits?dialog. This spends credits. - Judge what comes back. Results land on the
RESULTSshelf. Click a tile to open its version row —Versions of {name} · click to APPLY · Ⓢ solo, again for the scene · 🔧 retouch. Clicking a thumbnail applies that version to the scene, the circledSbadge shows it alone at full size, and the wrench opens the repair window. All of this is free. - Approve or re-roll.
✓in the top-left moves the sprite toAPPROVED;↺in the top-right queues another try. When nothing is left unjudged a banner appears under the section:✓ All {n} reviewed — approved sprites continue to Add Shadows. - Press
Continue to Add Shadows.
The one decision here: what you leave queued. It is the only thing on this step that costs money, and it is the only thing that decides how long the step takes.
Careful. The approval gate switches on the moment you tick your first ✓ anywhere in the project. From then on a sprite reaches Add Shadows and the exports only if it is ticked, or has nothing queued or generated against it at all — so a sprite still sitting on QUEUED, and a generated result left unjudged on RESULTS, do not ship. Work the queue down to the sprites you really want rebuilt before you continue.
Note. Three surfaces on this step have guides of their own, and none of them is needed for a first run. Selecting a sprite on the scene raises a pill with ✏ Fill zones… (paint where the AI may draw) and Retouch (holes, outline and color match on the version showing) — see Sprite repair. Open a generated version alone with its S badge and a 🎛 joins the header pill above the picture, opening the keyer that cuts a result off its background — see Keyer. And the 👁 beside the Generate button opens the panel where you can see how sprites pack into calls, untick one, drag a sprite to another call or repack the queue — see Calls & sheets.
Step 6 · Add Shadows
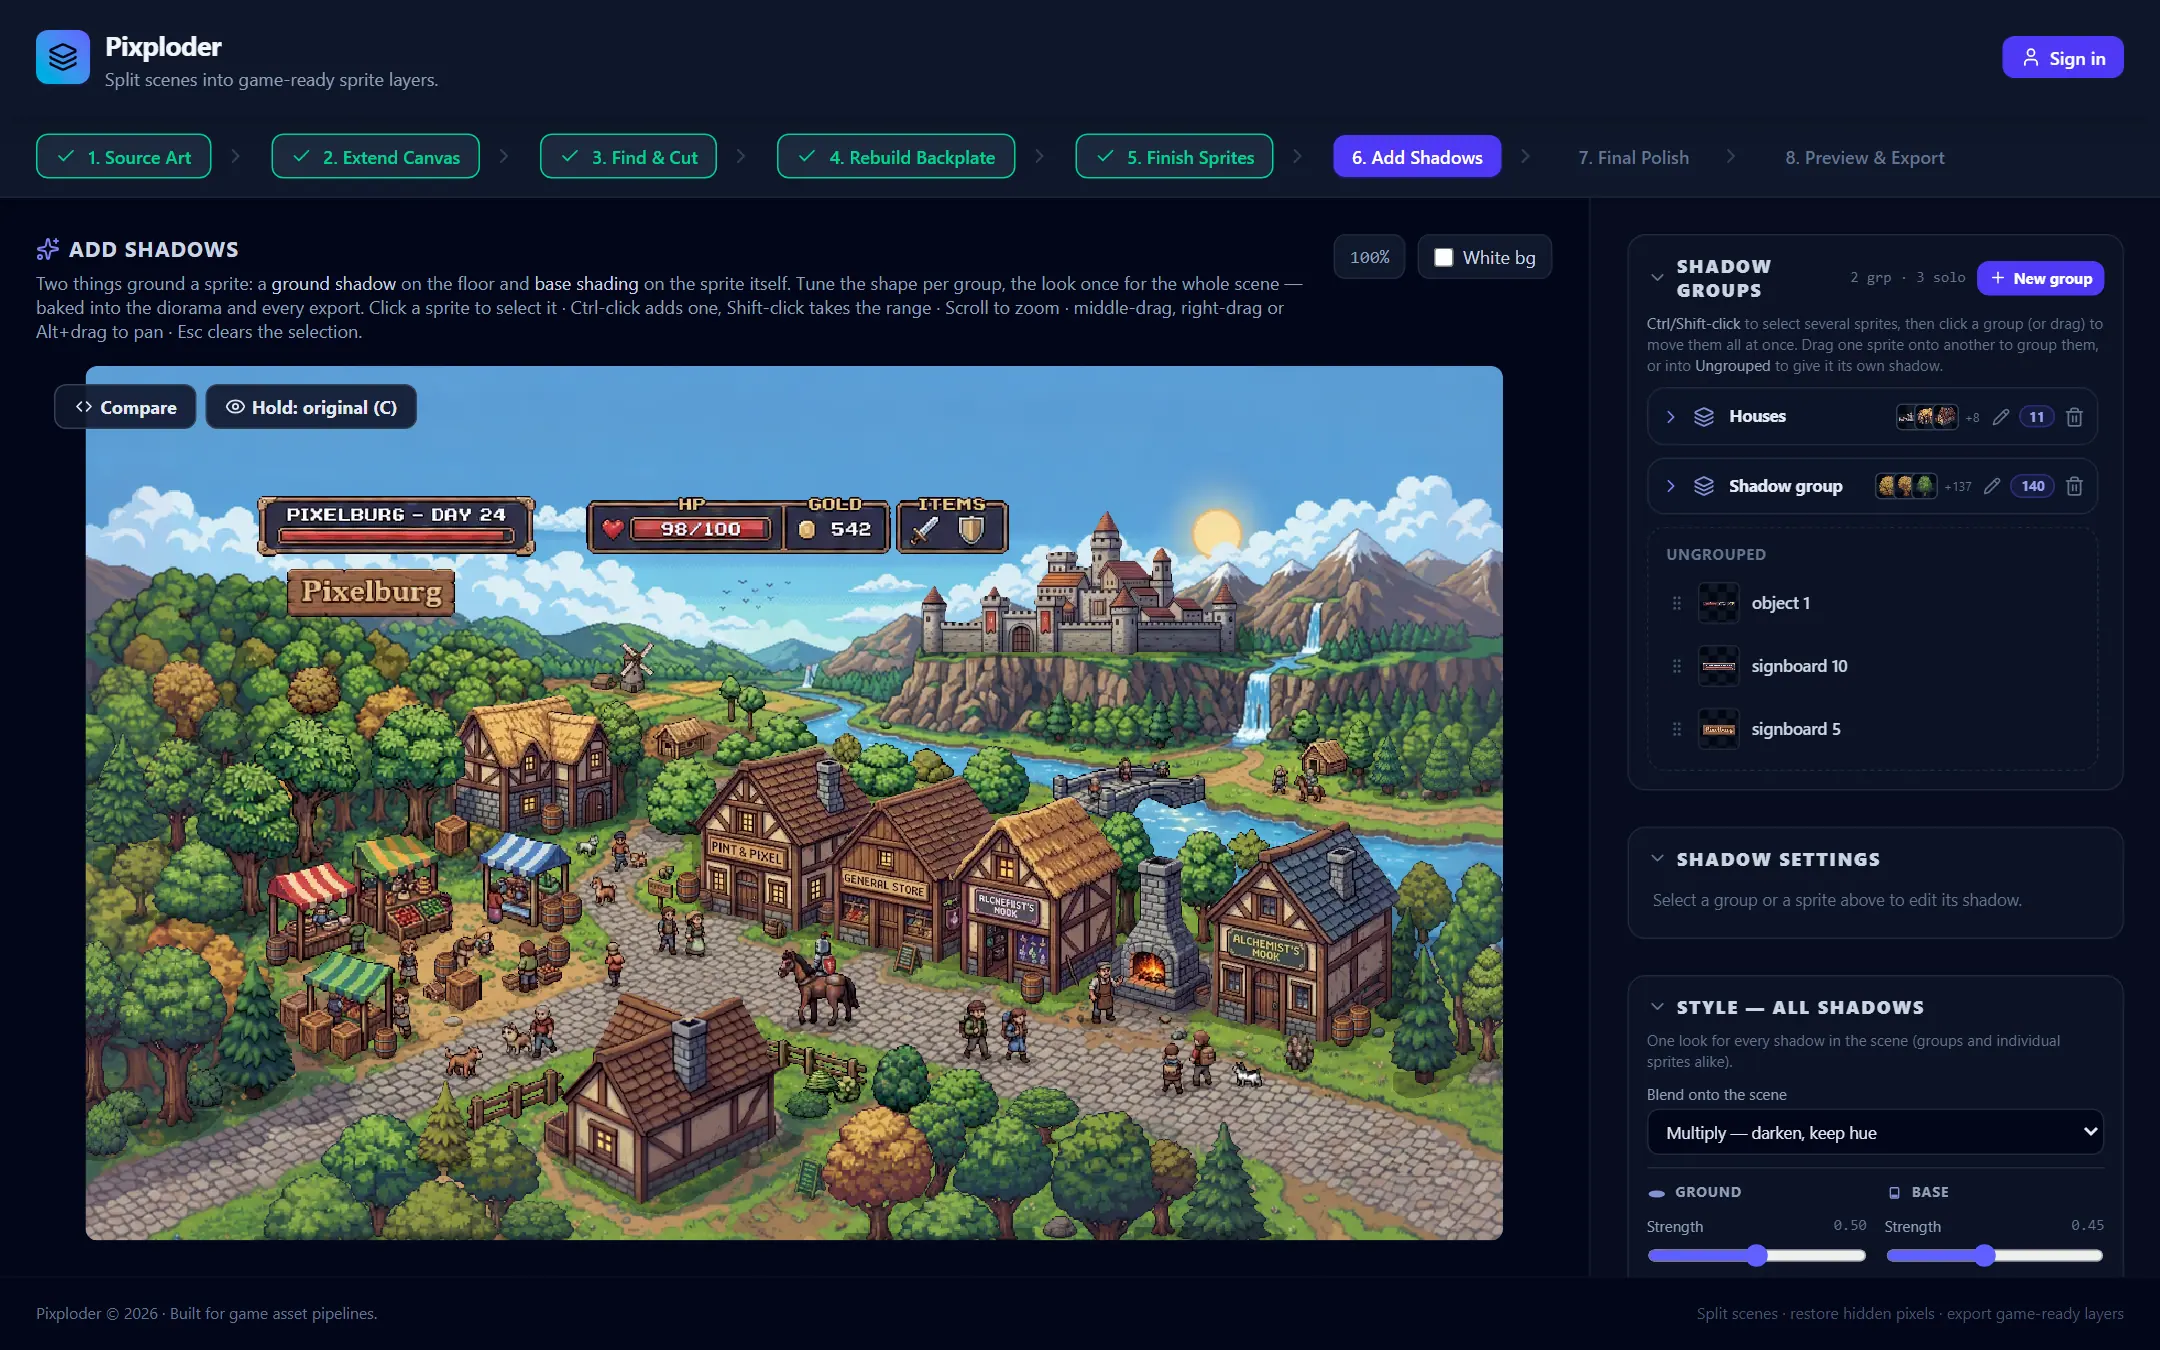
Shadows are free and optional. Two things ground a sprite here: a ground shadow on the floor and base shading on the sprite itself.
- Look at
Shadow groups. Anything you grouped back in Step 3 arrives as a ready-made shadow group; every other sprite is listed underUngrouped. The readout beside the heading counts both, as{n} grp · {n} solo. Pixelburg's tree opens with two groups — one seeded from a Step 3 folder, one built here. - Pick a target. Click a sprite on the preview or a row in the tree — Ctrl-click adds one, Shift-click takes the range. Until you do,
Shadow settingsreadsSelect a group or a sprite above to edit its shadow. - Add and tune. A sprite that has no shadow of its own offers
Add a shadow, which fits one immediately; once there is a shadow to edit, the sections under the heading —Contacts,Ground shadow,Base shading— tune its shape.New groupandUngrouprestructure the tree; dragging one sprite onto another groups them. TheWhite bgcheckbox above the preview composites on plain white so shadows read clearly. - Press
Continue to Final Polish.
The one decision here: whether a sprite is grounded by a group's shadow or its own. Groups keep a row of houses consistent; a lone prop usually wants its own.
Step 7 · Final Polish
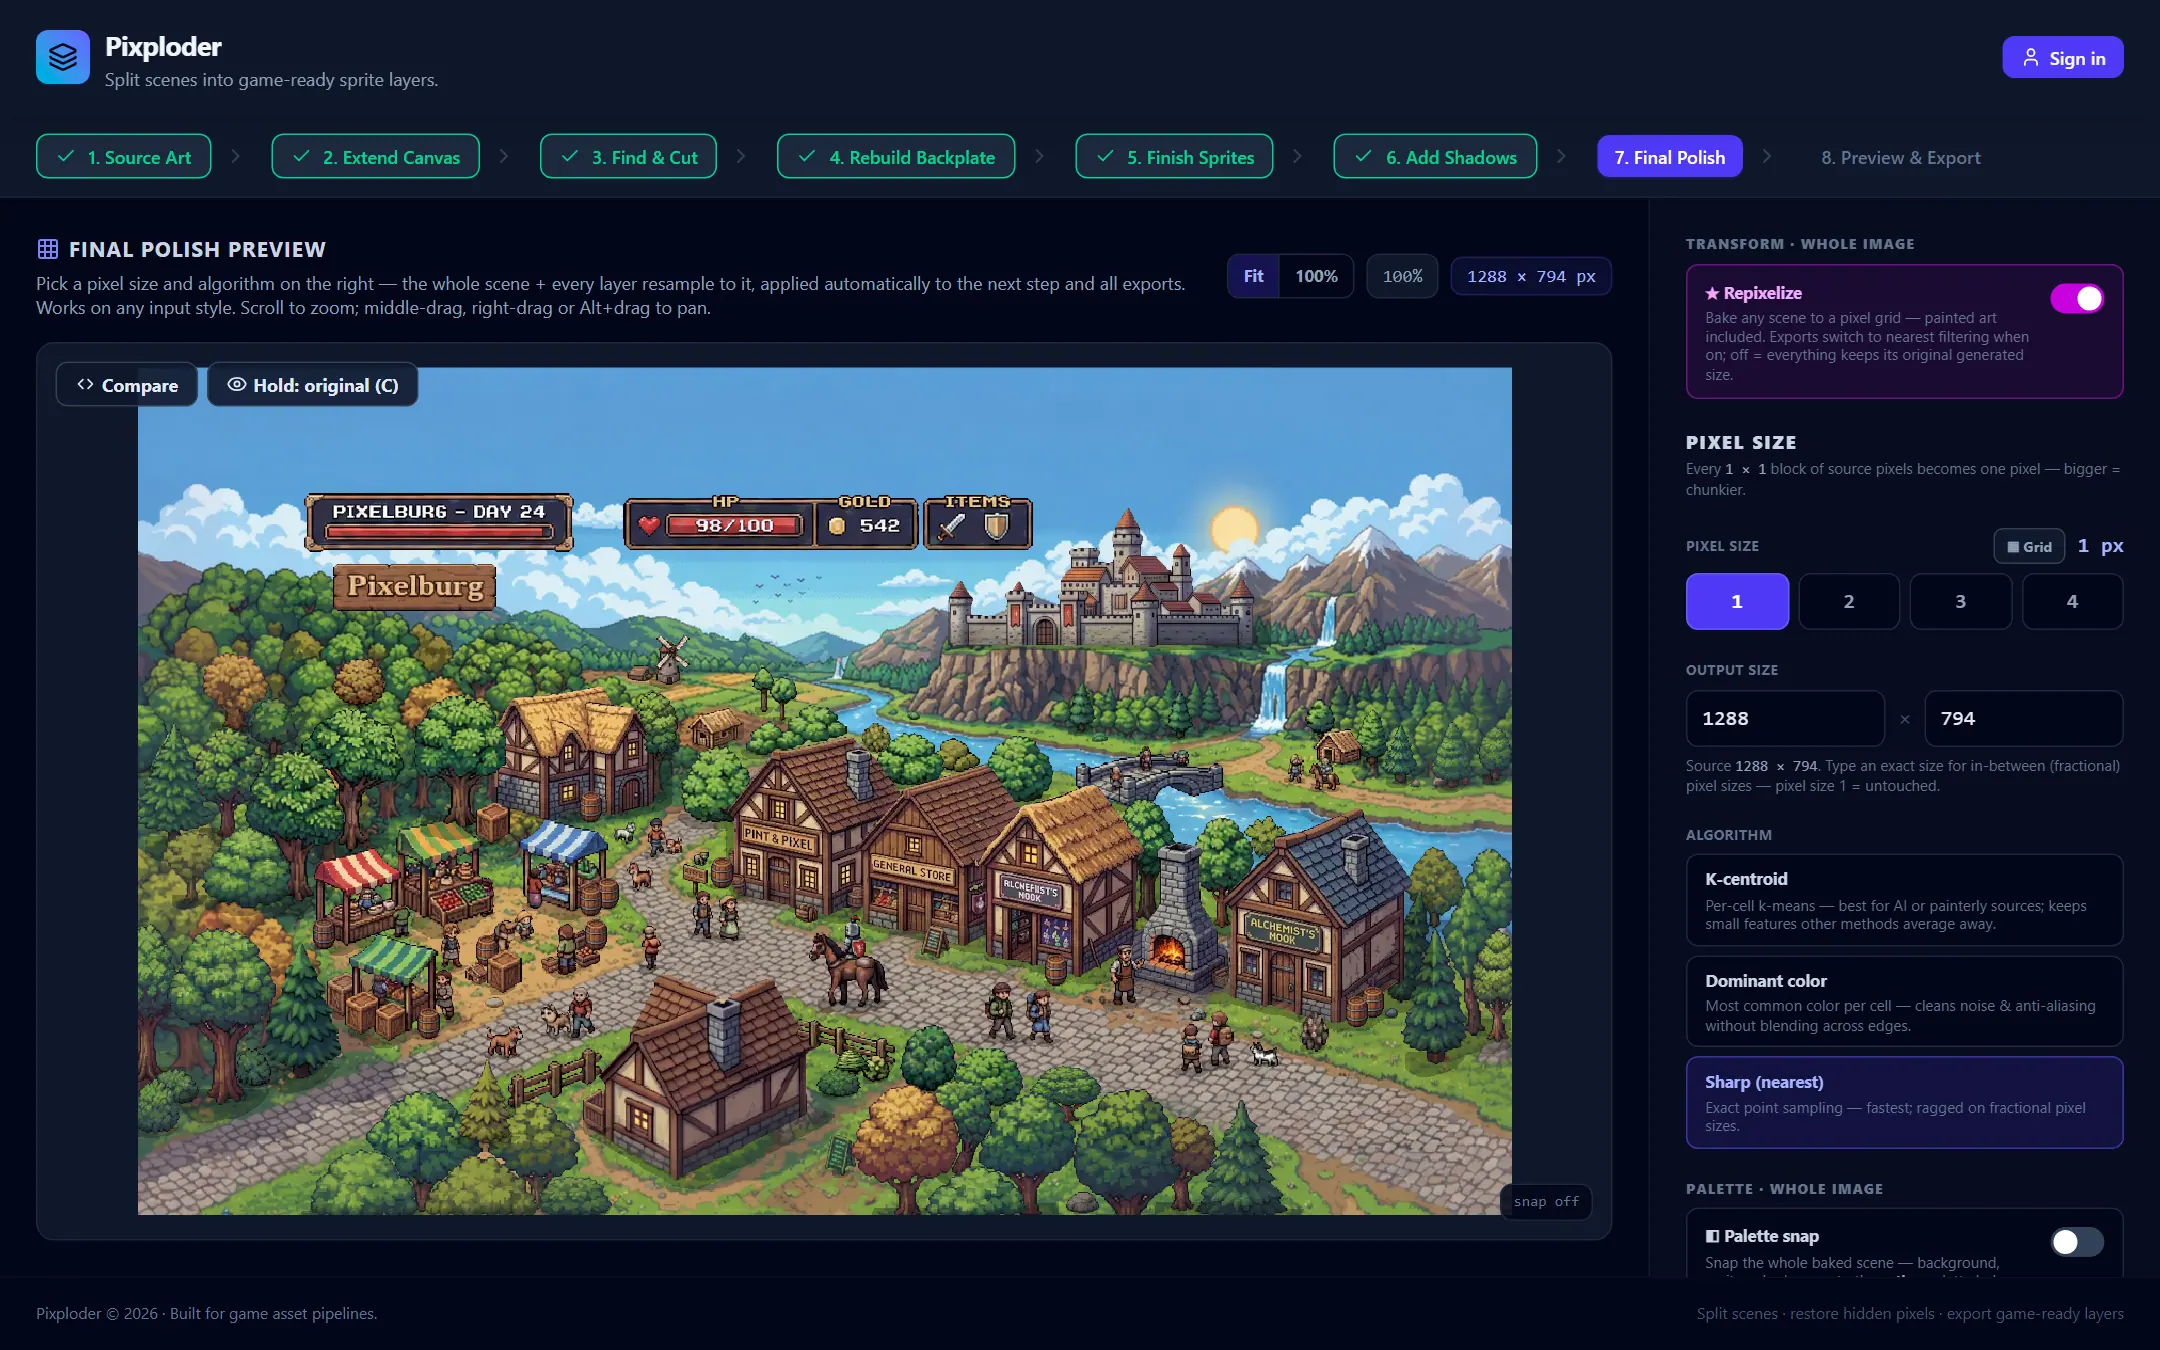
Two racks, both free, both fine on their defaults.
Transform · whole imageholds one switch,★ Repixelize. Pixploder turns it on when it reads your art as pixel art and leaves it off otherwise. While it is on you also getPixel Size, an aspect-lockedOutput sizepair and anAlgorithmlist; while it is off nothing is resampled and every export uses the full-resolution document.Palette · whole imageis off until you want it. Turn◧ Palette snapon, drop in any image as a palette — every unique color in it becomes an entry — and the whole baked scene snaps to the active palette. Leave the switch off and nothing changes.- Press
Continue to Preview & Export. The bake runs on the way into Step 8 — the resample, then the palette snap — and the line above the button says in advance exactly what it will do to your document.
The one decision here: whether to resample. If your source was pixel art and you want it to stay on its grid, leave ★ Repixelize on.
Step 8 · Preview & Export
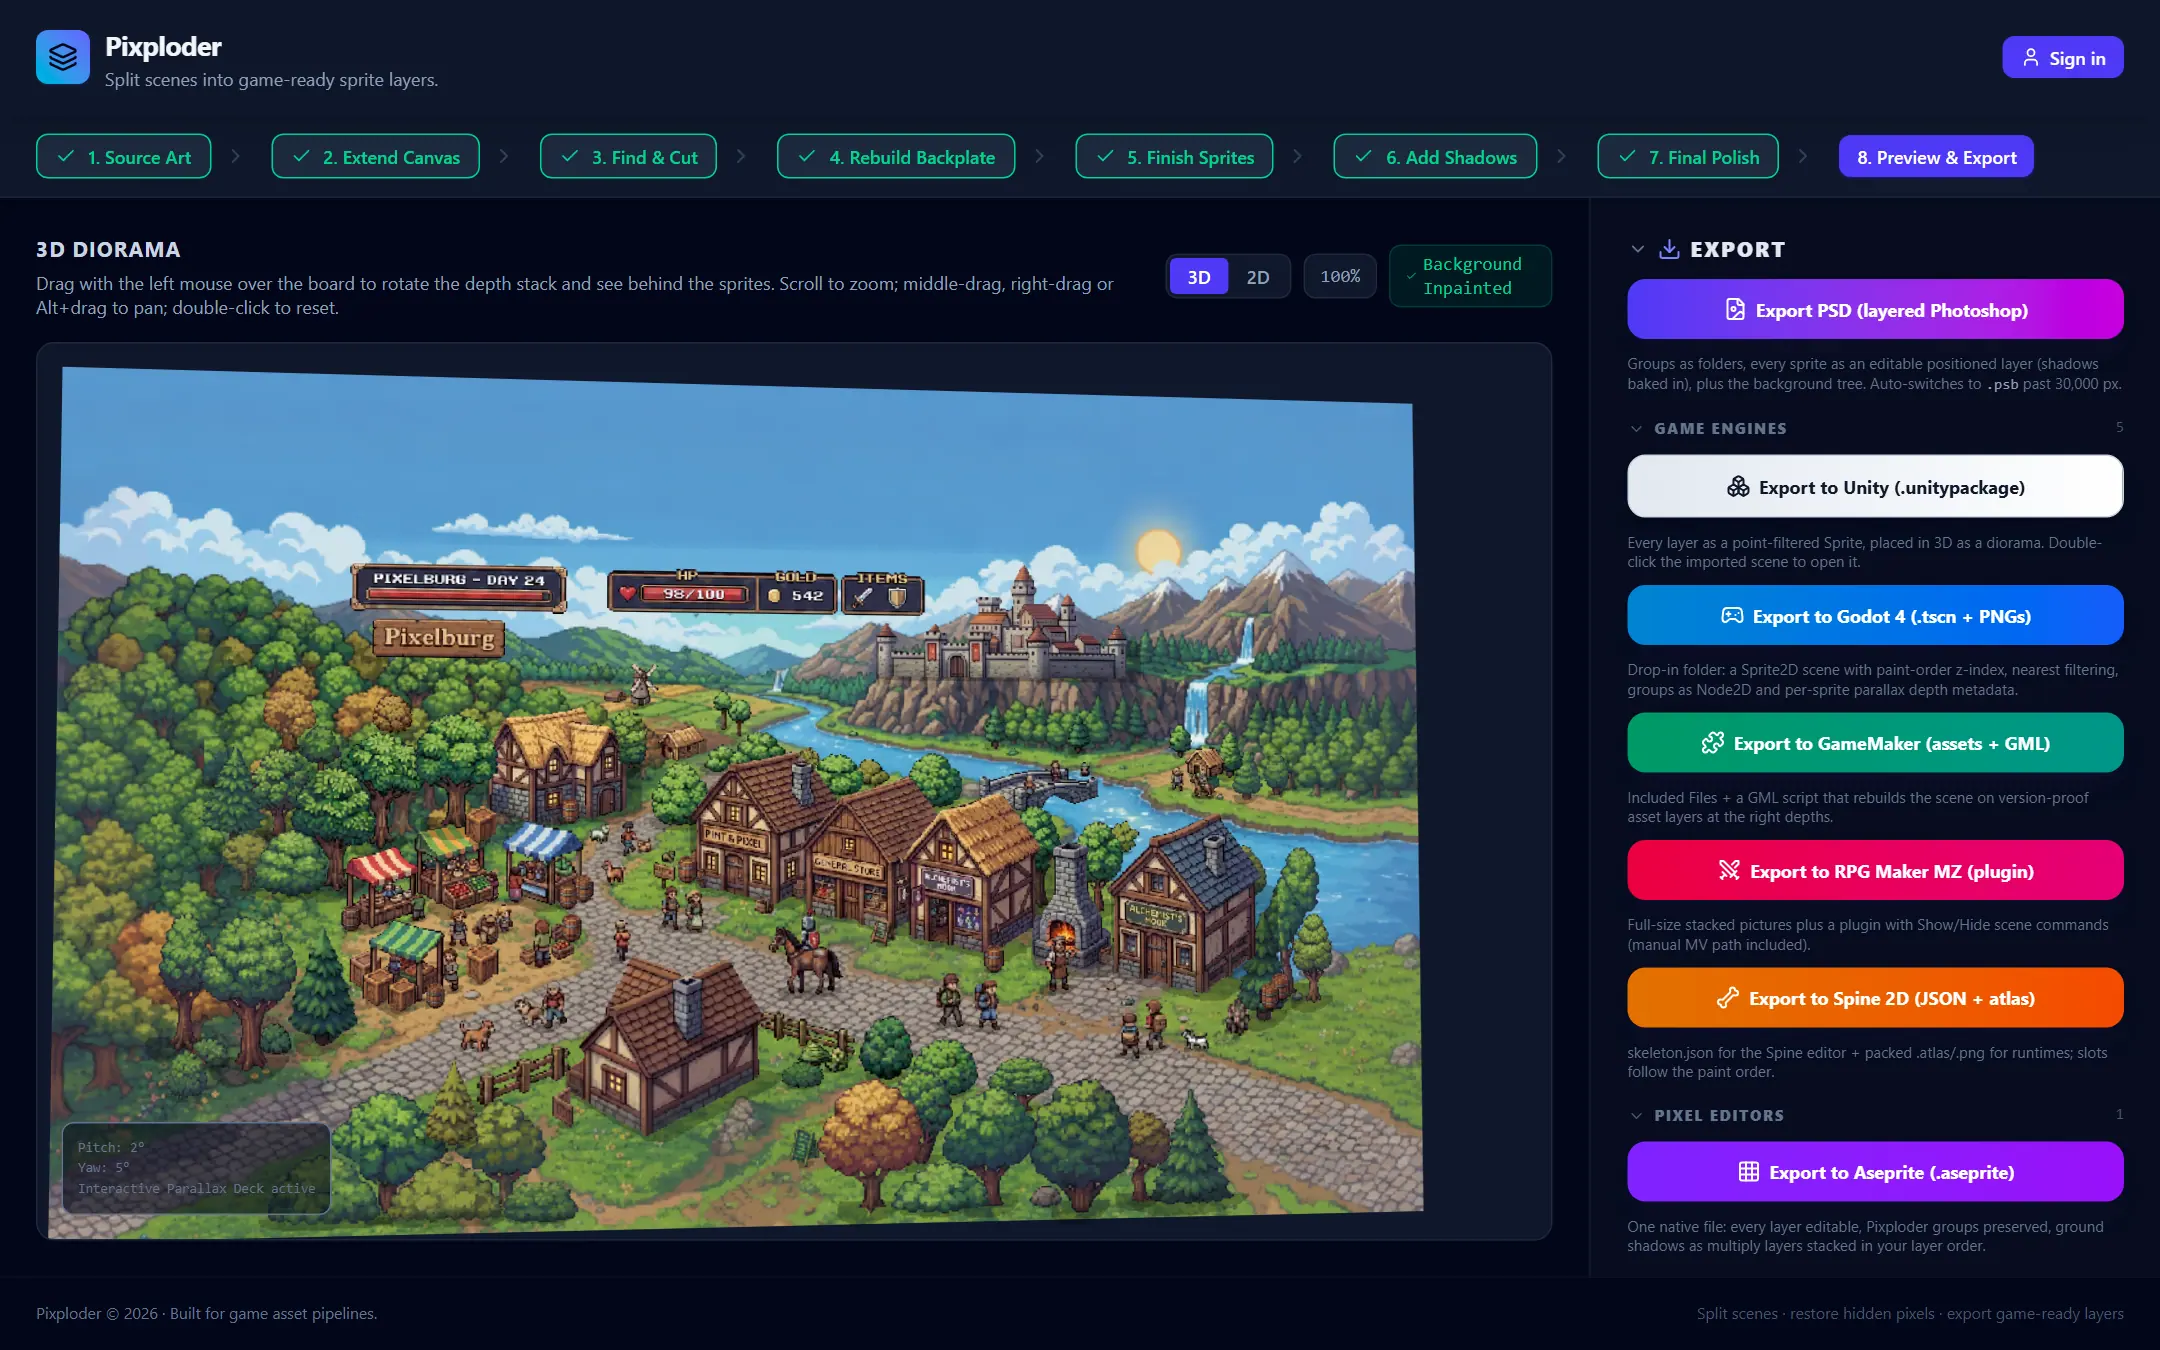
- Look around. The
3D/2Dtoggle sits above the preview. In3Dyour layers are staged as a depth stack — drag over the board to rotate it and see behind the sprites, scroll to zoom. In2Dyou get the flat composite plus the two comparison tools you already know from the earlier steps,Hold: original (C)andComparewith a divider you drag anywhere over the image. - Check the stack. In
2D, hold or wipe the original back over your composite — that is the alignment check, and it covers the whole scene at once. If a sprite sits wrong or paints over its neighbor, its order, position and size are all set back on Step 5 · Finish Sprites; this step only shows the result. - Export. The right rail is one panel,
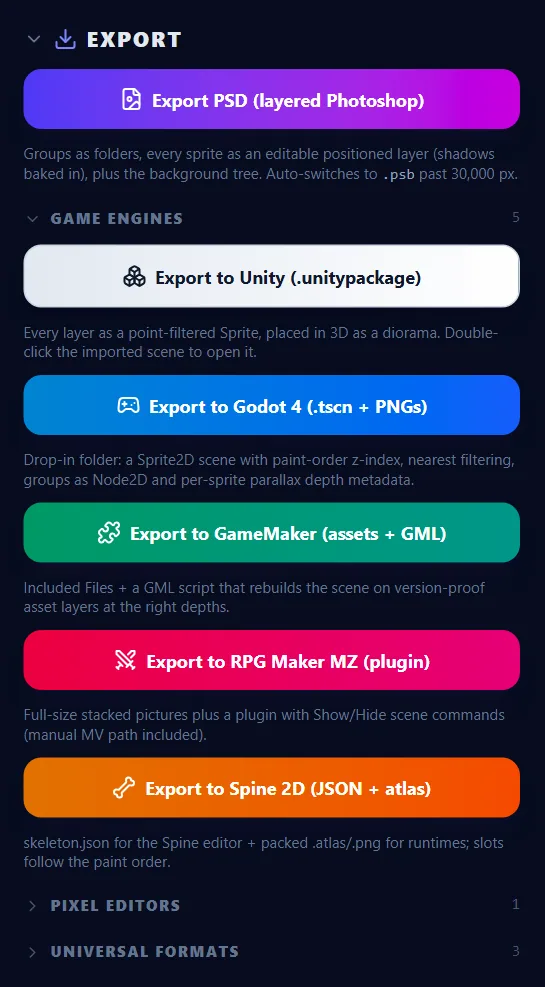
EXPORT, and it opens expanded: press its first button,Export PSD (layered Photoshop). Pixploder builds the file in your browser and it downloads — the Find & Cut tree as folders, every sprite as an editable positioned layer with its shadow baked in, plus the background tree. Past 30,000 px it switches to.psbon its own. Exporting is free.
The one decision here: none, if PSD is what you came for. The panel ships eleven formats and they are all built from one shared snapshot of the scene, so they always agree with each other.
What a scene this size actually costs
Every price below is what the button prints. The only variable is how much you ask for.
| Action | Price | On a scene this size |
|---|---|---|
Find Objects | 1 credit on the default AI model | 1 |
| The Segment button | 1 credit per tag | 24 (24 tags) |
Sweep Leftovers · SAM 2 | flat 3 credits, optional | 0 or 3 |
Generate take / + take | 10 credits each on the default model | 10–20 (1–2 takes) |
Generate this region (Step 4 touch-ups) | 10 credits each on the default model, optional | 0 upward |
⚡ Generate (Step 5) | 10 credits per call, up to 20 sprites per call | 10 (one call) to 80 or more (all 154) |
| Everything else | free | 0 |
Note. These are estimates, not quotes — the only figure that binds is the one printed on the button you are about to press. The fixed part of a first run is small: 1 credit to name the objects, 1 per tag to cut them out, and 10 for a single backplate take, so a scene with two dozen tags starts at 35 credits. What moves the total is the Step 5 queue, where each call is 10 credits and carries at most 20 sprites: rebuild a dozen sprites and one call takes you to 45, queue all 154 and the packer needs at least eight, which takes you to 115 or beyond. A second take, a sweep, or a few Step 4 touch-ups each add their own printed price on top. The clock is mostly yours rather than the AI's — budget half an hour to an hour for a scene this size, nearly all of it spent looking at results. A smaller scene with six or eight tags is a fraction of both numbers.
Where to go next
You now have a game-ready, layered file. Open it in Photoshop, Krita, or anything that reads PSD, and every sprite is already isolated and positioned. Want a Unity or Unreal Engine project, an Aseprite file, a texture atlas or a JSON scene instead? The same EXPORT panel ships eleven formats — see Export formats.
Each step has its own guide, in the order you just walked them:
- Step 1 · Source Art — uploading, generating a scene, PSD import
- Step 2 · Extend Canvas — margins, anchors, ratio presets, takes
- Step 3 · Find & Cut — tags, segmentation settings, sweeps, grouping
- Step 4 · Rebuild Backplate — takes, touch-ups, the hole mask
- Step 5 · Finish Sprites — the queue, versions, placement, the gate
- Step 6 · Add Shadows — contacts, ground shadows, base shading, style
- Step 7 · Final Polish — Repixelize and palette snap
- Step 8 · Preview & Export — the previews and the export hub
And when you want the map rather than the path, Features overview shows every surface in the app in one illustrated tour.