Step 3 · Find & Cut
Step 3 · Find & Cut turns a flat picture into a stack of individually masked elements — one clean cut-out per object, each ready to become a sprite. It works in two AI passes: Find Objects reads the scene and lists what it sees as tags, then Segment traces a pixel-perfect mask around every instance of the tags you keep. Everything that comes back — plus anything you draw or hand-edit — collects in one FOUND ELEMENTS tree standing over a live Background remainder. You are done when every object you care about is its own element and the Background holds only what belongs behind them. Confirm & Proceed carries the stack to Step 4 · Rebuild Backplate.
Costs. Every paid button prints its own price on its face, and there are only four of them. Find Objects costs whatever the AI model in the gear costs — 1, 2 or 4 credits a run. Segment costs one credit per tag the run is masking, minimum one, and any drawn boxes riding along add one more credit for the whole batch. Sweep Leftovers · SAM 2 is a flat 3 credits, whatever its Detail rung. ↻ Re-segment all from scratch in the gear is a Segment run over every enabled tag, so it prices itself the same way and is usually the dearest button here. Everything else on this step is free: adding, removing and clicking tag chips, drawing a box, renaming, resizing, grouping, hiding, deleting, keeping an element in the background, and Confirm & Proceed. The Edit mask workspace has paid tools of its own — see the mask editor. A confirm dialog names the cost before any credits leave your balance, unless you tick Don't ask again this session. See Credits & plans.
The canvas
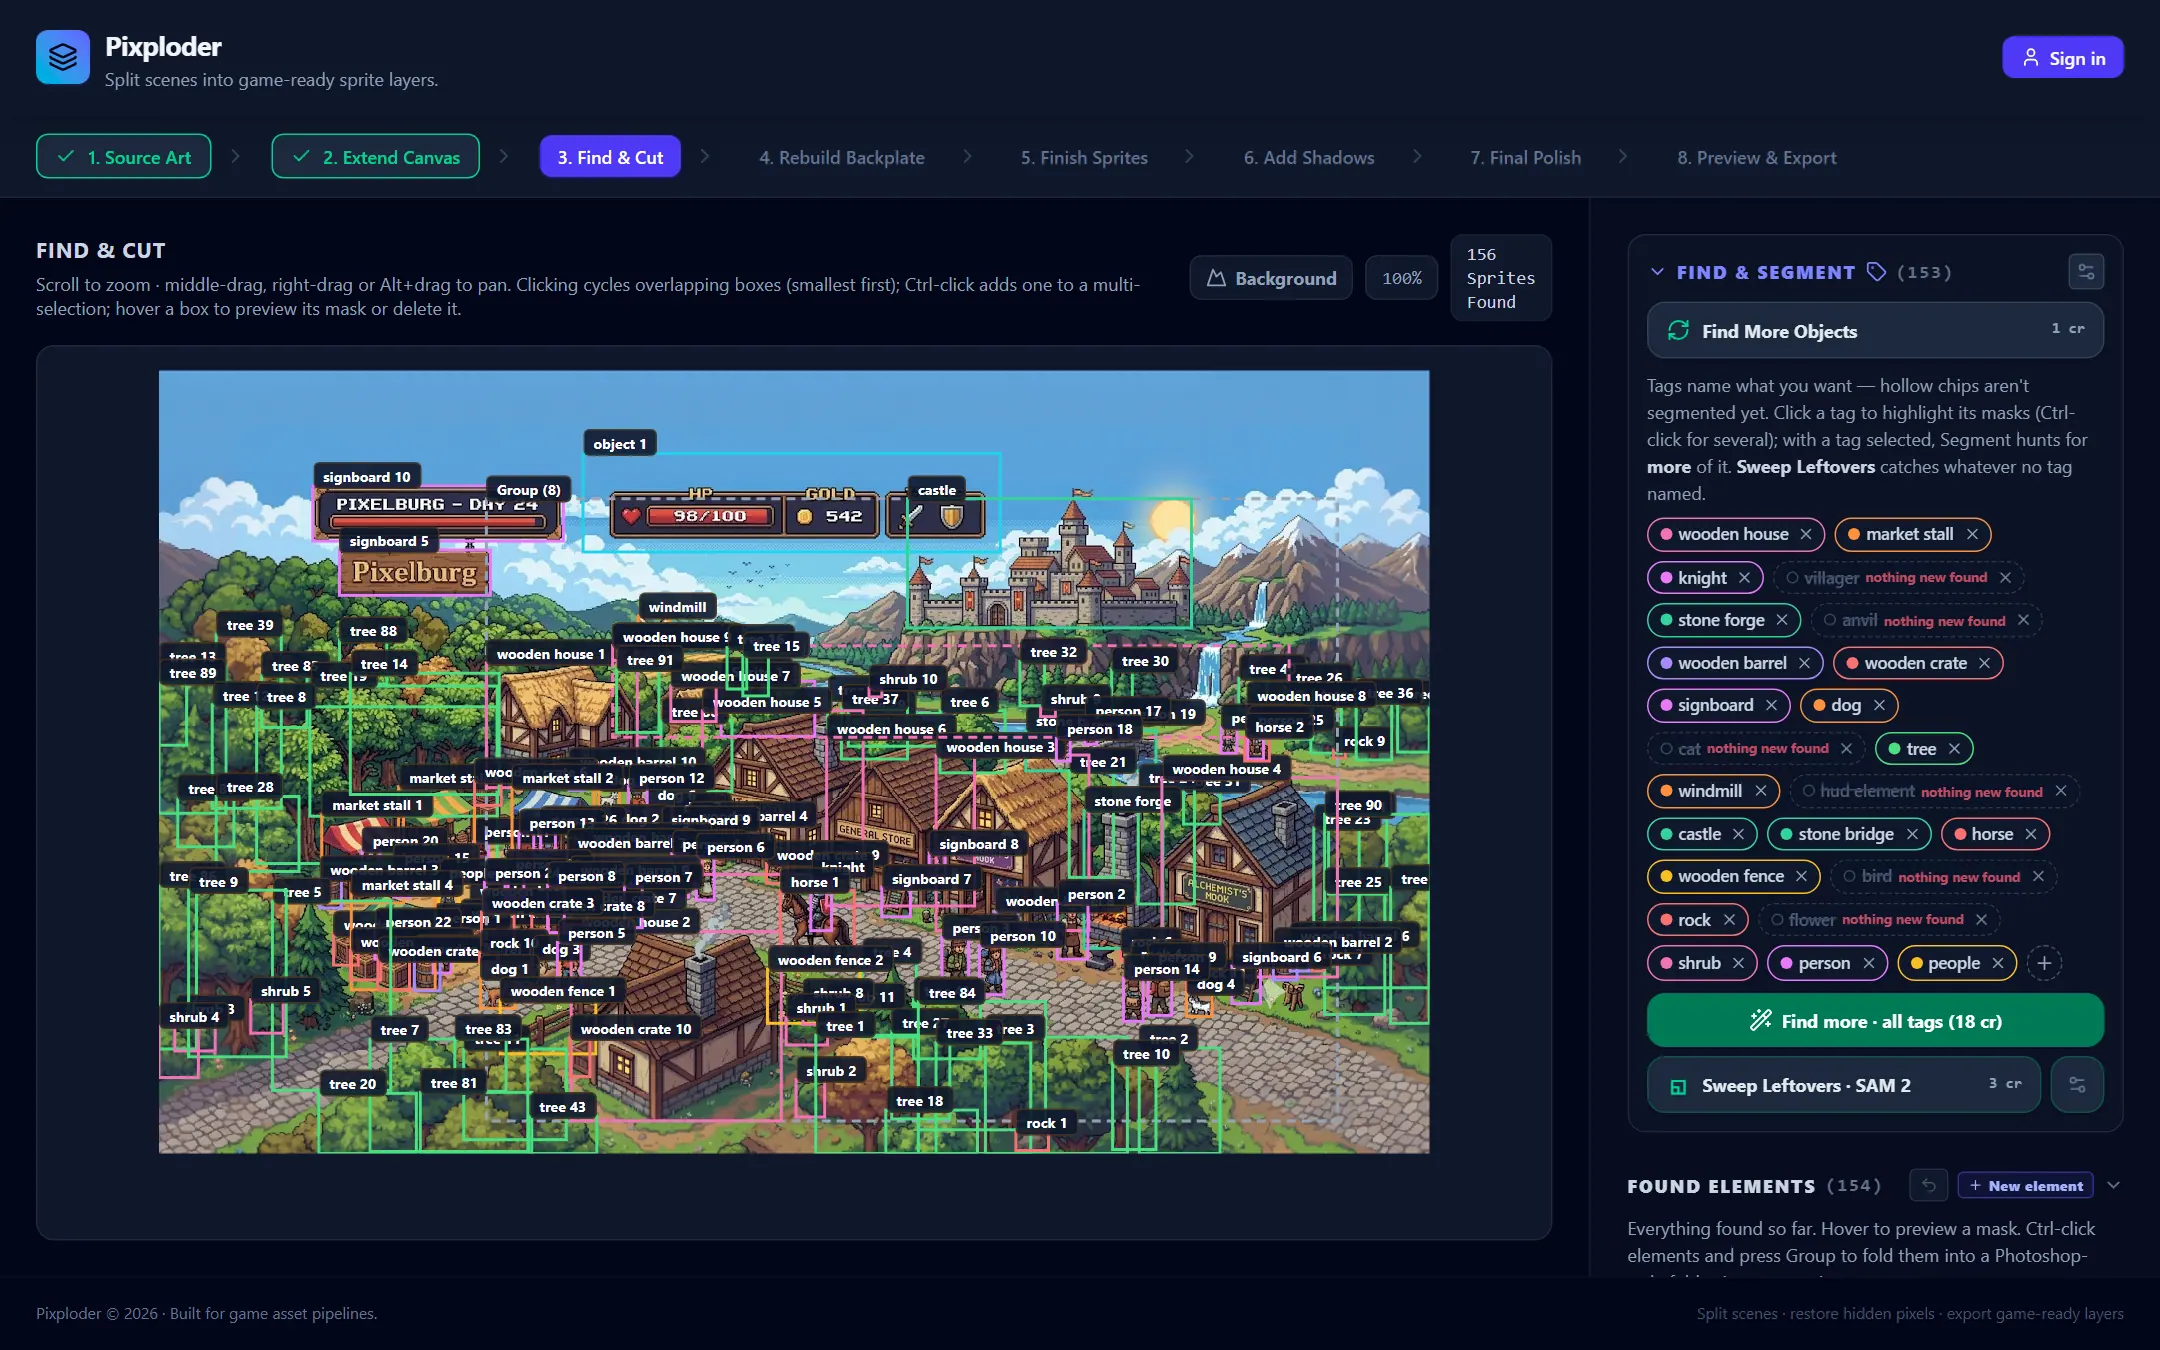
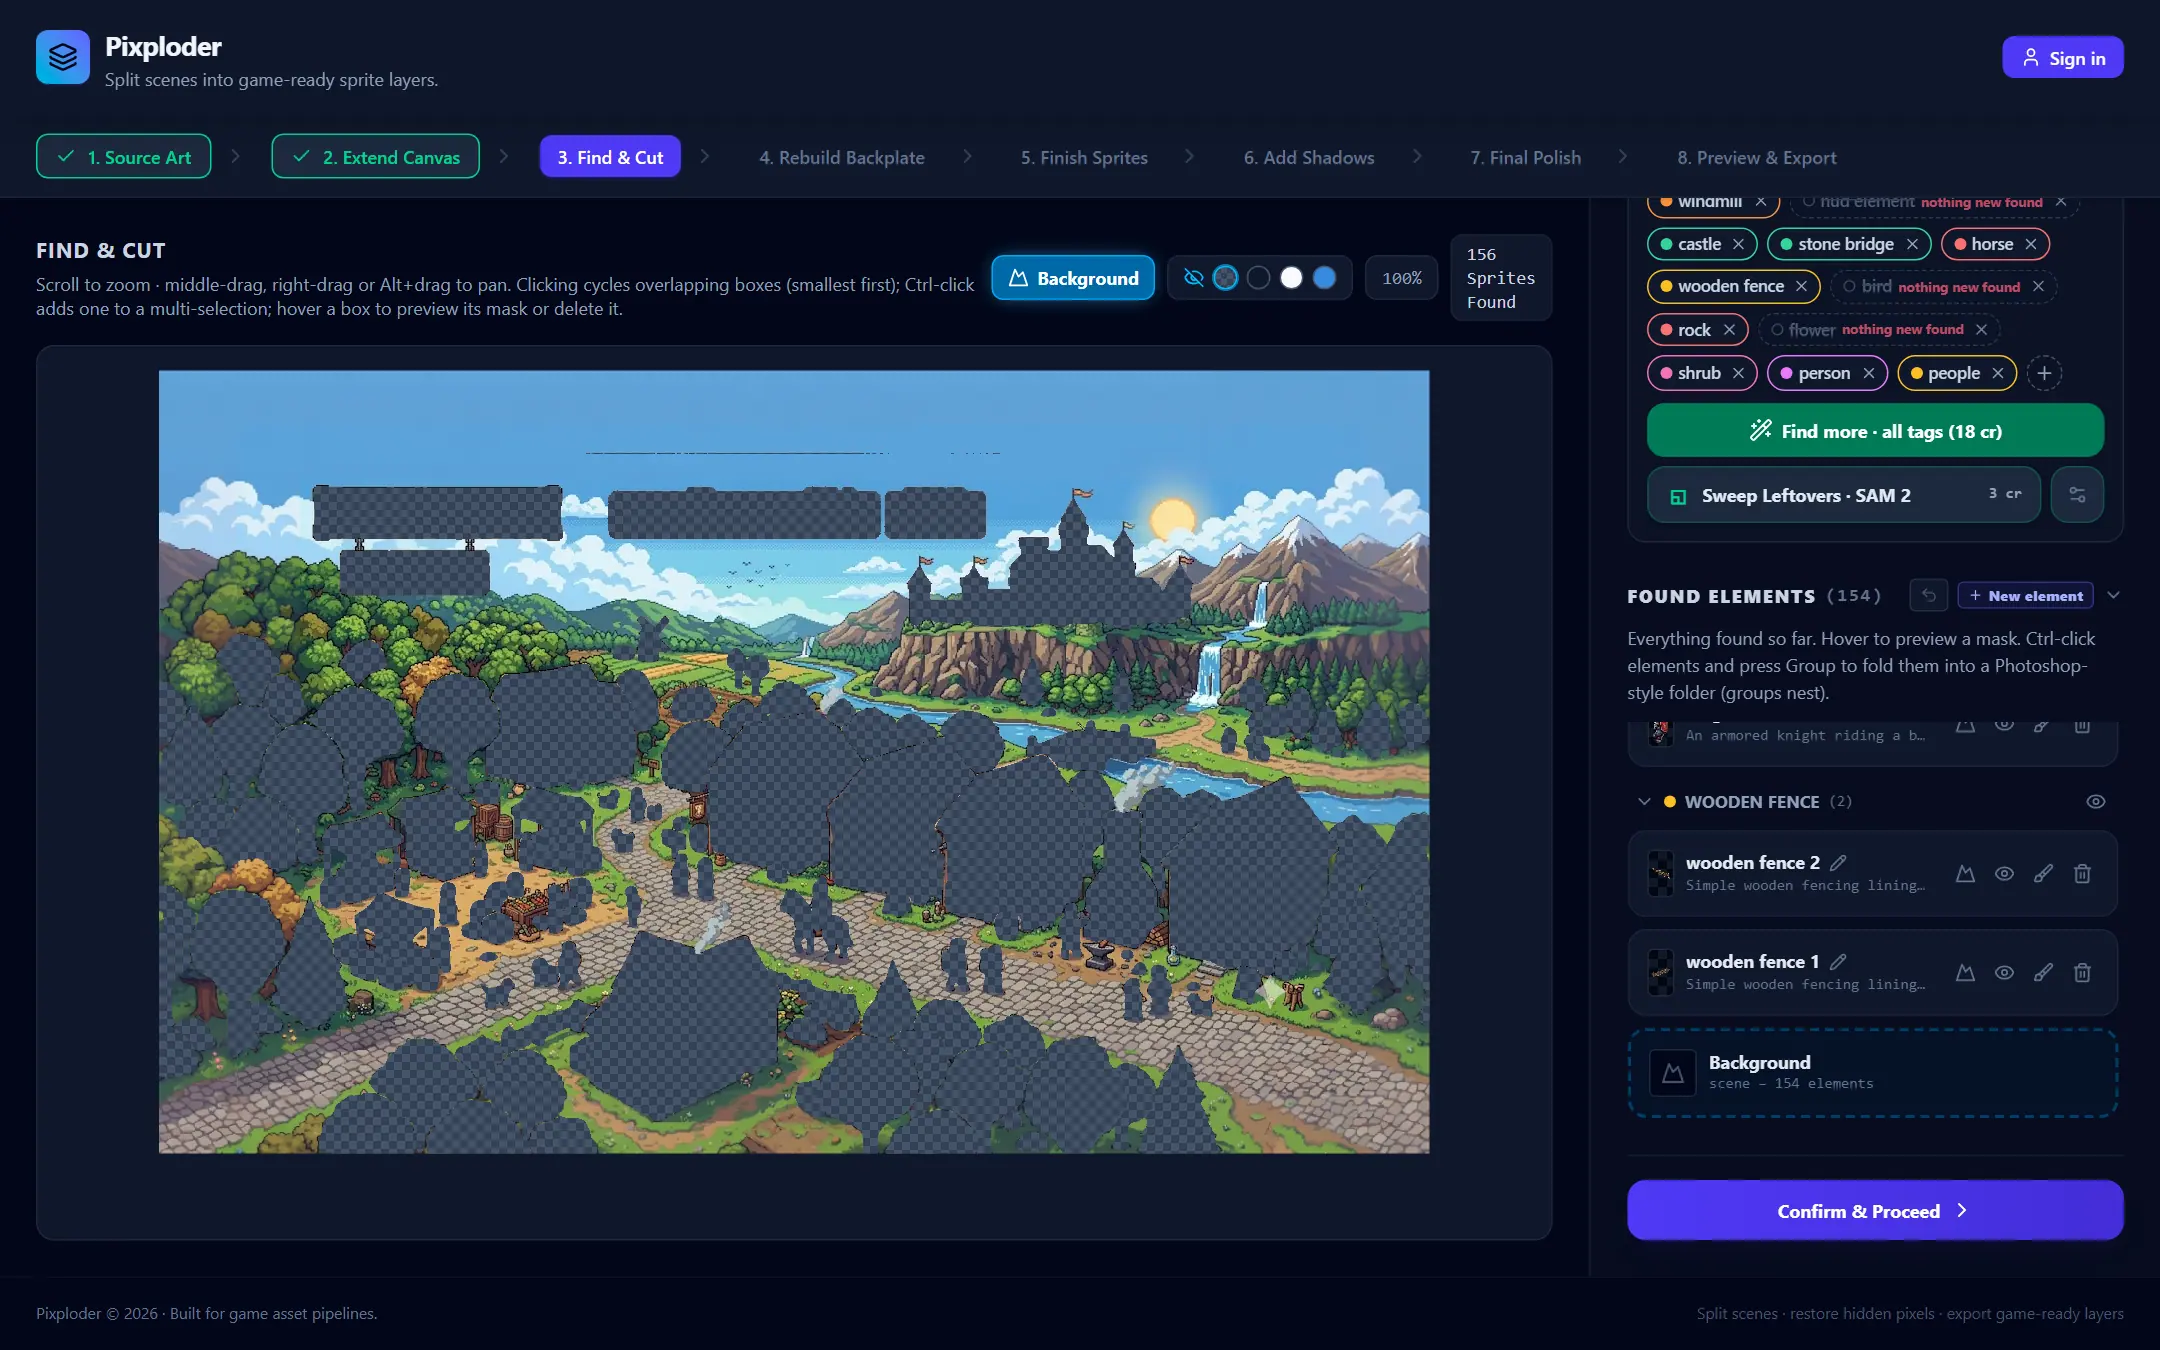
The left pane is headed Find & Cut and shows your scene with a colored box around every element. The line under the heading is the whole navigation contract: Scroll to zoom · middle-drag, right-drag or Alt+drag to pan. Clicking cycles overlapping boxes (smallest first); Ctrl-click adds one to a multi-selection; hover a box to preview its mask or delete it. Clicking the dark letterbox around the art, or the picture itself where nothing lives, clears every selection.
Hit-testing is by real pixels, not boxes — the element whose actual artwork sits under the cursor wins, smallest first — so a big group's transparent filler never steals a click or a hover from the small thing you are pointing at. Each further click takes the next element down the stack, and one more click past the last one deselects.
The row of controls top-right changes with what you are doing:
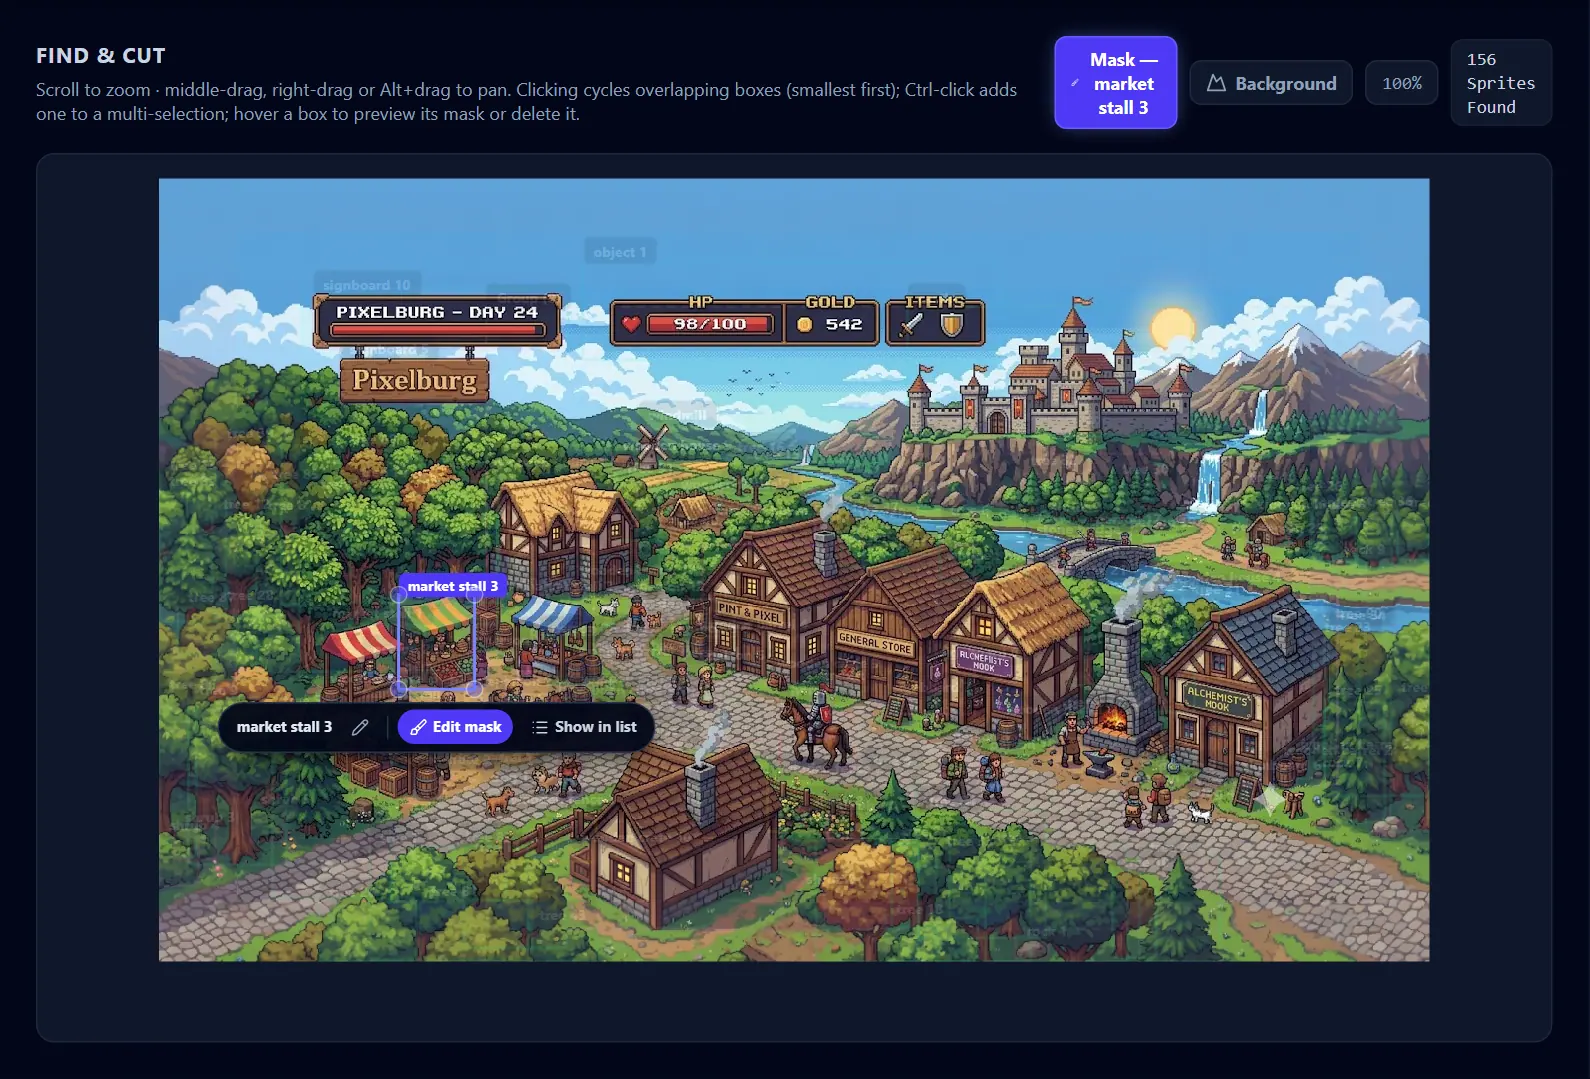
Mask — <name>appears the moment a single non-group element is selected, and opens the Edit mask workspace on it. Names longer than 16 characters are shortened on the button.Backgroundpins the background preview: every cut-out element is removed and the ones you kept in the background stay, which is exactly the view Step 4 · Rebuild Backplate opens with. While it is pinned the boxes step aside so nothing sits between you and the backdrop, but the art is still made of elements — click the plate to pick one up and only that element gets its box, ribbon and pill back. It shows up once at least one element carries a mask, and pinning it disarms theNew elementdraw mode.- Backdrop swatches appear as soon as something is hidden or the background is pinned —
Transparent (checker),Dark,LightandBluedecide what shows through the holes. Whenever an element is individually hidden, ashow allbutton joins them and un-hides the lot (it leaves theBackgroundpin alone — that is the toolbar toggle's job). {NN}%prints the current zoom, and pressing it resets to 100% and recenters the art.{n} Sprites Foundcounts everything in the tree, folders included.
Boxes, ribbons and handles
A box is colored by its tag and carries its name in a small ribbon. A solid outline means the element is masked; a dashed outline means it is still just a box waiting for a mask. Hover one and its cut-out floats above the dimmed scene with a green glow, and a red × appears inside the top-right corner whose tooltip reads Delete this box and its element — undoable with Ctrl+Z. Double-click a box to rename it in the ribbon; an empty name falls back to Sprite {n}. Ctrl-click anywhere on the art adds the element under the cursor to an amber multi-selection for grouping, and under a tag focus or a multi-selection the boxes that are not in it fade out and stop catching clicks.
Selecting an element gives it four corner handles, and they mean two different things:
- On a box with no mask yet they resize the prompt rectangle live, and dragging the box body itself moves it.
- On a masked element they re-cut it to a new box. Dragging shows a dashed candidate outline with a live size-delta readout in source pixels (
+12px ↔ · -4px ↕) and nothing changes until you let go; the box then re-anchors its crop, mask and cut-out together. A masked box does not move, only re-cut. The handles dim and refuse the drag while the element is showing an AI variant from a later step — the tooltip saysShowing an AI variant — switch this element to its Original first.
A selected element also grows a small pill under its box (above it when the box sits near the bottom edge): its name, a pencil that opens the same inline rename, Edit mask, and Show in list, which scrolls its row into view in the sidebar and pulses it — the same reveal a plain click on a box performs, opening the folders and the category the element lives in on the way.
Find & Segment
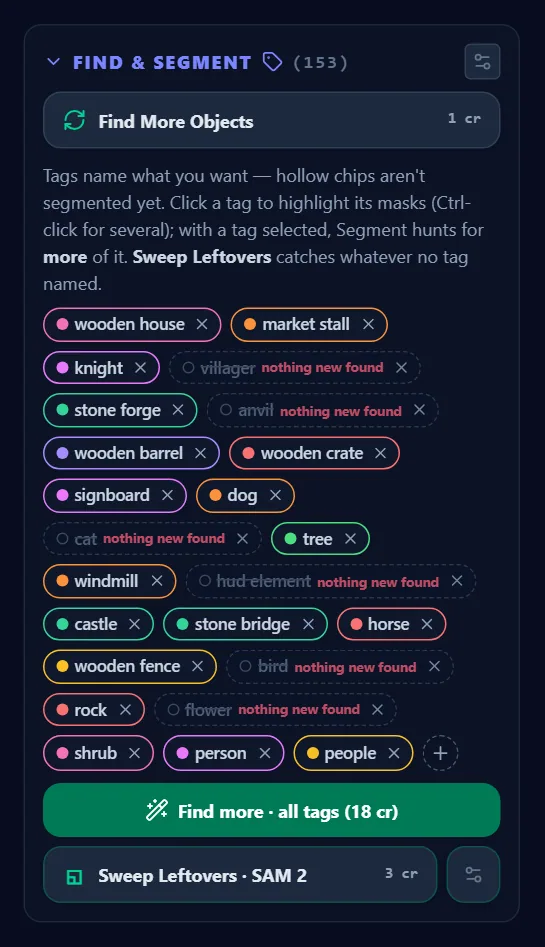
The FIND & SEGMENT card drives detection across the whole image. Its heading counts the elements found so far, the chevron collapses it, and the gear in its header — Find & Segment settings — Find Objects, Segment — opens the settings for the two runs it names. Sweep Leftovers is a different engine and carries its own gear beside its own button. The status line under the card survives collapsing it, so a run's outcome is never lost. Work top to bottom.
Find Objects— the first AI pass. It lists what it sees as tags; once there are tags the button readsFind More Objectsand appends new ones without disturbing what you have. While the tag list is empty, the chip row readsNo tags yet — press Find Objects above, or add tags manually.- Curate the chips — a filled chip has masks behind it; a hollow, dashed chip is named but not segmented yet. Click a filled chip to highlight and select its elements (Ctrl-click for several, clicking the only active one again clears it); its trailing
×removes the tag and every element it found. It works the other way round too: select any element and the chip it was cut from picks up a dotted outline, so a row can always answer which tag it came from. The dashed+chip opens a smallnew taginput so you can type your own tag for anything missed — Enter adds it and stays open for the next one, Esc closes, and text left behind is added on blur. Typed tags segment exactly like found ones. Segment— the second pass, the one that traces masks. Its label names the job and the price:Segment 4 tags (4 cr)for a fresh list,Segment 2 new tags (2 cr)when only some are hollow,Find more "barrel" (1 cr)when one filled tag is selected,Find more · 2 tags (2 cr)for several, andFind more · all tags (4 cr)when nothing is hollow and nothing is selected. Drawn boxes ride along as+ 3 boxeson the end of the label, or carry the run on their own asMask 8 boxes (1 cr)when there are no tags to hunt. With nothing at all to do it readsSegment (add tags first), orSegment (re-enable a tag first)when every tag you have is a disabled one. Priority is fixed: a selected tag beats hollow tags, which beat the whole list.Sweep Leftovers · SAM 2— a flat-priced pass over whatever is not an element yet. It cuts the elements you already have out of the search image, segments what is left, and drops every new piece straight intoFOUND ELEMENTSaspiece 1,piece 2… under onesam 2 sweepheading. Nothing is held for review, so the status line tells you what landed — how many pieces, how many tiny ones the floor skipped, how many duplicates were dropped — and you delete the strays.
The cutting buttons share one stop: if that service is ever down for maintenance, Segment is replaced in place by Precision segmentation is temporarily unavailable — try again later., and the sweep and ↻ Re-segment all from scratch go dim with it. Find Objects runs on a different service and keeps working, so you can still name things now and cut them later.
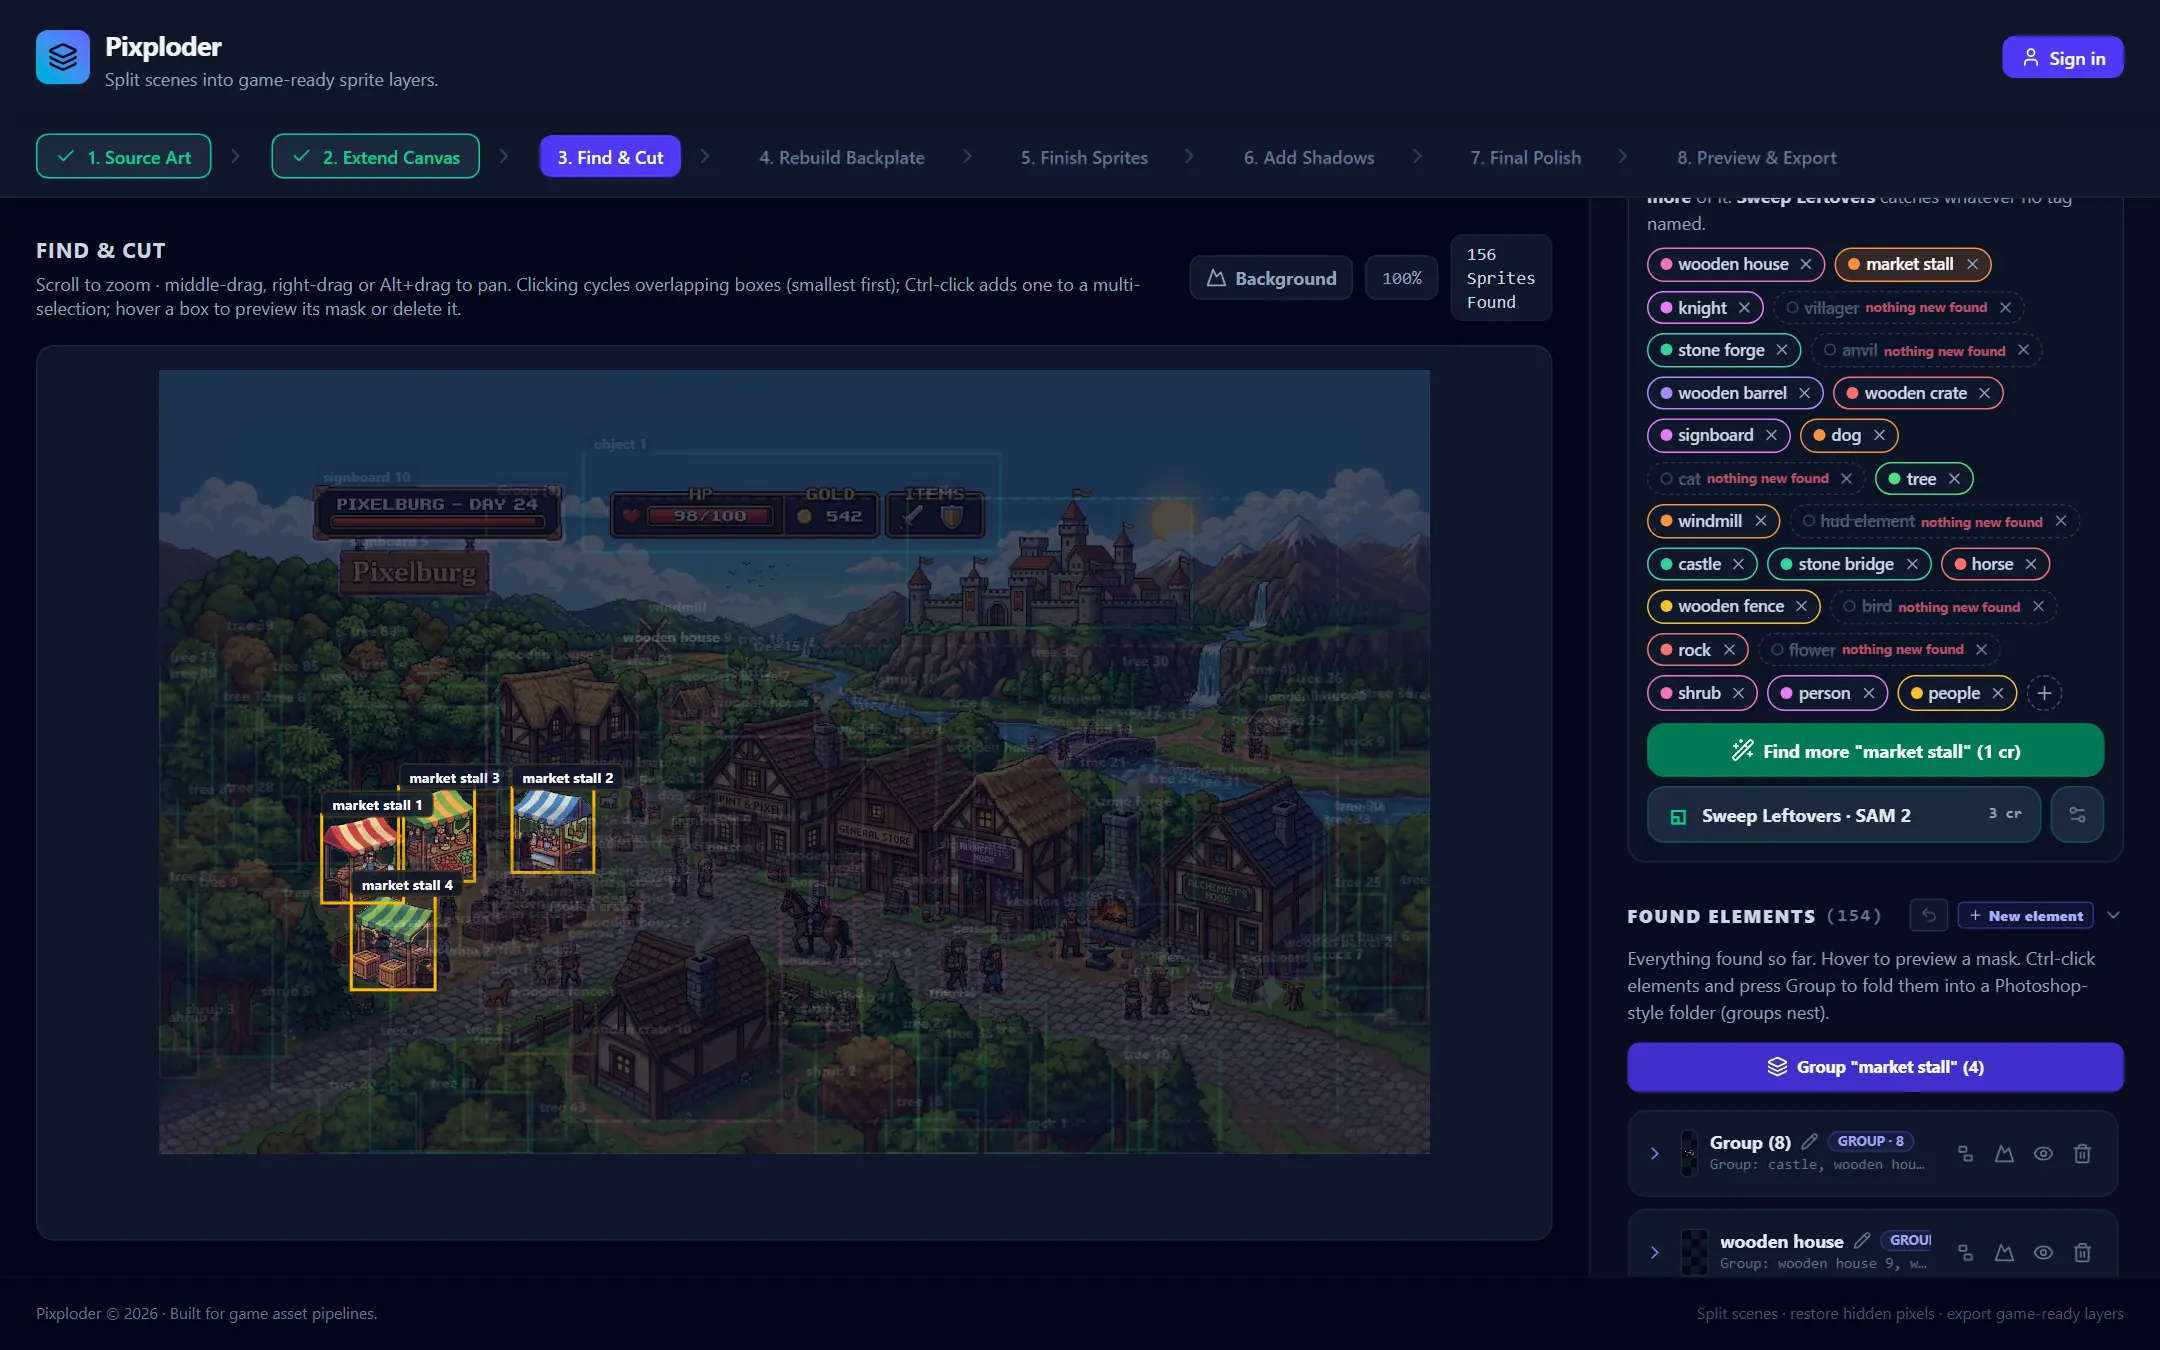
Tip. Selecting a filled tag first is how you hunt for more of one thing — every barrel in a stack. The button re-scopes to Find more "<tag>" and the run normally cuts that tag's existing elements out of the search image before looking again. Clicking the chip also selects its elements, so the Group button above the list offers Group "<tag>" (n) in the same breath.
Careful. One run segments at most 24 tags. Past that the card warns Only the first 24 tags are segmented — remove tags you don't need. and grays out the already-segmented chips over the cap; hollow ones stay reachable at any position, and a left-out tag can still run on its own once you select its chip. A tag a run searched and found nothing for becomes a struck-through nothing new found chip that every later run skips — click it to re-enable it. A fruitless Find More Objects reports No additional objects found — the tag list looks complete.
Two gears, two algorithms
There is no single shared settings panel, because this step runs two different segmenters. Segment works from your tags (concept and box prompts); Sweep Leftovers is an automatic pass with no tags at all. A dial that means something to one of them usually means nothing to the other, so each gear carries only its own algorithm's settings and each is set independently — including the two rows that share a name. Only one gear is open at a time: opening either closes the other.
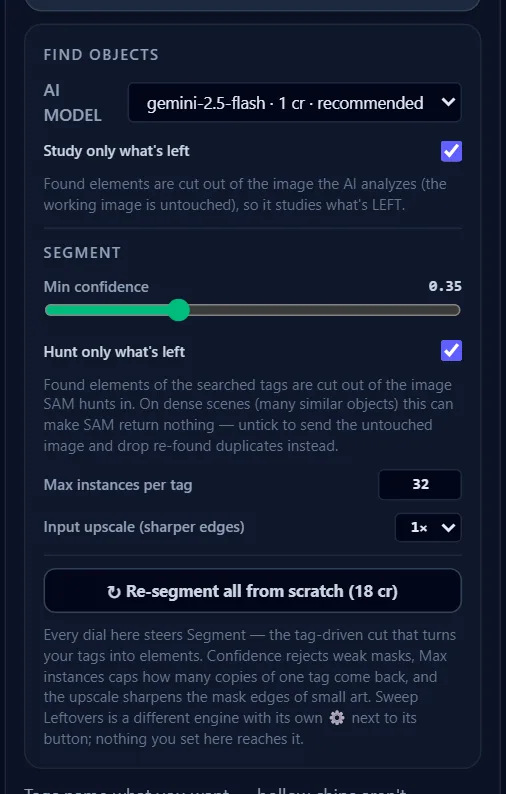
The Find & Segment gear
Find Objects
AI model— which model reads the scene. Every option prints the credit cost of a run — 1, 2 or 4 — and one carriesrecommended.Study only what's left— on by default. Found elements are cut out of the image the AI analyzes, so it concentrates on what remains. Your working image is untouched.
Segment
Min confidence— the score a mask must clear to be kept. The slider prints its value and runs from 0.10 to 0.90 in steps of 0.05. Lower it to catch faint objects, raise it to reject junk. When a run keeps nothing, the status line quotes this number back at you and, on short runs, says what each tag actually returned.Hunt only what's left— on by default, and it only has anything to do on aFind morerun: the elements already found under the hunted tags are cut out of the picture before it is segmented, so the pass hunts what remains. That is what makes a second pass productive on an ordinary scene — and what can make it impossible on a dense one, where a picture with dozens of holes in it stops reading as the kind of picture it was and the run returns nothing at all. Untick it and the untouched picture is sent instead; elements found a second time are recognized on the way back and dropped as duplicates, which the status line counts. Either way your working image is never altered.Max instances per tag— how many copies of one tag a run may return, from 1 to 32. Lower it to stop one tag over-splitting into a crowd. It is a ceiling rather than a promise: one run shares a fixed mask budget across all the tags it is masking, so a run carrying many tags is capped below the number in the box. Whenever that applies, an amber line under the row prints what the next run will actually get —24 tags in the next run → up to 26 per tag (server budget)— and a run of twenty tags or fewer always gets the full number you set. The same line warns when tags are over the 24-tag cap:only the first 24 tags fit in one run — 3 enabled tags will be left out (select a chip to hunt it directly).Input upscale (sharper edges)—1×,2×or4×, Segment's own and unrelated to the sweep row of the same name. Upscaling the image sent for segmentation sharpens mask edges, which pays off on small or pixel-art elements. The rung you pick is a request, not a guarantee: the app trims the factor on the way out so the picture it sends never passes 4096 px on its longest side, so on a big scene4×quietly becomes whatever still fits.↻ Re-segment all from scratch— wipes the automatic elements of every enabled tag and masks the image again. The button prints its own price, counting every enabled tag up to the 24-tag cap, so it is usually dearer than an ordinary run. Elements you hand-edited, grouped, gave AI variants or built yourself survive, so only untouched automatic cuts are re-rolled.
The sweep gear
Its title says what it holds: Sweep settings — Detail, hold-back floor, input upscale.
Detail— how aggressively a sweep carves, on a four-rung ladder:coarse · 16,normal · 32 ★,fine · 48andfinest · 64, with★on the rung this control starts from. Coarser keeps only pieces the AI is confident about; finer admits smaller, less certain ones, and more strays to delete. It never changes the price.Hold back pieces smaller than … % of canvas— a floor from 0 to 5, starting at 0.05. Pieces under it are skipped and counted in the status line rather than added. Set it to 0 to keep everything. If a whole sweep falls under the floor it says so:The sweep found only tiny pieces (under 0.05% of the canvas) — lower "Hold back pieces" in ⚙ to add them anyway.Input upscale (sharper edges)—1×,2×or4×, the sweep's own. It does two things here: sharper edges, and a smaller effective minimum piece size, because the engine's own smallest-region limit is measured at the resolution actually sent — so upscaling is how a sweep reaches fragments it would otherwise never be offered. The hold-back floor above is not part of that: it is a share of the canvas whatever you send. The same 4096 px ceiling trims this rung on a big scene.
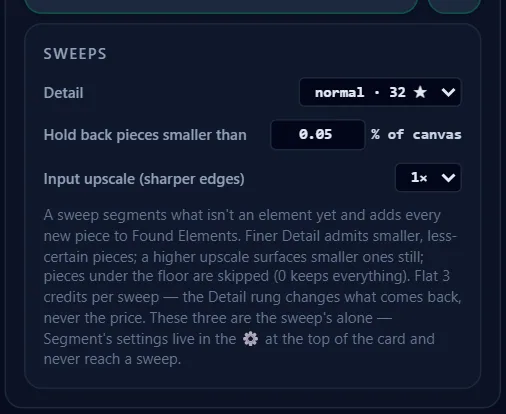
Note. These panels remember what you set them to in this browser — the AI model, both checkboxes, Max instances per tag, both upscales, the sweep Detail and its floor all come back after a reload. Min confidence is the exception: it is session state and starts from its default every time the app loads.
Found Elements
Everything the scene finds, everything a sweep catches and everything you build lands in one shared, collapsible FOUND ELEMENTS tree. Hover a row to float its mask on the canvas. The heading counts the elements — folders excluded — and carries three controls:
- The undo arrow — the step's undo, described below. It carries no text of its own: it is disabled until there is something to take back, and its tooltip names the operation the next press would undo.
New element— the plus button that arms a one-shot draw mode. A pill appears over the canvas readingDrag on the image where the new element should live… (Esc cancels); drag a rectangle and the Edit mask workspace opens on that crop with an empty mask. Nothing is created until you pressCreate elementthere, orSave box for next Segment, which files a box-only element for the nextSegmentrun to fill in. Arming the mode un-pins theBackgroundpreview, a drag too small to be a real box is ignored, and a created element is trimmed to its own mask before it lands.- the chevron — collapses the whole section.
While the list is empty it reads No objects segmented yet. Curate the tags above and press Segment — or press + New element and drag a box on the image.
Categories
Root elements cluster under collapsible category headers named after their tag, each with the tag's color dot and its count. Folders you make yourself sit above them. An element that never came from a tag takes its header from its own name instead, so a Sprite 4 you drew yourself files under a sprite header until you rename it or drop it on another one. At the right end of a header sits the same eye the rows carry: it hides every element under it in one press, and turns into a crossed-out eye only once all of them are hidden, so on a half-hidden category one more press finishes the job.
A header is the tag itself, so dropping elements on one re-files them under that tag: drag a row onto the header, onto any row already under it, or into the space beside those rows, and the whole category lights up to say it will take them. On release they move to the bottom of that category, its count goes up, the one they left goes down — and a category left with nothing in it disappears, since it is only ever a picture of which tags the elements carry. A closed category opens itself rather than swallow the row unseen. The new tag is what everything tag-shaped then reads: the element's box on the canvas takes that tag's color, clicking that chip highlights it along with the rest, and the old tag's × no longer takes it down with the others. A tag you empty this way goes hollow again, so the next Segment run hunts for it. Folders have no tag of their own, so a header never hands one out: dropping a folder there only lifts it out to the top level, and a folder already at the top level is refused with no hint at all.
Grouping and order
To group, Ctrl-click a set of elements — in the list or on the canvas — then press the Group button that appears above the list. Its label counts what it would take: Group 3 elements, Group 1 element, or Group "barrel" (7) when a tag click made the selection, in which case the folder inherits the tag's name. Otherwise it is named for you — barrel ×3 when everything going in shares one tag, the element's own name when there is only one, Group (3) for a mixed set. A fresh folder lands at the top of the list, selected, with its row pulsed and its name open for typing in the ribbon on the canvas. Gathering elements out of folders they already sit in empties those folders, and an emptied folder is removed on the spot.
Groups nest. Drop a row on a group row — or on the indented rail beside that group's members — and it goes inside, at the end of the members, and the folder opens itself. That works from anywhere, so an element already filed in one folder moves straight into another. A drag arriving from another level takes the whole folder row as "join this folder"; only a drag that already sits beside the target keeps the thin top and bottom edges that mean "re-order me here", which is the layer order your PSD will carry. Drop a row on empty list space to send it back to the root with its tag untouched, or on a category header to send it back to the root and re-file it under that tag. Empty folders are never kept — whichever way the last member leaves, the folder goes with it.
Rows
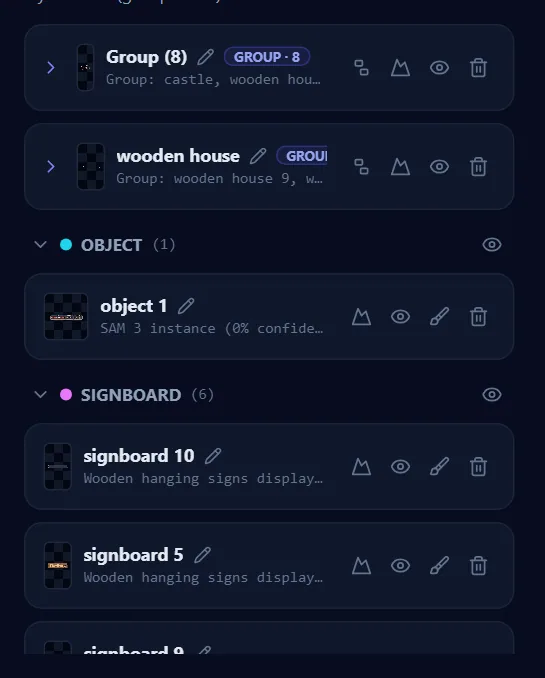
Every row shows a thumbnail (always the stable Step 3 cut-out, never a later AI result), the name with a pencil for inline rename, and a badge where one applies — GROUP · n for a folder, BOX ONLY for a drawn box with no mask yet. A group also carries a chevron on the left that shows or hides its members, and the folders holding the selected element are outlined with a dashed border. Underneath, a one-line subtitle says what the row is; a box-only row reads Segment finds it with the AI — or build its mask by hand. Clicking a row selects the element on the canvas, and clicking it again deselects. The action icons on the right work at any depth:
| Icon | What it does |
|---|---|
| ungroup | Groups only — dissolve the folder; its members move up one level and the group's own mask is discarded. |
| lift-out | Children only — take this one element out of its group. If it was the last one in there, the folder goes with it. |
| mountain | Keep in background — the element's pixels stay in the background image while it remains a normal element, so it renders both behind and in front. Green when on. Flagging a group keeps everything inside it, and the tooltip then offers to release either that one child or the whole folder. |
| eye | Hide the element to peek at the background underneath — its box goes with it, so nothing is left outlining a hole. The backdrop swatches above the canvas decide what shows through. Hiding a group hides everything inside it. |
| brush | Open the Edit mask workspace. On a box-only element this icon is filled indigo, because giving it a mask is the obvious next move — it opens full-white, ready to carve. |
| trash | Delete the element — box, mask and cut-out go and the pixels return to the background. On a group it takes the whole subtree. Deleting the last element in a folder takes the folder with it. Ctrl+Z brings the lot back; use ungroup instead if you only want the folder gone. |
The Background row
At the bottom, the dashed Background row is the live remainder — your scene minus every cut-out, with kept-in-background elements left in. It appears as soon as one element carries a mask, since that is the first moment there is a hole to show. Its subtitle counts them — scene − {n} elements, with · {n} kept in on the end when any are. Hovering it previews the plate on the canvas, exactly like the Background pin, and it exports as the bottom layer of your PSD. It is not a folder: nothing can be dragged into it, and the mountain icon on an element is the only way in.
Undo on this step
Ctrl+Z is the undo for the element list, and the undo arrow in the FOUND ELEMENTS header is the same thing with a tooltip. It keeps the last 20 operations: adds from Segment, a sweep, Create element or Save box for next Segment, deletes, tag × removals, box moves and resizes, drag and drop, group, ungroup and lift-out, and ✂ splits made in the mask workspace. Every press names what it took back in the card's status line above, as Undone: {operation}.
Two things are worth knowing before you lean on it:
- Each step restores the whole element list, so anything you changed after that operation goes back with it — renames, hide/show and applied mask edits included. The tooltip says which operation the next press would take back.
- There is no redo. Ctrl+Shift+Z does nothing here; the history only remembers the state before each change, so it walks backwards only. The Edit mask and repair windows do have their own redo, over the mask they are painting.
The shortcut is scoped to this step and stands down whenever a dialog is open on top of it — the Edit mask workspace, the repair window, a confirm dialog or the pricing sheet — so it can never undo something you cannot see. It is also ignored while you are typing in a field, so the inline rename keeps the browser's own undo. The history is cleared when you leave the step.
The Edit mask workspace
Four things open the same dialog: the brush icon on a row, the Mask — <name> button, the Edit mask pill under a selected box, and a fresh New element box. It always paints on the element's original crop, never on an AI variant from a later step, so what you carve stays aligned with the scene; groups have no editable mask of their own, so their rows carry no brush at all.
See the mask editor for every tool inside it, and for which of them spend credits.
Confirm & Proceed
When every object is its own element and the Background row holds only what belongs behind them, press Confirm & Proceed to move to Step 4 · Rebuild Backplate, where those holes are repainted into a seamless backdrop. The button is disabled only while a Find Objects run is in flight. You can always come back — the stepper reaches this step at any time, and segmenting more objects later just punches fresh holes for Step 4 to fill.
If you imported a layered PSD
A .psd or .psb dropped on the Step 1 · Source Art upload control is read in your browser — no AI, no credits, works on the Free plan. Its flattened composite becomes the scene and each raster layer becomes an element, keeping its name, its position and its own transparency, with the Photoshop layer-opacity slider baked into the alpha. Layers inside Photoshop groups are read individually, zero-size layers and ones left at 0% opacity are skipped, the first 60 of whatever is left are imported, and layers the file stored hidden arrive visible so nothing is imported invisibly. The canvas is capped at 4096 px on its longest side and an oversized document is refused before anything is committed.
The import lands you on Step 5 · Finish Sprites directly, because the work Step 3 does has already been done for you. Come back here through the stepper whenever you want to group those layers, rename them, keep one in the background or tidy an edge. One thing to expect: a PSD layer arrives with its own transparent pixels but no Pixploder mask behind them, so this step lists it with a BOX ONLY badge and a dashed box, and its brush icon is the filled indigo one. Give it a mask in the Edit mask workspace, or let the next Segment run use its rectangle as a box prompt.