Step 2 · Extend Canvas
Extend Canvas is the optional step where you give a scene more room — or trim it — without disturbing the art you already have. Drag an edge outward and the AI paints the new space so it continues your scene; drag inward and you crop, for free. The line under the step heading says it in one sentence: Drag any edge or corner of the canvas outward to grow it — inward to crop. Your pixels never move, scale or resample. A scene that is already framed the way you want can pass straight through. You are done when the canvas is the shape you need and, if you grew it, the fresh edges read as part of the same picture.
Costs. Four controls spend credits, and they all do the same thing — one AI fill: Extend canvas · N credits, ↻ Re-roll extend · N credits, ↻ Roll new variant (W×H) · N credits, and the ↻ on a take row. Everything else is free: Apply crop (free), the Snap to ratio presets, the anchor, editing the prompt, switching the AI model, clicking a take to use it, ↺ Undo extend, ↻ use last margins, Save (download + keep in project), deleting a take, and Continue to Find & Cut. The price is the picked model's per-image cost: the AI model menu prints it next to every option and the button repeats it, so you see the number before you click. Pixploder then asks you to confirm the spend on every run, until you tick Don't ask again this session in that dialog. A fill that fails comes back to your balance — in full when the AI was never reached, minus a single credit when it had already started. Signed out, or short on credits, you get a notice instead of a charge. See Credits & plans.
Getting in and out
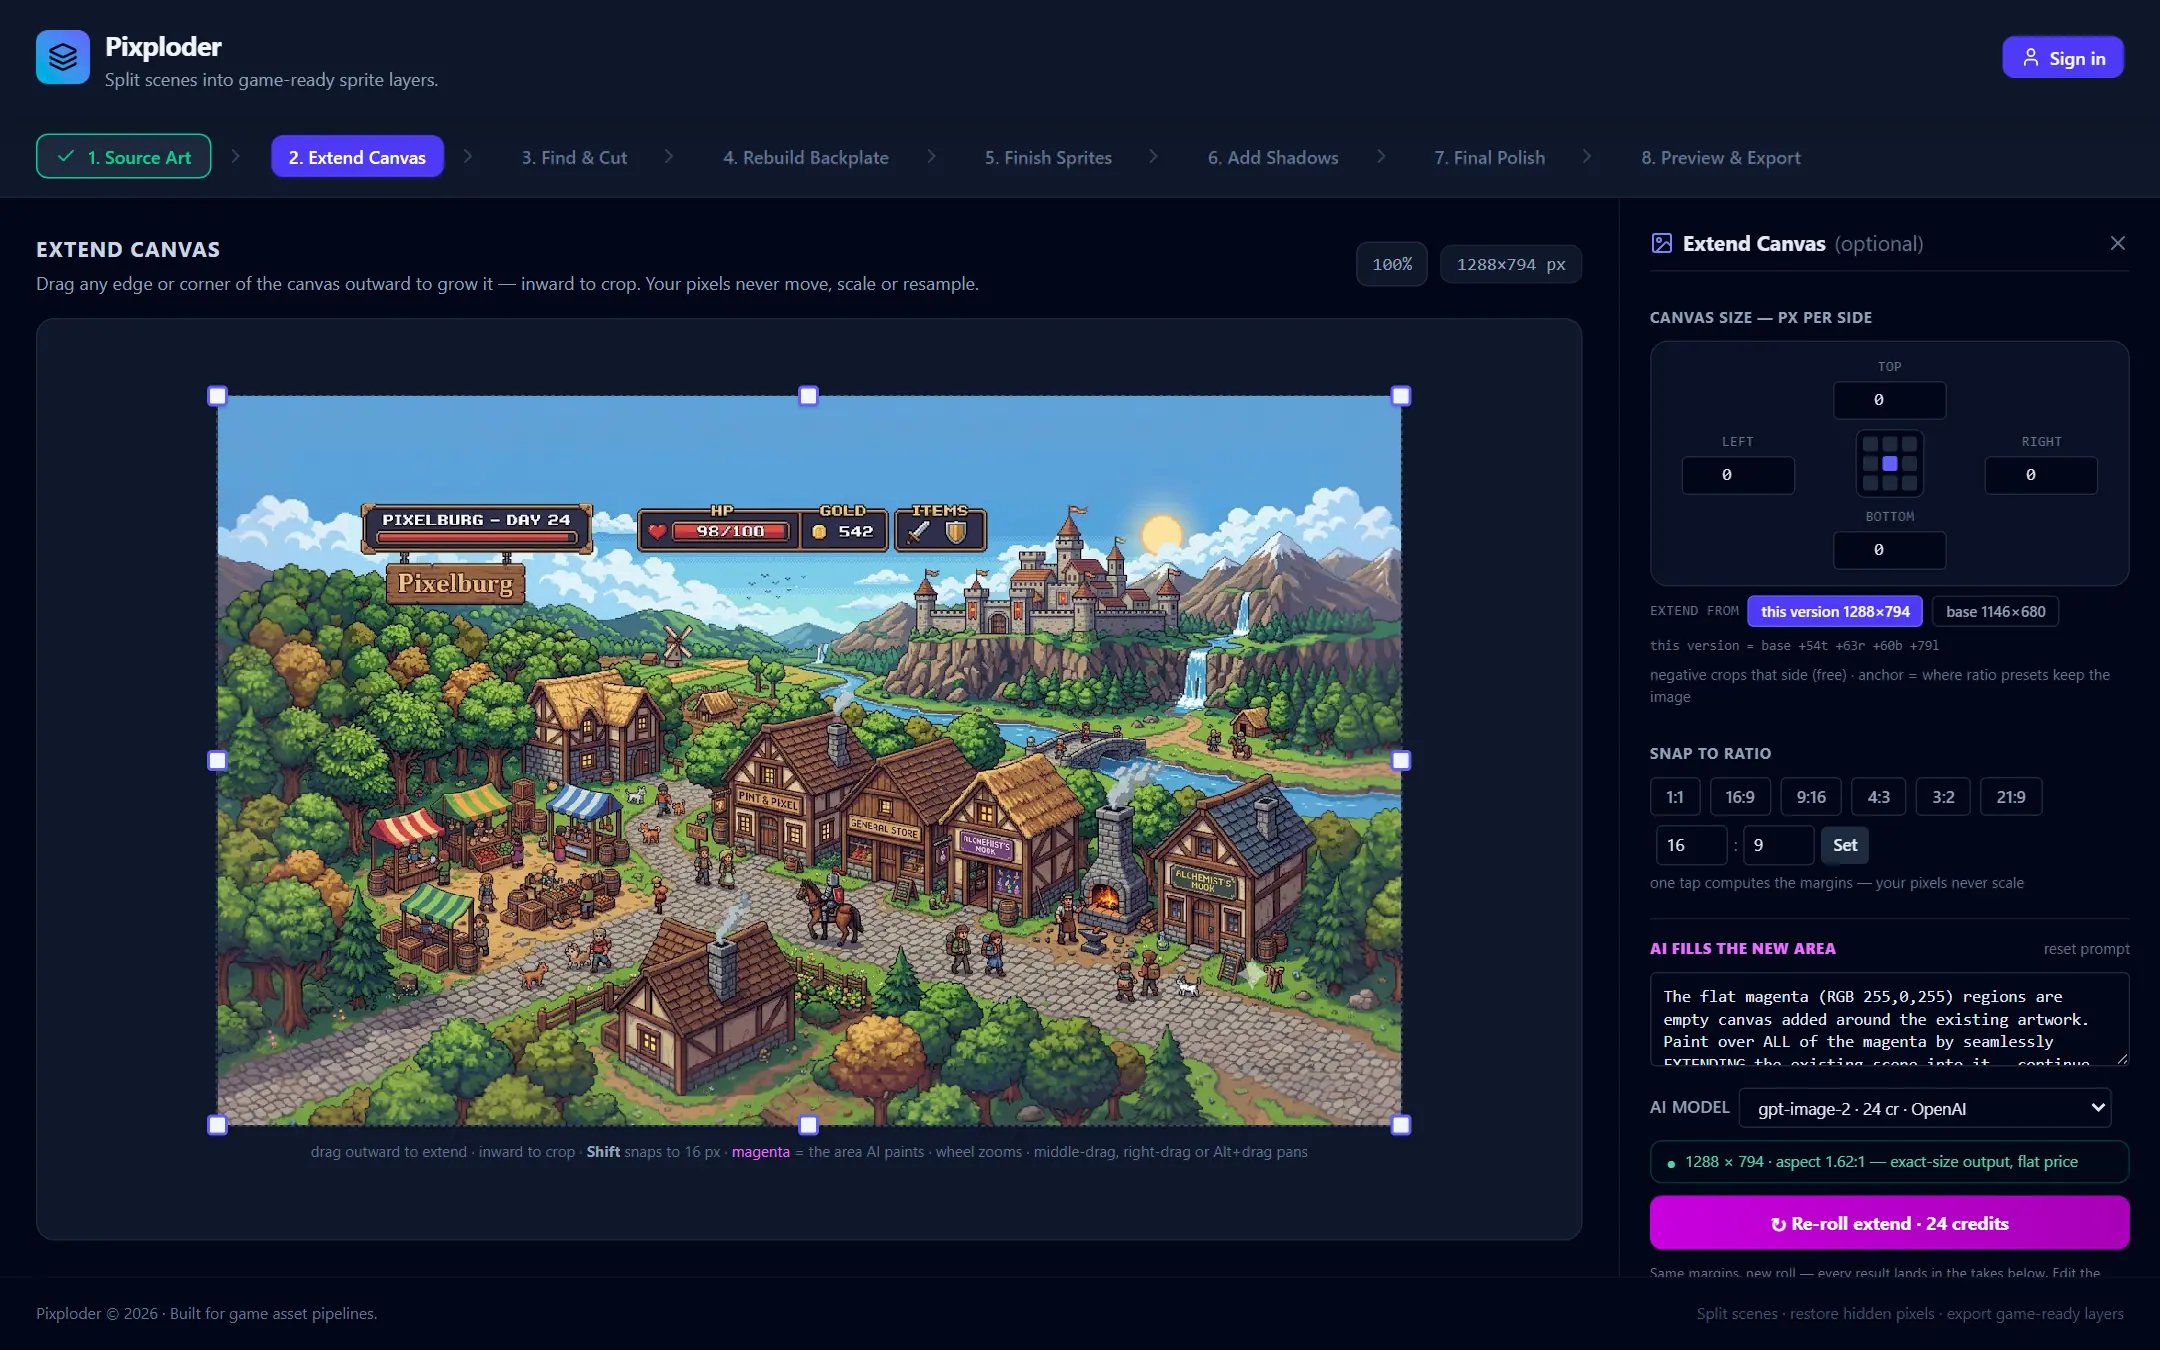
You arrive from Step 1 · Source Art: in the Source Art Review panel, click Continue to Extend Canvas — or Skip — go straight to Find & Cut to bypass this step entirely. The stepper along the top also jumps straight to 2. Extend Canvas at any time, which is how you come back to grow a canvas later; the node is disabled until an image is loaded.
The right-hand panel is headed Extend Canvas (optional). The X beside that heading (Back to upload) returns to Step 1 without touching the canvas, and if you land here with nothing loaded the panel just reads Upload an image first. with a Back to upload link. At the bottom, Continue to Find & Cut advances to Step 3 · Find & Cut; it is disabled only while a fill is running. Leaving every margin at 0 and pressing it is perfectly fine — extending is never required.
Set the canvas size
The canvas sits inside a dashed frame with eight white handles — four corners, four edges. They drive four independent margins measured in pixels, and so do the number inputs on the panel.
- Drag any handle — outward grows that side, inward crops it. Its tooltip is the whole rule:
Drag outward to extend, inward to crop (Shift = snap 16 px). A plain drag is precise to 1 px. - Or type exact margins under
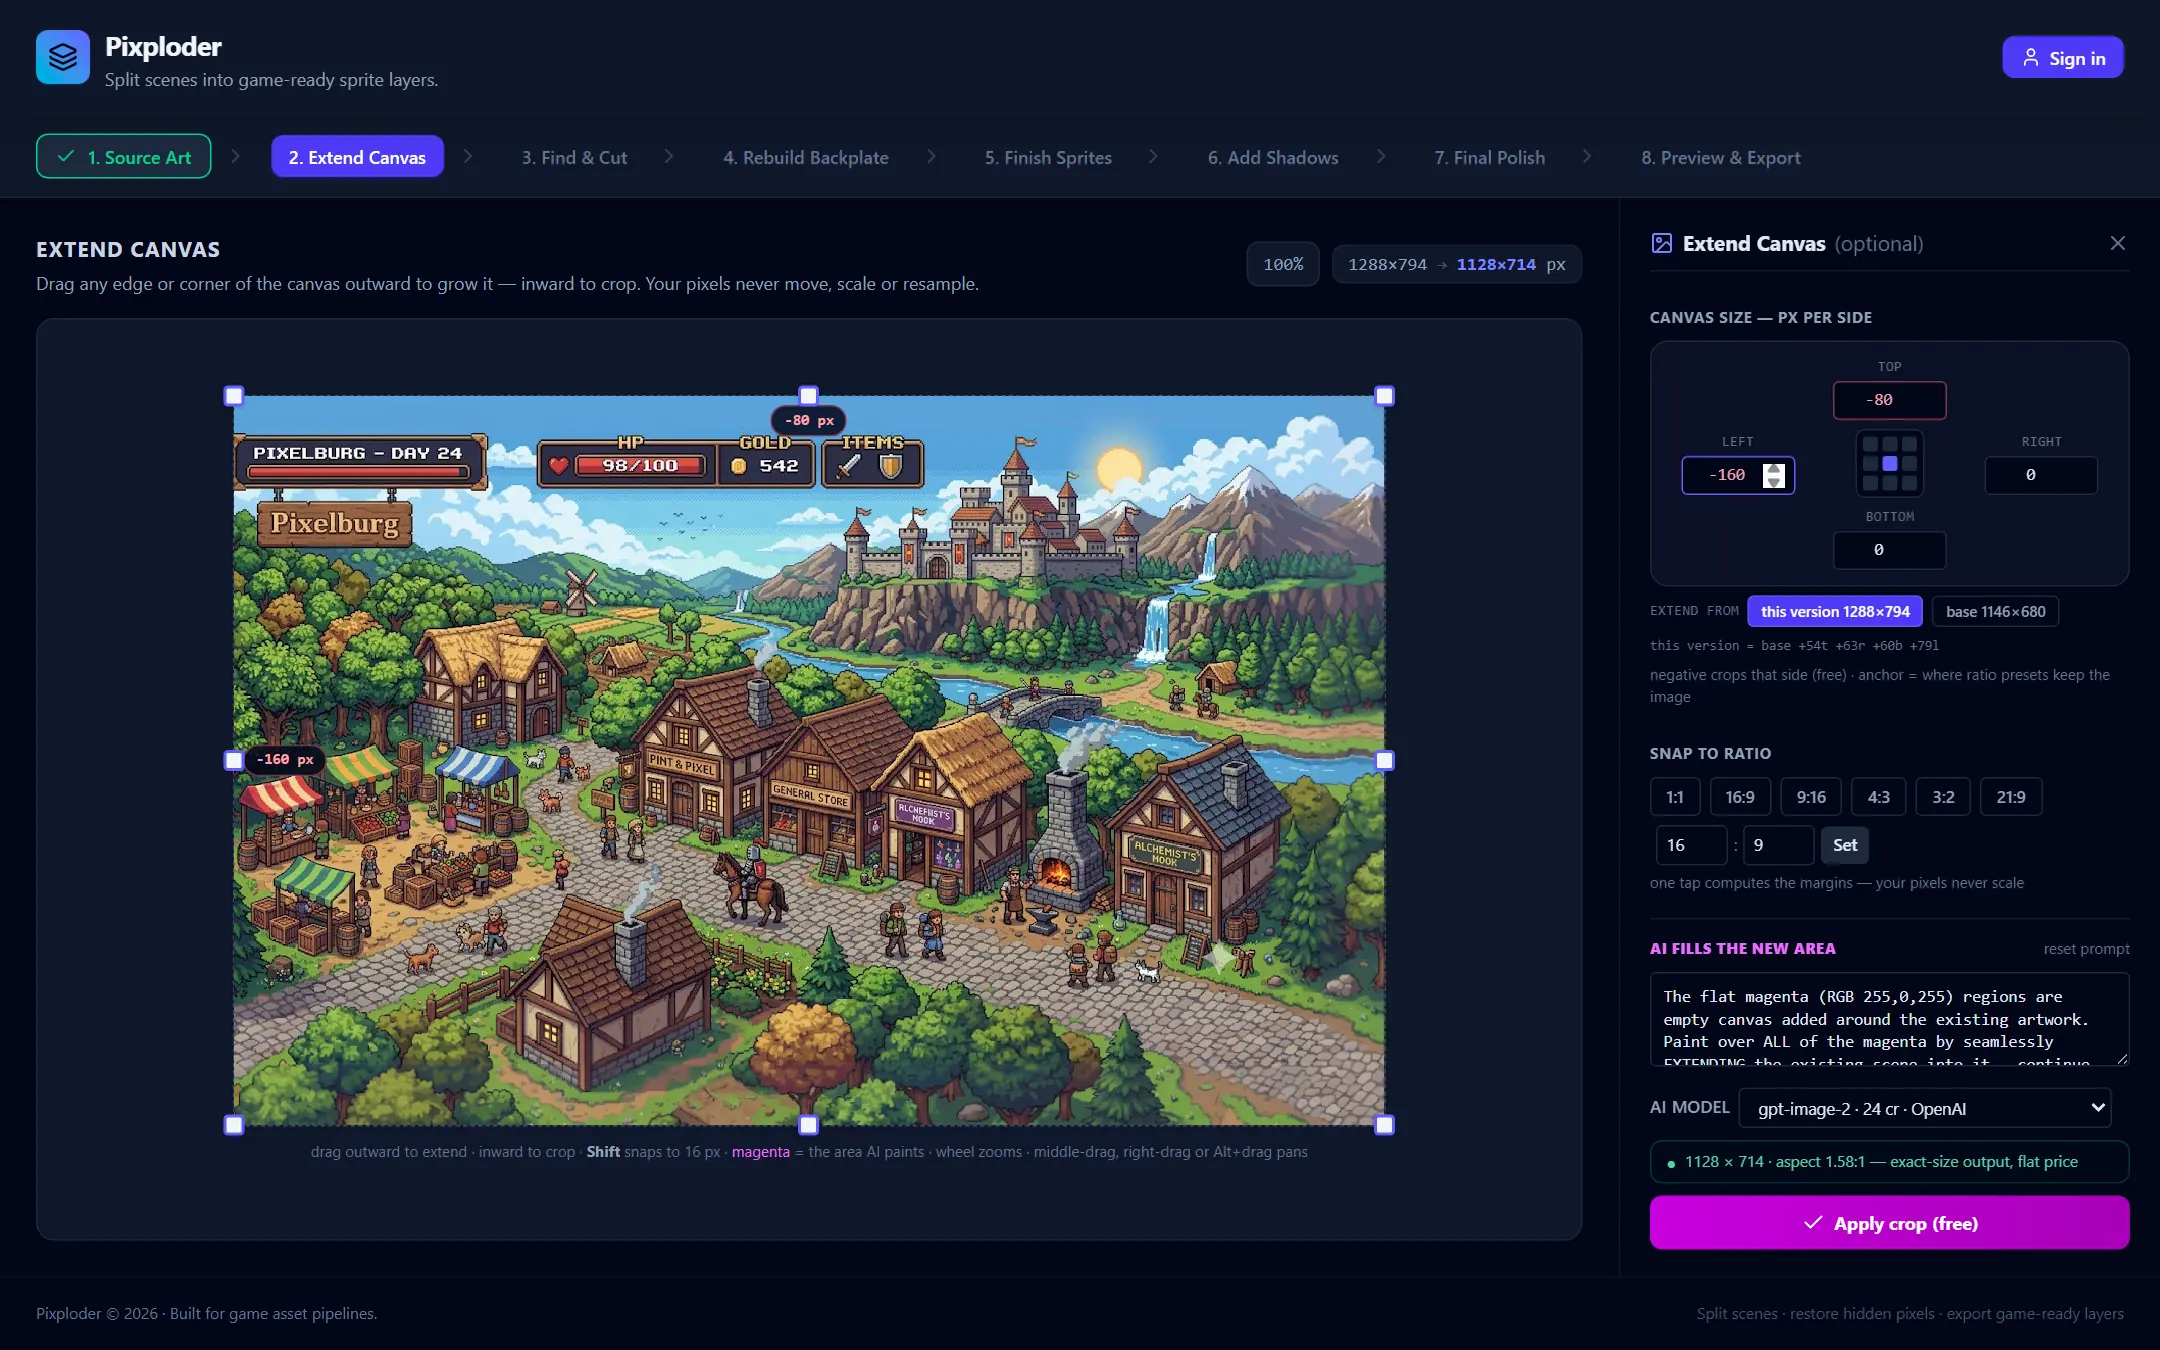
Canvas size — px per side— theTop,Right,Bottom, andLeftnumber inputs. A positive value grows that side and the box turns fuchsia; a negative value crops it and the box turns rose. The stepper arrows move in 8 px steps, but you can type any number. - Set the anchor — the 3×3 pad of dots between
LeftandRight, centered until you move it. It decides where your existing image sits when a ratio preset splits the growth: pick bottom-center and a preset adds all its new height as sky above. It changes nothing about margins you drag or type by hand. The hint under the grid says the same thing:negative crops that side (free) · anchor = where ratio presets keep the image.
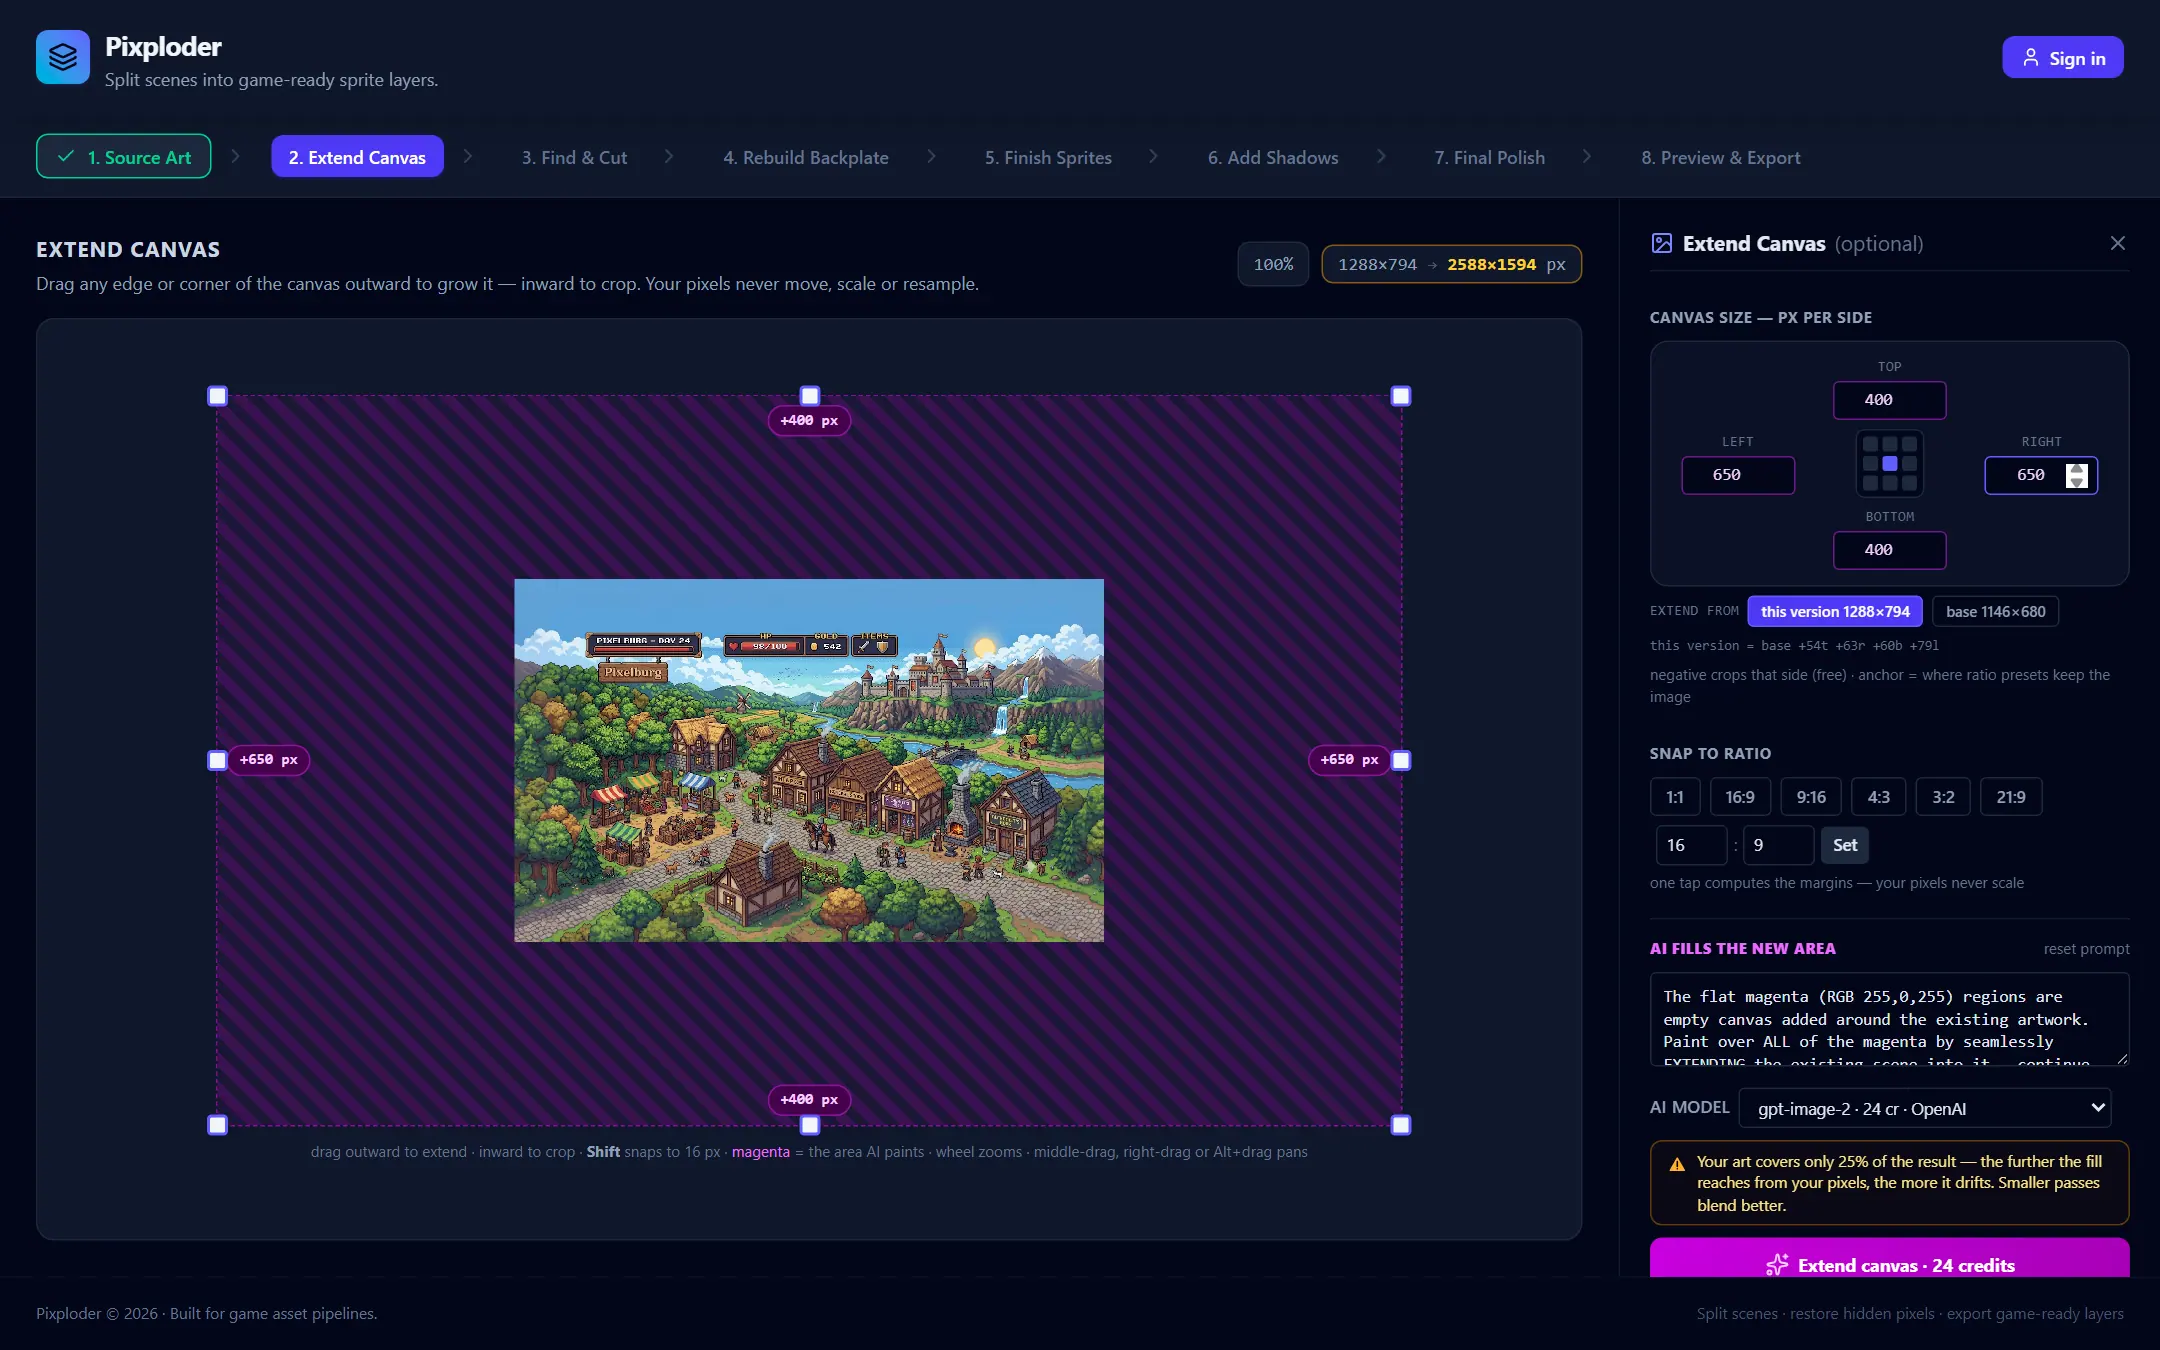
Growth previews as a magenta hatch — the exact pixels the AI will paint — and turns the frame outline magenta. A chip on each changed side shows the amount, fuchsia +200 px for growth, rose -120 px for a crop. A crop shows no magenta: it is pure geometry, so the preview simply cuts in.
Above the canvas, a size badge reads the dimensions the margins measure from, then → the result once anything changes — for example 1288×794 → 1488×914 px. When the guard line described below turns amber or red, the badge picks up that color too. The caption under the frame repeats the gestures: drag outward to extend · inward to crop · Shift snaps to 16 px · magenta = the area AI paints · wheel zooms · middle-drag, right-drag or Alt+drag pans.
Margins are clamped for you. Growth stops at 4096 px per side, and a crop always leaves at least 16 source pixels in each dimension, so an over-crop springs back instead of erasing the image.
The preview has the same view gestures as every other step: the wheel zooms at the cursor between 0.5× and 10×, middle-drag, right-drag, or Alt+left-drag pans, and the percentage chip in the header (100% at rest, tooltip Reset zoom) resets zoom and pan in one click. Zooming changes nothing about the canvas, and handle drags stay accurate at any zoom.
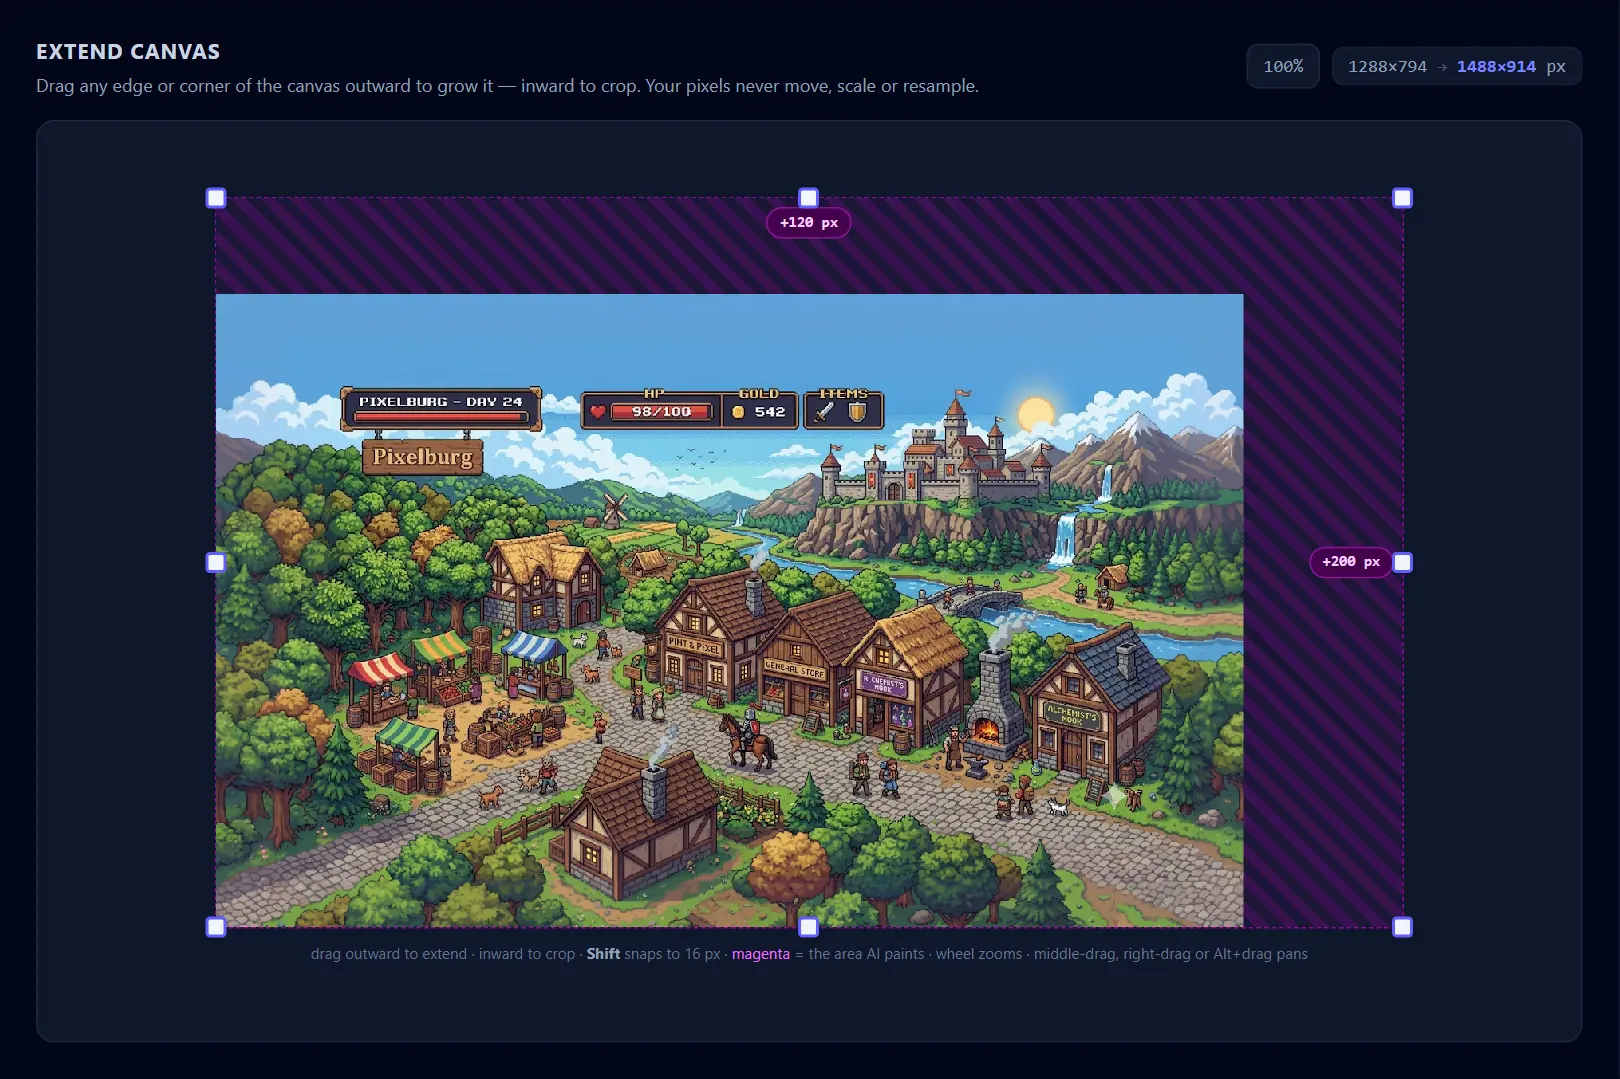
Tip. The magenta hatch, the per-side chips, and the size badge show exactly what will change before you spend anything. Nothing here touches your credits until you press the button at the bottom of the panel.
Snap to a ratio
The chips under Snap to ratio are margin calculators. One tap fills in the four margins — grow-only — so the canvas reaches a target aspect, split according to the anchor. Your pixels never scale; only empty canvas is added, which is what the hint means by one tap computes the margins — your pixels never scale.
- Tap a preset —
1:1,16:9,9:16,4:3,3:2, or21:9. - Or type a custom ratio in the two number boxes beside them and click
Setto run the same math for any aspect.
Because presets only ever add, they never produce a crop of the frame they are measured from. Pick your anchor first so the new room lands where you want it.
Choose what the margins measure from
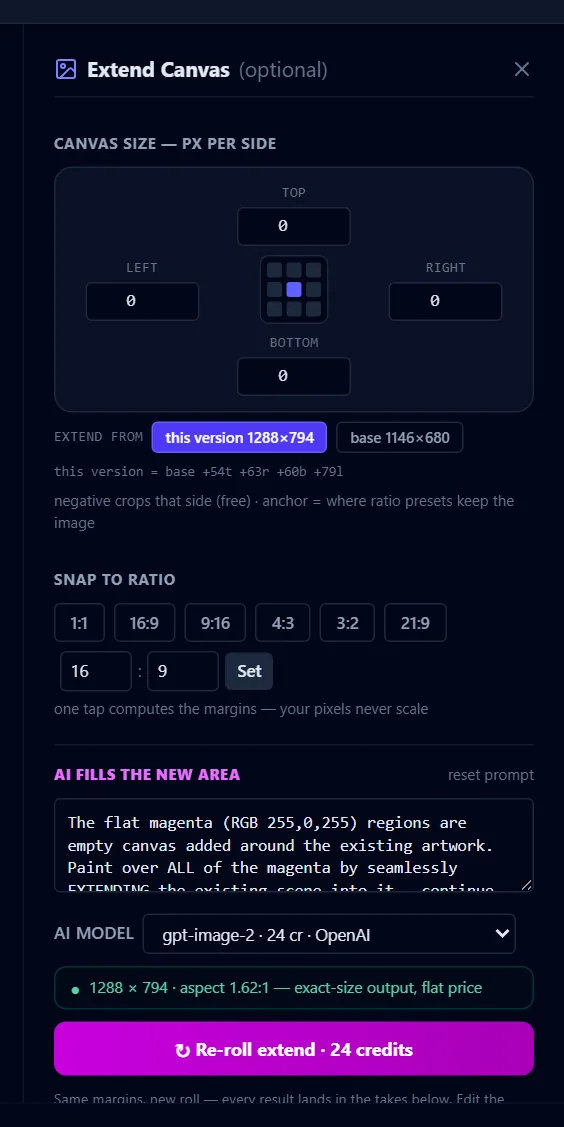
Once the canvas on screen was itself produced by an earlier apply on this step — an extend or a crop — an Extend from row appears under the margin inputs. It picks the frame of reference your margins edit against, and that decides what a paid fill actually repaints.
this version W×His selected whenever you enter the step. It chains on top of what you have: the existing fill is kept, the margins start at0, and dragging paints only the newly added strip.base W×Hreshapes from the version's base instead. The inputs prefill with this version's real offsets, and changing them regenerates the whole margin as one fill.
Under the two chips, an info line spells the relationship out in either mode — this version = base +54t +63r +60b +79l.
Reducing offsets in base mode is not a re-fill. As long as no side ends up bigger than the canvas you are looking at, the button turns into Apply crop (free) and the fill you already paid for is simply trimmed.
Tip. Use base when widening a previous extension — say from +124 to +200 px — so you get one clean margin instead of a visible seam where the new fill meets the old one. Stay on this version when you are adding room in a new direction and want to keep a fill you already like.
Let the AI fill the new area
The block headed AI fills the new area is the paid part of the step.
- The prompt box — the instruction sent to the AI, describing how to continue your scene into the magenta. It ships with a thorough seamless-extension instruction: continue the sky, terrain and scenery to the new edges in the same style and palette, finish anything the old border cut off, add no new foreground objects, leave the existing artwork untouched, and leave no magenta behind. Edit it freely;
reset promptputs the default back, and clearing the box falls back to that same default — the placeholder says so:empty = the default fill prompt — "reset prompt" brings it back. AI model— the menu that picks which AI paints the fill. Three are offered on this step: the suggested one at 10 credits per image, tagged· recommended, and two at 25 — every option carries its own price inside its label. Your pick sets the number on the button below, is shared with the other scene-level AI actions — generating a scene on Step 1, repainting on Step 4 — and is remembered between sessions. If the models for this step are all switched off, the menu is replaced byAI model unavailable.- The guard line — a live readout marked
●(green: good to go),⚠(amber: it still runs, but the fill may soften or drift), or⛔(red: blocked). Green spells out the result size and aspect; the other two say what is wrong and how to get around it, and a red verdict disablesExtend canvas. - The primary button changes with what is pending:
Extend canvas · N creditswhen a growth is waiting. One press bakes the growth as flat magenta, runs a single AI fill, matches the result back onto the frame it was sent, cleans up any magenta the AI left unpainted, and commits the model's repaint as the whole canvas. It stays grayed out until something is pending, and a red guard verdict disables it too.Apply crop (free)when the pending change only removes pixels — pure geometry, no AI, and the current fill is kept.↻ Re-roll extend · N creditswhen nothing is pending and the canvas is itself a recorded roll that grew: another fill for the same margins.↻ Roll new variant (W×H) · N creditswhen the canvas is the base a roll was made from — it targets the newest extension made from this canvas.- While a fill runs, the button reads
Extending scene…, the handles stop responding, and↺ Undo extendandContinue to Find & Cutare disabled until it lands. If it fails, a toast readsExtend failed: …and your canvas is left exactly as it was.
- The line under the button tells you which of those states you are in. Re-roll explains itself with
Same margins, new roll — every result lands in the takes below. Edit the margins above to reshape this version instead.; the variant state readsNew fill for the newest extension made from this canvas — or drag a handle to extend it differently.Whenever nothing is pending and the canvas is not a re-rollable roll, the line readsDrag a handle on the canvas — or type margins above — to make room to extend.and may offer↻ use last margins, which reloads the margins of the most recent version made from this canvas so you can re-apply them.
What comes back from the AI is not pasted blind. The result is content-matched against the frame that was sent — scored only on your original pixels, never on the magenta — and drawn back onto your canvas at the size and offset that actually line up, so a model that letterboxes, reflows, or shifts its output does not smear your art. And because the editor works in pixel art, nothing is ever blur-upscaled onto the frame.
Careful. For a big enlargement, extend in two or three smaller passes — apply, then drag again. A fill blends better the closer it stays to your pixels. The guard hard-stops the extremes: an aspect past 3:1, a result side past 4096 px, or your art covering less than about 20% of the result. Below that coverage the AI stops extending your scene and paints a new one around it. Between roughly 20% and 35% you get the amber warning and can still proceed; some models add their own amber note when a size pushes them onto a softer output.
Compare versions in Extend takes
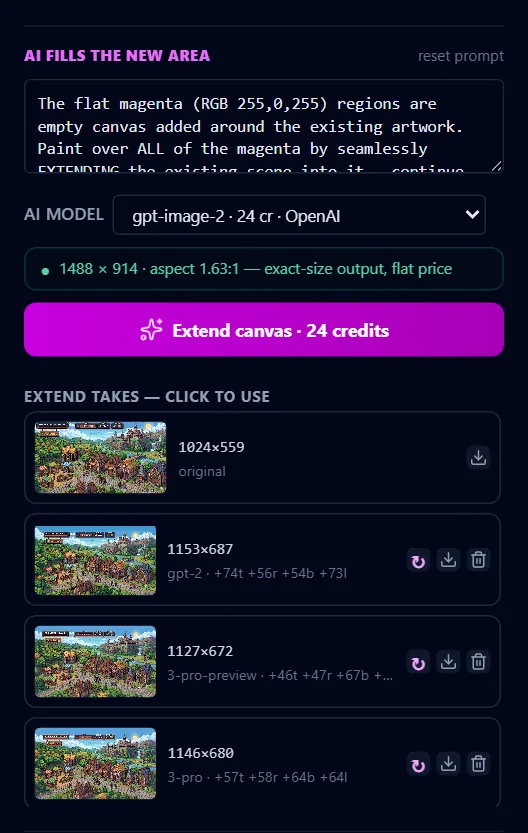
Every apply lands in the Extend takes strip — headed Extend takes — click to use as soon as it has rows — so a paid fill is never a one-shot. The original sits at the top, versions run oldest to newest below it, and the newest roll is at the bottom. Click any row to make that version the working canvas; when versions share a lineage, your later-step work follows the switch automatically. The list is never empty for long: arriving on the step records whatever canvas you came in with as the original row, so there is always a way back. With no rows at all, the strip explains itself instead — Every AI extend lands here — compare rolls and switch between them anytime. Takes survive Undo and reloads.
Each row shows a thumbnail, the version's W×H, and a one-line recipe: the model that painted it, in short form (or crop), plus the margins that produced it. A fresh AI fill also carries · whole image, because an extend is the model's own repaint of the whole frame; a crop never went near a model, and rolls recorded by older builds predate the tag. Rows that are not the result of a recipe read original for the root, or base — with · anchors 2 versions appended when later rolls were built on it. Hovering a row tells you what clicking it does: current canvas on the active one, otherwise click to use this version, with · anchors later versions added on a row other versions depend on. On the right:
current— the fuchsia badge marking the active canvas.↻— rolls a new variant of that extension: same margins, a fresh fill. It appears only on rows that actually grew the canvas, and it spends credits. On the row that is already your canvas it rolls straight away; on any other row it asks first when the switch would cost you something.- Download —
Save (download + keep in project)downloads the PNG, and with a saved project open it keeps a copy in that project's saved images too. - Trash —
Delete this take foreveropens a confirm. The original has no trash button, and neither does a base that still anchors later versions.
Until one growing extend has been recorded, an amber line explains that this canvas has no extension recipe yet, and offers the fix: drag a handle or tap a ratio and extend once, and every result after that gets an instant ↻ new variant.
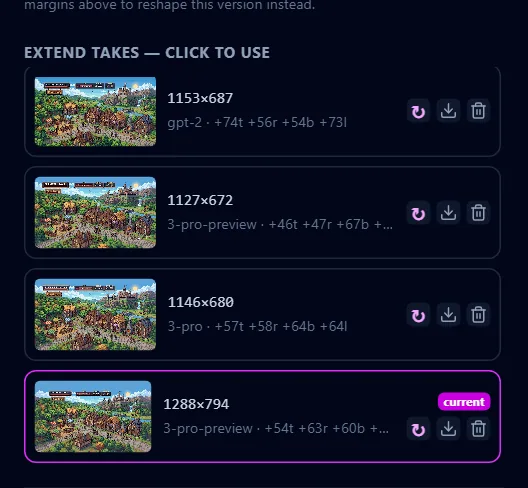
Note. The strip keeps ten rolls; the original and any base rows are never dropped, because they are what hold the version lineage together. Takes deliberately survive ↺ Undo extend and reloads — which is exactly why deleting one is permanent. Download a version you love before it can age out.
Undo, and keeping your later-step work
A paid extend changes the size of the document, so it can invalidate work you have already done further down the pipeline. This step guards that work rather than silently dropping it.
↺ Undo extendappears after any apply on this step — extend, roll, or crop — and after a take switch, and reverts it in one click: the previous canvas and everything that was cleared with it. It is a single in-memory slot, so a second apply, another take switch, or a reload discards the snapshot.Extend with work in later steps?opens when downstream work exists. It counts how many masked elements keep their pixels versus fall outside the crop, and confirms that backgrounds and takes are padded rather than scaled and that shadows, sheets, and regions follow their elements. Your choices areCanceland✨ Extend & keep all, which remaps everything that fits and then extends.- Switching or re-rolling from a take asks the same way when it would remove something —
Switch to this extend take?(Switch canvas) andRoll a new variant of this take?(↻ Roll variant · N cr). When the two versions are related and nothing would be clipped, it just happens, with no dialog, and re-rolling the row that is already your canvas never asks at all.Delete this extend take?guards the permanent delete withCancelandDelete forever. It warns you when the take is your current canvas — the canvas itself stays, but its recipe is forgotten, so the margin inputs reset and↻re-roll is unavailable until you extend again — and when later versions build on it.
Applying keeps you on this step so you can extend again and keep growing — the footer says as much: Applying keeps you here — extend again to keep growing. Continue when you're happy. What lands is the AI's repaint of the whole frame, not just the new strip, so if a detail in the middle of the picture came back changed, roll a fresh variant with ↻ or touch it up in Step 4 · Rebuild Backplate.