Step 5 · Finish Sprites
Step 5 · Finish Sprites turns each object you cut out in Step 3 · Find & Cut into a game-ready sprite on transparent alpha. A cut-out is rarely the finished thing: a mask bit into it, another object stood in front of it, or the canvas edge sliced it off. So opening this step lines every sprite that has never been through a call up on the QUEUED shelf — queued sprites are packed into the cells of one sheet, sent as a single AI call, redrawn whole, and keyed back to clean transparency. The panel says it in one line: New sprites are queued for a rebuild — the AI fills in what was hidden, cut off or missing; wear and damage stay as drawn. What comes back waits on the Results shelf until you judge it — ✓ to approve, ↺ to try again. Nothing is spent until you press Generate. The screen is the scene on the left and one panel, Rebuild sprites, on the right. You are done when every sprite is approved, because only approved sprites flow on to Add Shadows.
Costs. Everything that spends credits here prints its price before you press it: ⚡ Generate · {N} calls · {X} cr under the QUEUED shelf, ⚡ Generate all · {N} calls · {X} cr at the foot of the panel (the same run through a second door — one price, one confirmation), the ↺ at the end of a sprite's version row (one sprite, one call), Regenerate on a withheld run's banner, Run again inside a past run's settings, and the one optional AI engine inside a version's repair window. One call is one charge, flat per model, however many sprites it packs — and a call that fails before it ever reaches the AI comes back to your balance in full, while one that fails after the AI has already run keeps a floor of one credit and returns the rest. Everything else on this step is free: approving with ✓, queueing again with ↺, moving and scaling a sprite on the scene, Snap and Reset, Compare and Hold: original (C), the All | Pick runner, opening the 👁 calls list, unticking a call, Split into {N} calls · {X} cr (it prints what running them would cost, but the split itself only re-packs the queue), Repack into {N} calls · {X} cr, painting fill zones and placing a sprite in its cell, the ▨ mask toggle (free to press, though a masked sprite travels in a call of its own, so the price above it can go up), the keyer, + use another sprite's result and the bulk ⧉, the bulk Edge and Match chips, and Re-cut G{n}. A Use {N} credits? dialog — with a Don't ask again this session box and Cancel pre-focused — confirms each spend, and Pixploder stops with a notice first if you are signed out, not on an AI plan, or short on credits. See Credits & plans.
The scene, and the controls above it
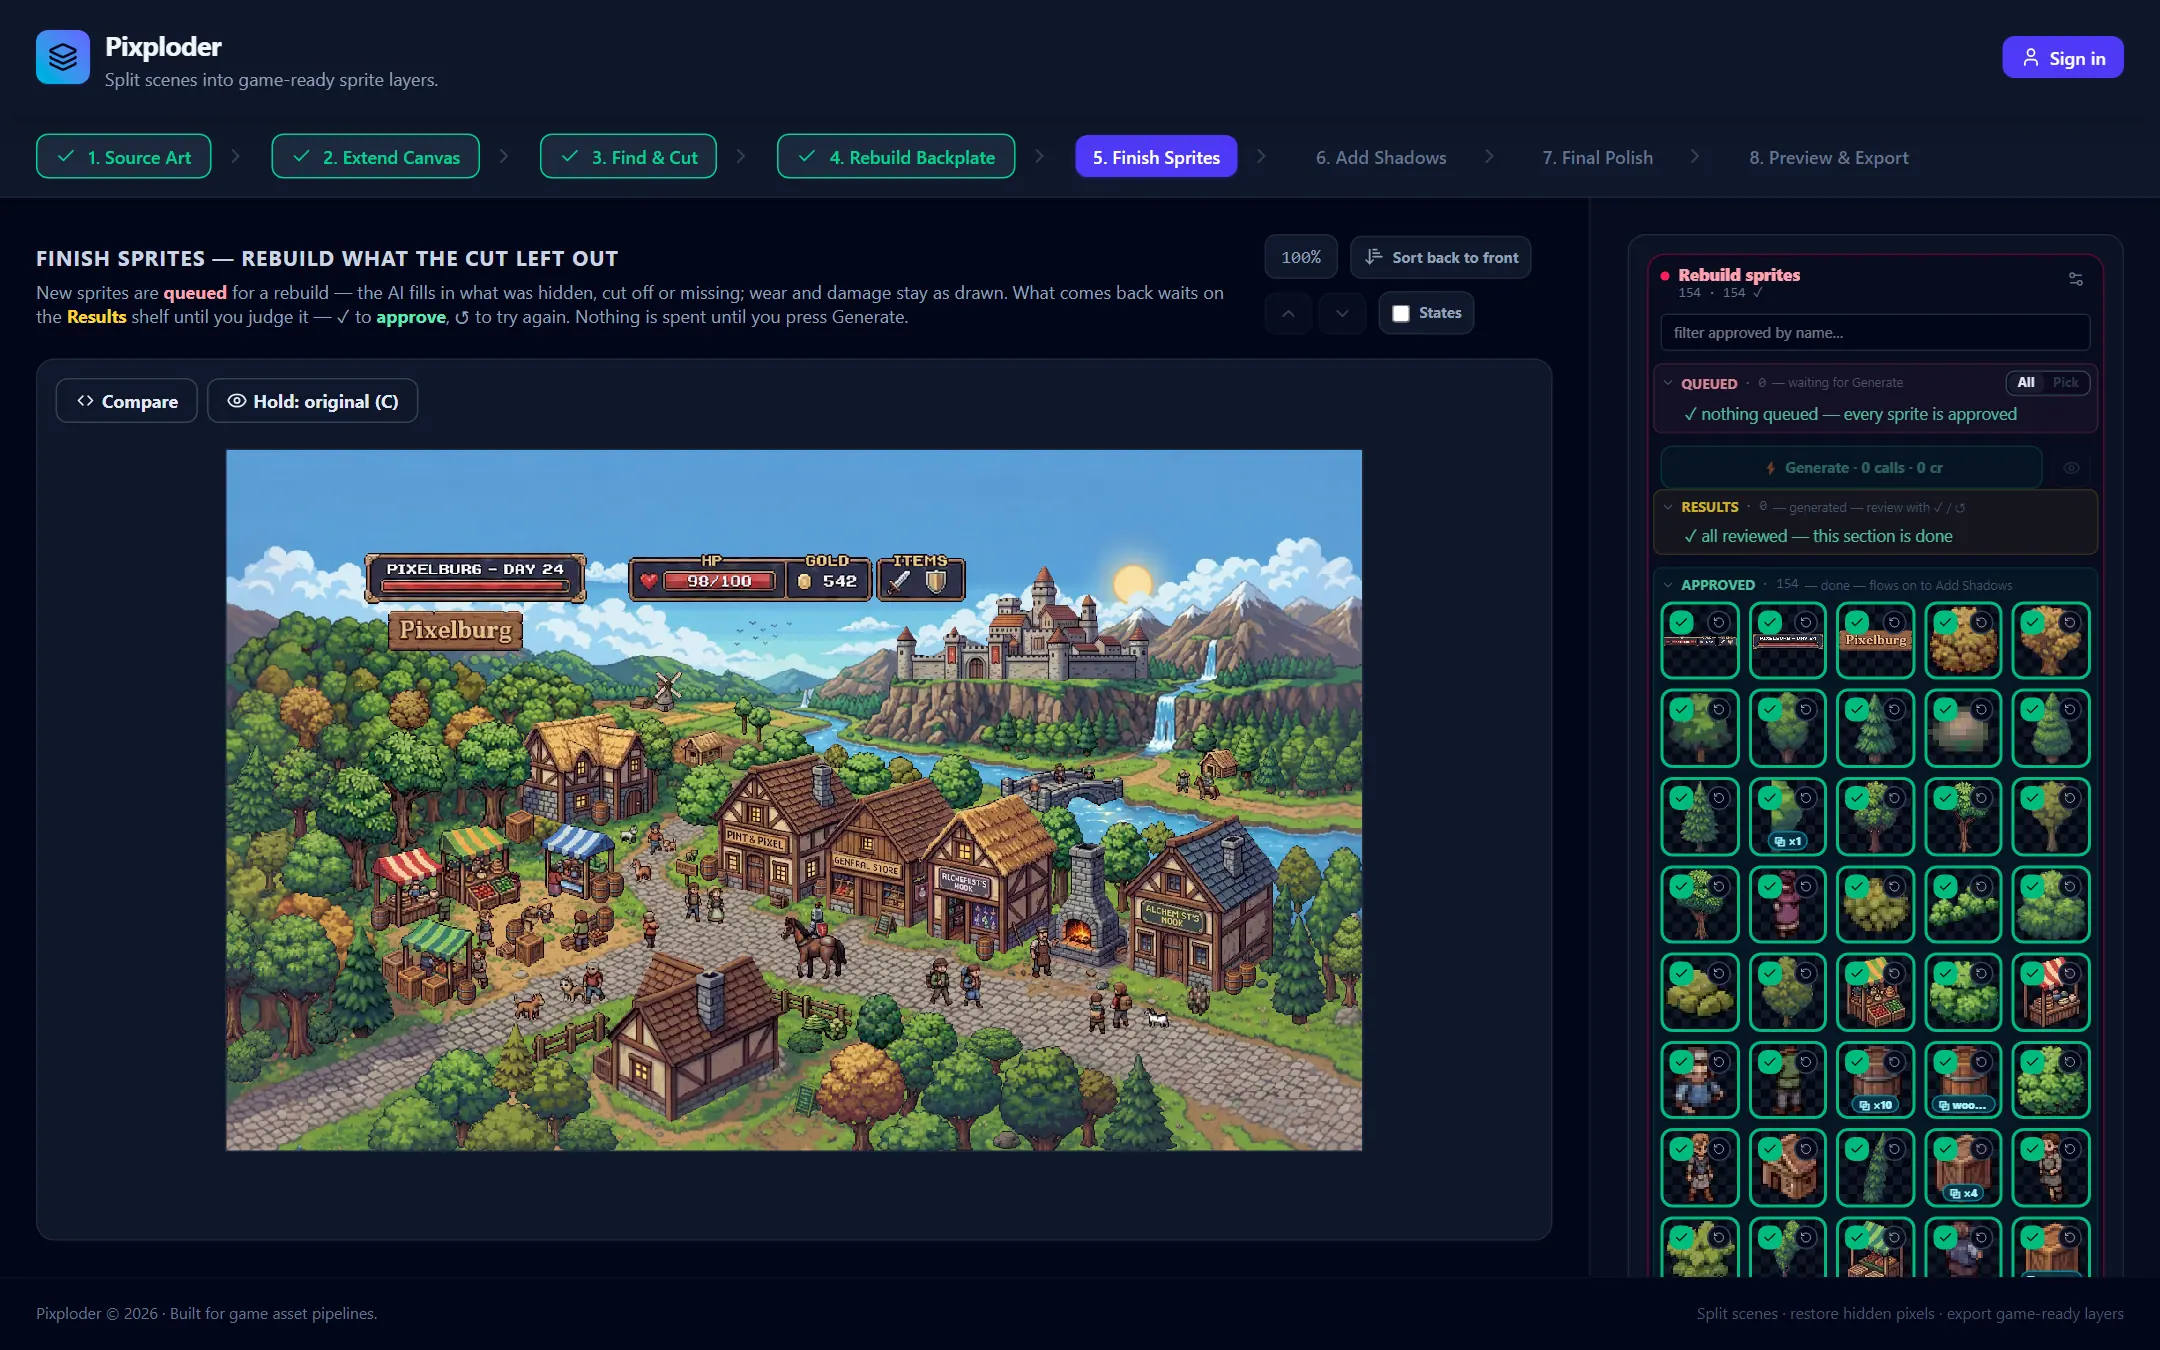
The heading reads FINISH SPRITES — REBUILD WHAT THE CUT LEFT OUT. Under it the left column shows your scene clean — the resting view is the artwork itself, with no boxes painted over it. A sprite's box appears only when you hover it (rose if it is queued, emerald otherwise) or select it (indigo). There are no painting tools here: a click says which sprite you mean, a drag says where it goes. Ctrl/Cmd-click adds sprites to a set, a click on the background deselects, and so does Esc. Scroll to zoom, middle-drag, right-drag or Alt-drag to pan.
The picture is not always your upload. Once Step 4 · Rebuild Backplate has produced a backdrop, the scene is that plate with every sprite painted back onto it — the same composite the later steps build — so what you judge here is what you ship.
Five controls sit in the panel row above the picture, and the last four are offered only while the scene is the surface on screen (neither the packed sheet nor the single-version view stacks anything).
{NN}%prints the current zoom and resets zoom and pan in one click.Sort back to frontlays out the whole stack at once, from each sprite's ground line: the ones standing further back paint first, and anything cut from inside a bigger element stays in front of it. It replaces the current order in place.#{i} / {N}appears when exactly one sprite is selected and reads that sprite's slot in the paint order, back to front —0paints first, at the very back. Exports keep the sequence and renumber it from 0 over the layers they include.⌃brings the selected sprite one layer forward — it paints later, covering what it overlaps — and⌄sends it one layer back. With several selected each one moves a single slot within its own sibling list; with nothing selected both chips are dim and say so.Statestints each sprite's silhouette — not its box, because boxes overlap and a wall of rectangles reads as nothing. A legend under the picture names the colors:emerald = approved · rose = queued · orange = rebuilt, still to review.
This is where paint order is set, and the order is not a preview setting: Step 6 · Add Shadows, the composite and the diorama on Step 8 · Preview & Export and every export ship it.
Two chips float in the top-left corner of the picture as soon as anything has been applied to it — the same pair steps 4, 6, 7 and 8 carry. Hold: original (C) brings your source art back — no backplate, no applied rebuilds — for as long as you hold the button or the C key. Compare wipes between the two: the original is clipped to the left of a divider, and pressing anywhere over the image jumps the divider there so you can drag it. While Compare is armed the divider owns the frame — a drag moves the divider rather than a sprite, the arrow-key nudge stands down and the placement bar hides — because the left half is the untouched original and sprite chrome drawn over it would describe geometry that half of the picture does not have.
Move, scale and Snap a sprite
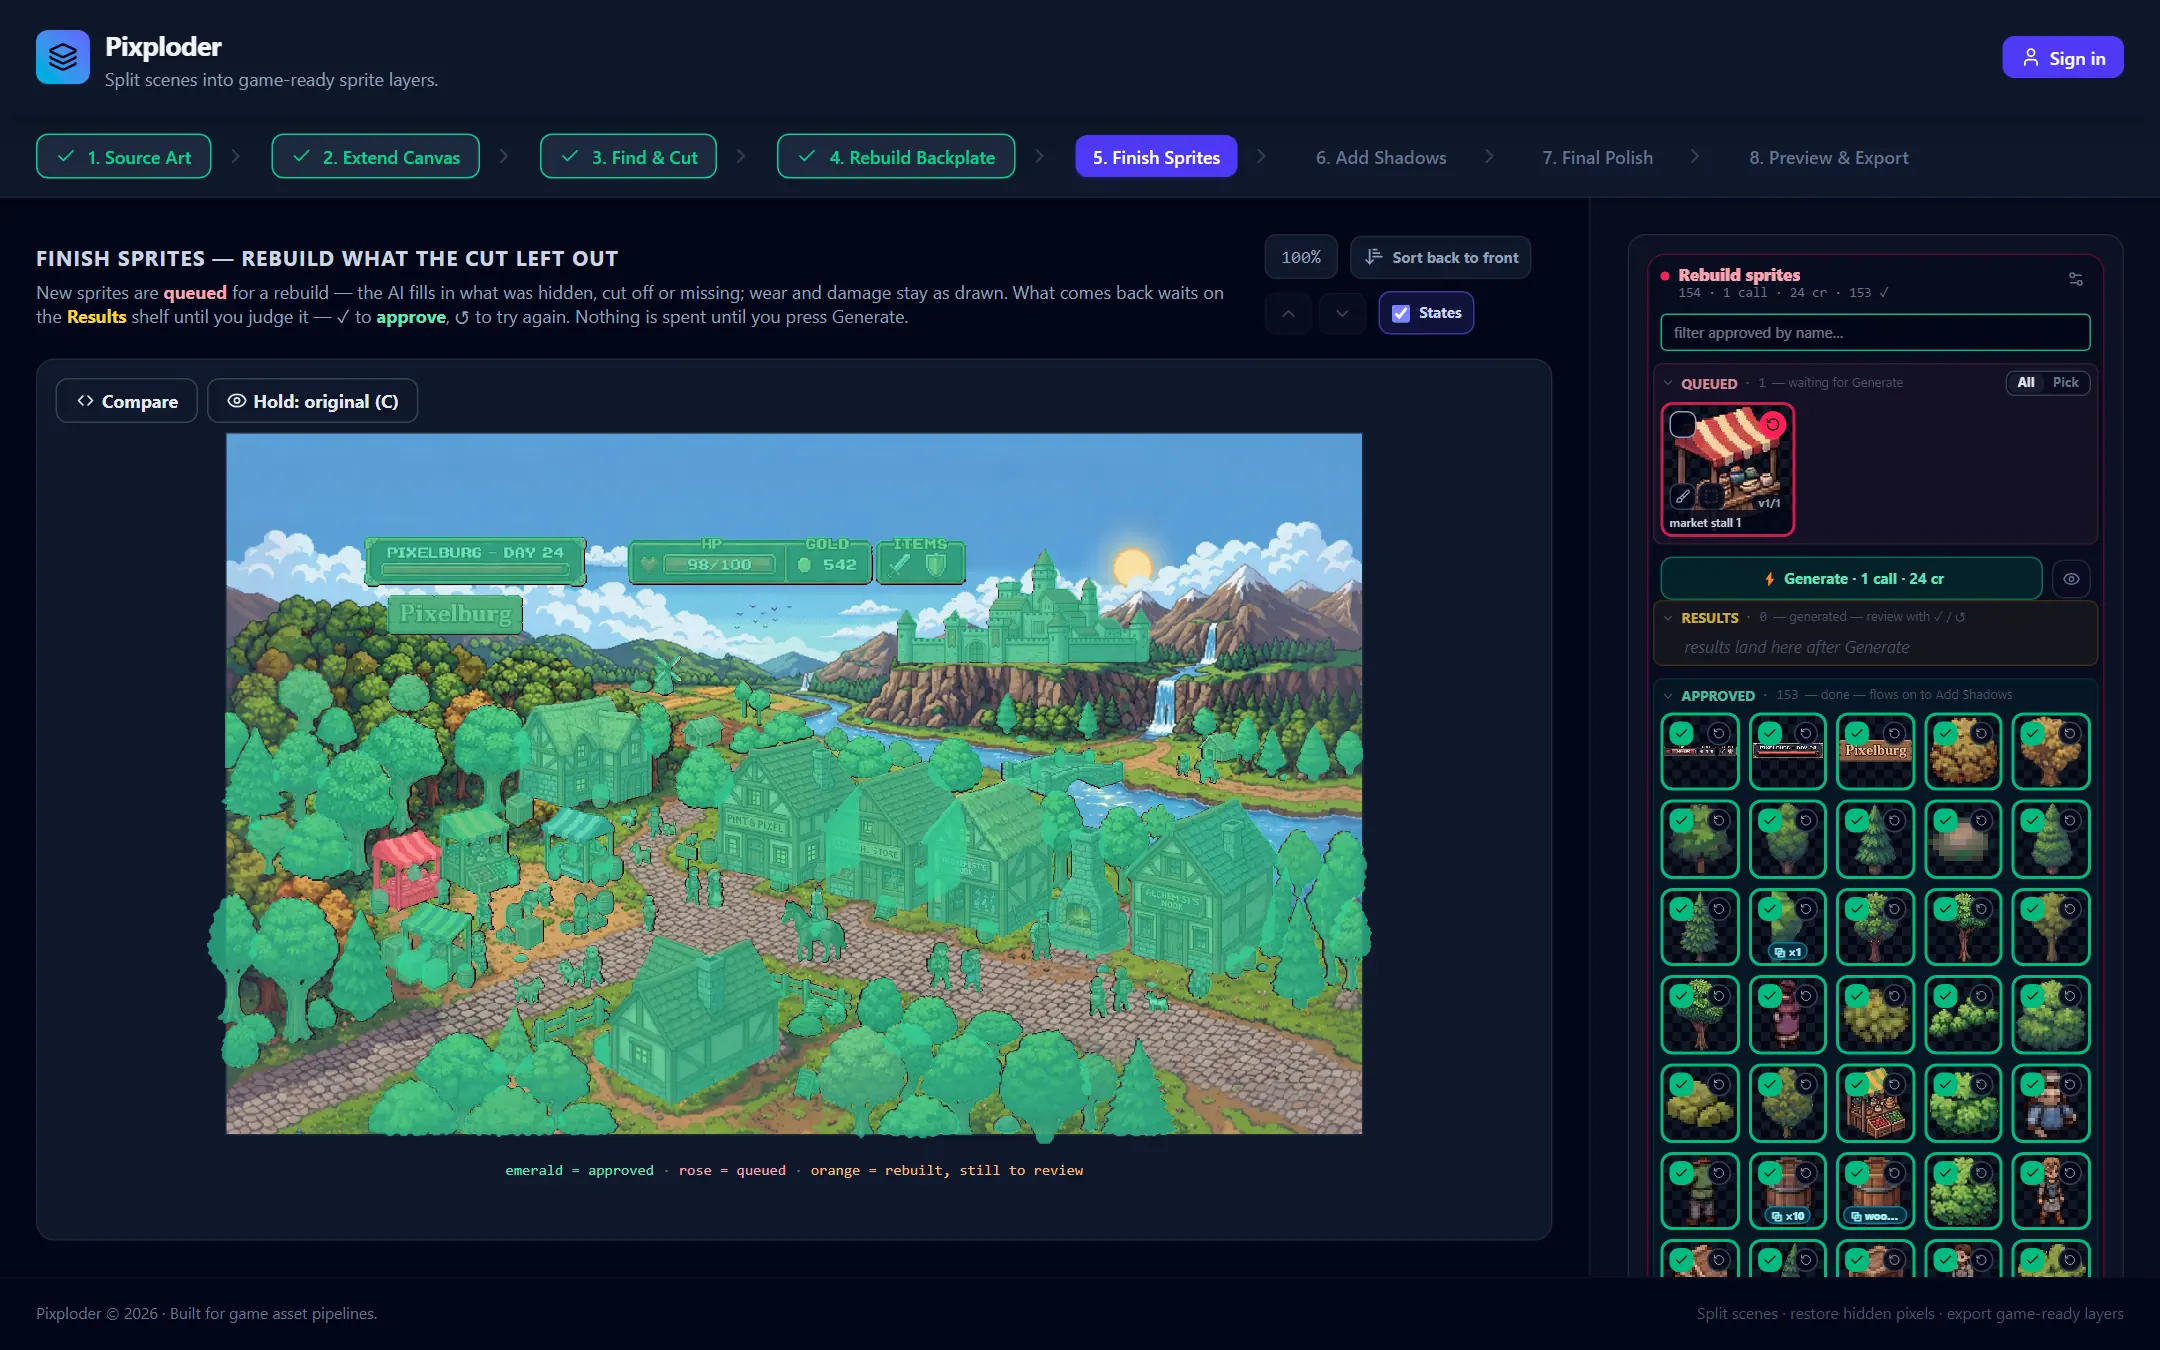
Press a sprite and travel more than about 4 px and the gesture becomes a move; let go under that and it was a click.
- Drag a sprite to move it. A ghost of the sprite follows your pointer with an indigo outline, and the picture underneath rebuilds when you let go.
- Pull one of the four corner dots on the selected sprite to scale it. The scale is proportional around the opposite corner — one factor for both axes — so a sprite can never come out squashed. The dots appear only when exactly one sprite is selected.
- Press an arrow key to nudge the selection by one source pixel, or ten with
Shiftheld. Nudging stands down while a second sprite is selected and while your cursor is in a text field, a text area or a dropdown. - Double-click a sprite — or press
Resetin the bar — to put it back to its natural geometry: the box its applied generation was drawn at, or its original cut-out box when no generation is in play.
A bar is pinned to the bottom-left of the picture whenever exactly one sprite is selected. It carries the sprite's name, how far it now sits from its original cut-out box as Δ 0, 0px, its width against that same box as scale 100%, then Reset, the Snap split-button, the last fit's readout, and the reminder drag = move · corners = scale · arrows = nudge (Shift ×10) · dbl-click = reset.
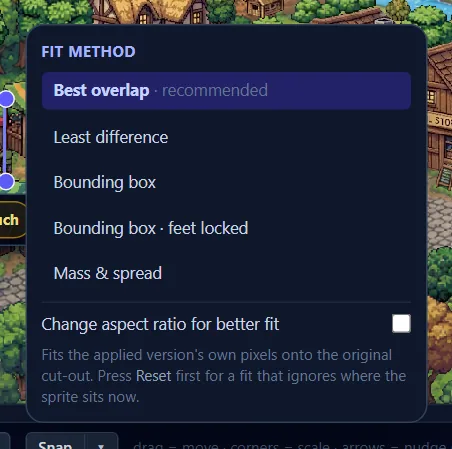
Snap puts the applied generation back on top of the original in one press. It reads the version's own cut-out pixels and the original sprite's cut-out, finds the placement and size where the two line up best, and writes that as the render box; while it works the button reads Fitting…. The ▾ beside it opens a popover headed FIT METHOD, and the five rows differ in what they line up:
Best overlap— tagged· recommended, and the default. It searches for the placement with the most silhouette overlap and ignores color entirely, which is what makes it reliable when a generation came back in a different palette.Least difference— matches the pixels instead of the outline, looking for the placement where the two pictures differ least. Reach for it when a generation drew in a part your original never had, and when it came back in your original's colors. On a truss, a fence or anything built of repeating parts,Best overlapis the surer pick.Bounding box— lines the generated outline up with the original's, trying each edge on its own instead of trusting all four, so a side the AI drew past your original cannot set the size.Bounding box · feet locked— takes the width from the original and locks the bottom edge to the original's ground line. This is the one for a standing object whose generation lost its top.Mass & spread— matches ink area and center of mass. The most accurate row on a healthy generation, the least robust on a broken one.
Underneath sits Change aspect ratio for better fit, unchecked by default: left alone, Snap keeps the generation's own proportions, exactly like pulling a corner dot; checked, the two axes may scale independently for a tighter fit. The method and the checkbox are session settings, so the next plain press of Snap repeats what you chose last. The popover ends with the one thing worth knowing before you press: Fits the applied version's own pixels onto the original cut-out. Press Reset first for a fit that ignores where the sprite sits now.
After a fit the bar reports the silhouette overlap it achieved, as fit 0.83. Any geometry write — a drag, a nudge, a Reset, a version switch — clears that readout, so it can never describe a pose that is no longer on screen. Snap is grayed out with the reason in its tooltip when the sprite is showing its original rather than a generation (Snap moves a GENERATED version onto the original — this sprite is showing the original itself), when it is a group, when the version has no cut-out pixels yet, while you are mid-drag, and while Hold is down.
Every one of these gestures writes the sprite's render box — the rectangle everything downstream draws it in. Add Shadows, Step 7 · Final Polish, the composite and the diorama on Step 8, the saved project and every export follow it, so a sprite placed here is placed everywhere. This is the only step that sets it.
Several sprites at once
Ctrl/Cmd-click a second box and the scene switches to a set: every member keeps its own indigo box, the action pill and the corner dots stand down (a proportional scale has exactly one anchor), and the bar is replaced by the set's own.
{N} spritescounts the selection.Reset allputs every selected sprite back to its own natural geometry. There is no undo on this step.Snap {N}fits each selected sprite onto its own original cut-out. The number is how many it can actually reach — a sprite still showing its original has nothing to snap and is skipped — and the note afterwards readssnapped 3 of 5 · 1 skipped. The▾opens the same fit methods and the same aspect checkbox; one method and one aspect rule govern the whole press.◌ Edge {N}and◐ Match {N}write the outline repair and the color match across the selection without opening a window per sprite. The glyph reads the set at a glance —◌none of them carries that section,●every eligible one carries identical settings,◐mixed — and on a mixed set the press deliberately refuses rather than settle a disagreement by majority. Both are free and instant, and both are explained in full on Sprite repair.- The line at the end says what the two buttons mean for a set:
Snap and Reset apply to each sprite's own original · Ctrl/⌘-click a box to change the set.
Only one of these runs at a time: Snap stands down for a bulk write and the bulk chips stand down for a fit, so two passes can never overwrite each other's answer.
Rebuild sprites: the panel

There is exactly one section on the right and it is always open. Its header stacks the name over its numbers, so the name is never what gets squeezed:
Rebuild spritesis the name, and its tooltip is the promise:The AI fills in whatever was hidden, cut off or missing. Wear and damage drawn into the art stay as drawn.- The line under it is the whole cost story — the roster count, then
· {N} calls · {X} crfor what is queued, then· {N} ✓for what is approved, then an amber· {N} to reviewfor results still waiting on you. That last number is the one piece of homework a collapsed shelf can never hide. ⚙opens the section's settings — the model and the guidance sentence every queued call runs with. It hangs off the header, so folding a shelf away never takes the settings with it.filter approved by name…appears once the project holds more than six sprites. It narrows theAPPROVEDpile only.QUEUEDandRESULTSare deliberately never filtered: hiding a queued sprite would let the money row price something the screen is not showing, and hiding an unjudged result is how a sprite ships un-reviewed.
A project with nothing in it says so instead: No sprites yet — go back to Find & Cut to detect them with AI, or drop a layered PSD on the Source Art upload box (each layer becomes a sprite, no AI). A project with no picture at all gets the matching sentence on the left: No image loaded — go back to the upload step.
QUEUED → RESULTS → APPROVED
Three shelves, always drawn in this order even at zero, each on a faintly tinted band of its own and each collapsible by its own header. Membership is derived from the sprite's state, so the shelf a tile sits in, the tint its silhouette wears on the artwork and the number the header counts are one answer.
| Shelf | Reads | What is in it |
|---|---|---|
QUEUED | waiting for Generate | Lined up for the next run. This outranks everything else. |
RESULTS | generated — review with ✓ / ↺ | The inbox: generated and not yet judged. |
APPROVED | done — flows on to Add Shadows | ✓-picked or kept as it is, and finished with. |
Each header prints its own count as · {n}. An empty shelf says which kind of empty it is: nothing queued yet on a fresh project, nothing queued — {n} results still waiting for a ✓ or a ↺, or an emerald ✓ nothing queued — every sprite is approved; results land here after Generate while a run is still owed, or an emerald ✓ all reviewed — this section is done; and approved sprites land here once you ✓ them, or nothing here matches that filter when the filter is on.
Where a new sprite lands
A sprite you have just cut out in Find & Cut — or imported as a PSD layer, where each layer becomes a sprite with no AI involved — belongs to no call at all while you are still on Step 3. Opening Step 5 is what queues it: every roster sprite that sits in no call, has not been approved, has not been parked, and is not showing a borrowed ⧉ result is packed into a pending call the moment the step comes up, and lands on QUEUED. It is placed into whichever queued call still has room, and a fresh call is minted only when none has.
Four things keep a sprite out of that: it is already in a call (queued or finished), you have ✓-approved it, it was parked there by the project you loaded — an older project opens with exactly the shelves it had — or it is showing another sprite's result, which counts as an approval and lands it in APPROVED.
RESULTS is the fall-through, not an arrival shelf: it holds sprites that have been generated and not yet judged. A sprite is only ever drawn there once a run has brought something back for it.
Being queued is not being approved, and the two answer different questions. Queueing decides what the next Generate spends on; approval decides what reaches Add Shadows. The gate is off only while the project has nothing to review at all — nothing ✓-approved and nothing generated that you have not said yes to — and in that state every sprite flows on regardless. The first ✓ switches it on, and so does the first result a run brings back: a generation nobody has judged is exactly the thing the gate is for, so from that moment a sprite with no ✓ of its own is left out downstream, wherever its tile is drawn. Sending a result back with ↺ does not switch the gate off again: the tile moves to QUEUED, but the sprite is still wearing the picture you rejected, so it stays out until you approve something. That rule is unchanged by the arrival above: enqueueing a sprite writes nothing about approval either way, and a project that has never run keeps passing everything through.
APPROVED is dense — half-size tiles, five to a row — because that pile is scanned rather than read. It keeps only what still acts: the picture, the ✓ that un-approves, the ↺ that queues another try, the ⧉ link chip and the click that opens the versions. Everything it drops is one click away: move the sprite back and the full tile comes with it.
Every other tile shows the sprite's picture over a name bar and carries:
✓(top-left) approves that sprite and sends it toAPPROVED, on its way to Add Shadows. Tapping an approved tile un-approves it and hands it back. Approving a queued sprite that was never generated simply takes it out of the queue unspent, and the tooltip says so before you tap.↺(top-right) queues that one sprite for another try, moving it toQUEUEDand un-approving it on the way. On a tile that is already queued the corner is a filled rose badge, not a button — it means "this is what the next Generate spends". Nothing is spent until you press Generate.🖌(bottom-left, queued tiles only) opens the fill-zone editor for the run the sprite is waiting on, without hunting it down on the artwork first.▨beside it — also queued tiles only — decides how that zone travels, and is described with the zones below. It is drawn dim and dead until the sprite has a zone (Draw Fill zones first — the mask is derived from them.) rather than appearing out of nowhere the moment you paint one, and it turns violet when it is on.- An amber
text changedbadge when the AI rewrote, invented or wiped printed characters in the version on screen. Clicking it opens a zoomed original-versus-result compare and changes nothing. - A
v{i}/{n}label for the version the tile is showing (orig/{n}while it shows its original), a cyan⧉chip when it is showing another sprite's result or lending its own out, and a rose●when a fill zone is painted on it.
The border is the review state — emerald approved, rose queued, amber for a result waiting on you — and an indigo ring is the step's own selection, so an approved sprite can still show that it is the one on the scene. Those two corners are the whole of the triage: with one section there is nowhere else to send a sprite, so nothing on the tile moves it anywhere the ✓ and the ↺ do not already reach.
Clicking a tile's picture selects the sprite and opens its version row underneath; clicking the same sprite on the scene does the same, scrolls the tile into view and rings it — unfolding the shelf it sits in, and clearing the name filter, if either was hiding it. Ctrl/Cmd-click two or more tiles and a bulk row appears under the last one: {N} selected, ⧉ Use one result for all {N}… and ✕ clear.
Select a whole shelf
Each shelf header carries a Select all at its far end, opposite the shelf name. Select something and that shelf's own bulk buttons appear beside it, already counted: RESULTS offers Approve {n} and Re-roll {n}, APPROVED offers Re-roll {n}, and QUEUED offers Approve {n}. They are on the row only while at least one tile of their own shelf is selected, so at rest the header keeps the line of description that says what the shelf is for; the tooltip is where each button spells out the move and what it costs.
Select allputs every tile of that shelf into the same selection aCtrl/Cmd-click builds — the scene draws a box around each of them, and the multiSnap,EdgeandMatchchips light up exactly as they do for a hand-built set (on a shelf holding a single tile you get that one sprite's own bar instead, exactly as if you had clicked it). It readsClearonce the whole shelf is in, and clearing takes out that shelf and leaves any other shelf's selection standing.Escapedrops the lot.- It reaches only the tiles you can see: a sprite the Approved name filter is hiding is never selected, never counted and never acted on. Fold a shelf and, for the same reason, its
Select allgoes dead —Expand the shelf to select its tiles— while its bulk buttons fold away with the tiles. - Each bulk button acts on that shelf's share of the selection and nothing else — so a set built across two shelves can never be spent by the wrong one. Each names the move and its count before you press:
Approve {n} selected — they leave Results for Approved,Re-roll {n} selected — back to the queue; the next Generate spends credits on them, and onQUEUEDthe keep-original one,Approve {n} selected — keep them as they are, no generation. - A bulk press uses up the selection it acted on. Those sprites have just moved shelves, so they arrive on the new one unselected and any selection you still hold on another shelf is untouched — otherwise
Re-roll {n}would sit live over the sprites you just approved. - They are the plural of the tile corners, hand-pick included:
Approve {n}is the✓andRe-roll {n}is the↺, one press for the whole set. WhileAll | Pickis onPickthey carry the corners' second half too —Re-rolllights every sprite it queues, so the run you are building really does spend on them the way its tooltip says, andApprovetakes its sprites off the pick list, because a sprite approved away is not a pick any more.Select allitself never touches aPicktick:All | Pickdecides what the next Generate pays for, the selection decides which sprites the next gesture speaks for.
Generate: what a press costs
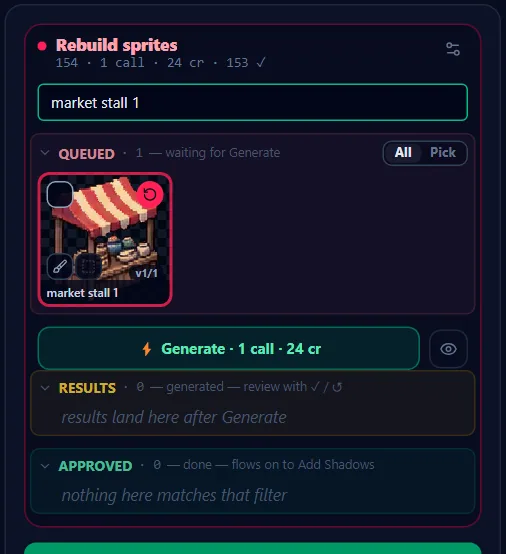
A call is one packed sheet sent to the AI once. Pixploder decides how many calls the queue needs and prices the result in two places that can never disagree, because there is one derivation behind both.
⚡ Generate · {N} calls · {X} crsits directly under theQUEUEDshelf it prices. Its tooltip names the run before you press:Rebuild the {n} queued sprites — {N} calls. With an empty queue it is disabled and saysNothing queued — press ↺ on an approved sprite; with every call unticked it saysEvery call is unticked — tick one in 👁 Calls to run it.⚡ Generate all · {N} calls · {X} crat the foot of the panel is a second door onto the same run: the same list, the same count, the same price, and one credit confirmation for the whole sum.👁next to the priced button opens the calls panel — one card per queued call, each readingcall {i}/{N} · {n}/{max} sprites · {X} crover the packed picture that will be sent. There you untick a call to leave it out of the next run, drag a sprite's name onto another card, drop one on+ drop here to start an empty call, pressSplit into {N} calls · {X} cron a legacy call that packs more than the model draws well, pressRepack into {N} calls · {X} cr, and tickAuto-reduce sheetsto let the app keep the queue at the fewest calls by itself. The👁turns amber whenever something is unticked, so a folded panel cannot hide a silent discount. All of it is explained on Calls & sheets.- While a run is in flight both buttons read
Generating…, and if other calls are still waiting they stay live and say exactly what a click would start:Generating… · ⚡ start {N} more · {X} cr.
Quiet lines under the money row explain any gap between what the queue looks like and what the press really does: how many of the run's sprites carry a painted zone ({n} of {m} queued sprites carry a painted zone — it aims the rebuild; each sprite still comes back redrawn.), a violet line counting sprites whose zone goes out as a real mask and the extra calls that costs, and a note when a call packs more than twelve named sprites, since only the first twelve are named in its prompt.
When a run lands, its results are applied to the sprites, the tiles move from QUEUED into RESULTS, and the scene repaints with the new versions in it. Nothing hijacks the left column.
Tip. Fewer sprites per call means a larger share of the AI's output budget for each one, so they come back sharper. If a result looks soft or garbled, split the call — or give the sprite a call of its own — before paying for the same crowded sheet twice.
All | Pick — spend on part of the queue
The QUEUED header carries a two-state runner right after its count: All (the default — the next Generate spends every queued sprite) and Pick. Pick is opt-in, lasts exactly one run, and changes only who the next Generate pays for.
- With
Pickon, every queued tile dims and its rose corner goes out. Tap a tile — or its corner — to light it back up. A lit corner is what the next Generate spends, which is exactly what it always meant.RESULTSandAPPROVEDtiles never dim. - The count lives in the header:
— 3/7 picked · rest stay queued, or· every oneonce you have lit all of them.Pick allandClearsit beside it. - Both
⚡buttons rename themselves to⚡ Generate {n} picked · {N} calls · {X} cr— or, with nothing lit yet, go dead and read⚡ Generate · nothing picked. A second line says what stays behind:{n} unpicked stay queued — they keep their turn.With everything lit it printsEvery queued sprite is pickedand then either— same spend as Allor the real numbers, because a picked set does not always pack the way the whole queue does. ✓and↺stay live. Approving a picked sprite takes it out of the queue and out of the run in the same frame;↺on a result or an approved tile queues it and lights it, and the tooltip says so before you tap.- It switches itself off when the run comes back, having spent what you lit, and a rose note under the money row says so and counts what is still queued. Leaving
Pickby hand spends nothing and remembers what you had lit for next time. Nothing about the mode is saved — reload or open another project and the shelf is back onAll. - While a run is in flight the runner is dead and picks cannot change: what that run spends is settled until it comes back.
What every call is sent with: the ⚙ drawer
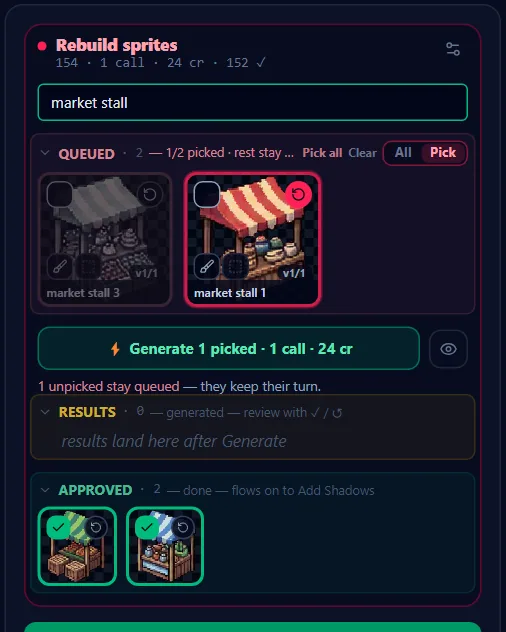
The section's ⚙ holds two settings, and both write through to every queued call so no call can disagree with what the drawer says. Finished runs are history and keep the settings they ran with.
Model— the AI model for the redraw. Each option prints its own per-image price in credits, the recommended one carries a· recommendedtag and the cheapest carries· budget; on a very wide sheet that first tag reads· recommended for wide piecesinstead. Changing it re-packs the queue to that model's capacity — calls that no longer fit are split, and calls Pixploder split itself are re-joined once there is room. Some picks then print an amber note of their own under the row, naming what the swap buys and what it risks:About 3x faster (~28 s against ~94 s), but it fails quietly more often: a sprite can come back unchanged, or redrawn as a different object.On a sheet that packs much wider than it is tall, an amber line warns when your pick is the one measured worse on that shape. It is a label and it blocks nothing: what you pick is what runs. If the server has disabled every sheet model the row readsAI model unavailable.Prompt— the one guidance sentence that is yours. Leave it empty and the queue sends Pixploder's own sentence and keeps following it when we improve it; the grayed-out text in the box is that sentence, so you can always read what will go out. Type here and this project gets its own instead, saved with it and written to every queued call.resetclears the box back to Pixploder's sentence — it does not paste a copy in, which is what would freeze the project on today's wording. A line under the box always names where a keystroke lands:Empty = the app's own sentence, greyed above. Type here for a project-specific one.orThis project's own sentence — saved with it, written to every queued call.- With nothing queued there is no call to write to, so the box is read-only and says so:
Nothing queued — the box is read-only. Greyed above is the sentence the first call will send.
Between the two sits one line that owns nothing and only points: The mask is per sprite — the violet ▨ corner on a queued tile. Toggled sprites go out as their own call.
The last line of the drawer is the boundary: Only this one sentence is yours. Everything else the call needs — the background, the cut-out edge and the see-through rules — is written around it for you, on every call. A project saved before this redesign can carry per-call settings of its own; an amber line then warns that editing here overwrites them all.
Versions: apply, compare, borrow, repair
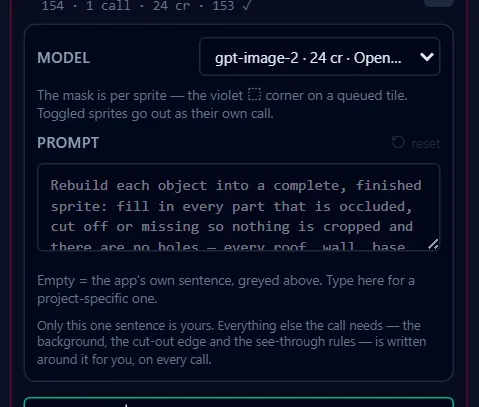
Tap a tile's picture — or click the sprite on the scene — and its version row opens under that row of tiles, headed Versions of {name} · click to APPLY · Ⓢ solo, again for the scene · 🔧 retouch, with ✕ to close it.
- Each thumbnail —
orig,v1,v2, or a cyan⧉ {source}·{version}copy — applies as the sprite's pick when clicked, and the left column stays on the whole scene with that version painted into it. The scene shows exactly one version per sprite, so clicking through a row is how you compare versions in context. An emerald ring marks the version in use, and a cyan outline marks whichever one the single-sprite view is showing. Ⓢ, the small ringed badge in a thumbnail's bottom-right corner, is the one door into the single-sprite view; press it again on the same version to come back to the scene.- The wrench badge in the top-right corner opens the repair window on exactly that version — holes, outline and color, in place and free apart from one optional AI fill. An outlined badge means there is a window here; a filled amber one means a repair is applied, and its tooltip names which. Beside it, once a fill exists, sits a small dot that switches that fill on and off. It is all on Sprite repair. A
⧉borrowed version has no badge — it mirrors the sprite it came from, so its repair belongs on that sprite's own tile, and hovering it reveals a small✕that gives the borrowed result back instead. - An amber
T{n}badge on a version means the AI rewrote, invented or wiped printed characters in it. Click it to compare, zoomed. Nothing is changed for you. + use another sprite's resultborrows any other sprite's version as this sprite's pick. It is free and it counts as an approval, so the sprite leaves the queue.↺at the end of the row regenerates just that sprite as one paid call. A🖌badge on it means the sprite has a painted zone, which aims the re-roll — the sprite still comes back redrawn. While a run is in flight it goes dead, and its tooltip ends— one re-roll at a time.
Solo: one version, big
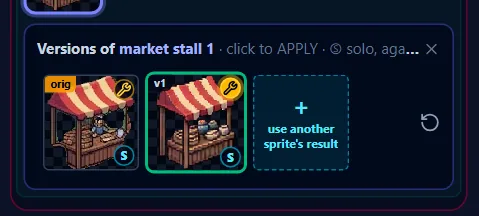
Ⓢ swaps the left column for a large, pixel-perfect view of exactly that version — never smoothed, at any zoom.
- The pill in the panel row reads
◀ Scene(back to the scene), then the sprite's name, then· {version} · applied, or· not appliedwhen solo is showing a version the sprite is not currently using. - Four backdrop swatches appear beside the zoom readout, under the group tooltip
Background under the preview; their own tooltips name themTransparent (checker),Dark,LightandBlue, so you can prove an edge against whatever your game sits on. The{NN}%button resets solo's own zoom, which is kept separate from the scene's. - Solo carries no shelf controls of its own. The sprite's tile stays live in the panel beside the preview, and that is where its
✓and↺are. 🎛in the pill opens the keyer for this one sprite's this one generation, floating over the bottom-right of the picture. It exists only on a generated version — an original cut-out was never keyed off a colored field — and it turns amber when this sprite keys that version its own way. Every change re-keys just that sprite, live and for free: the big picture, its thumbnails, the scene, and what the later steps receive. Its controls, andRun default/Apply to whole runat the foot of it, are covered on The keyer.
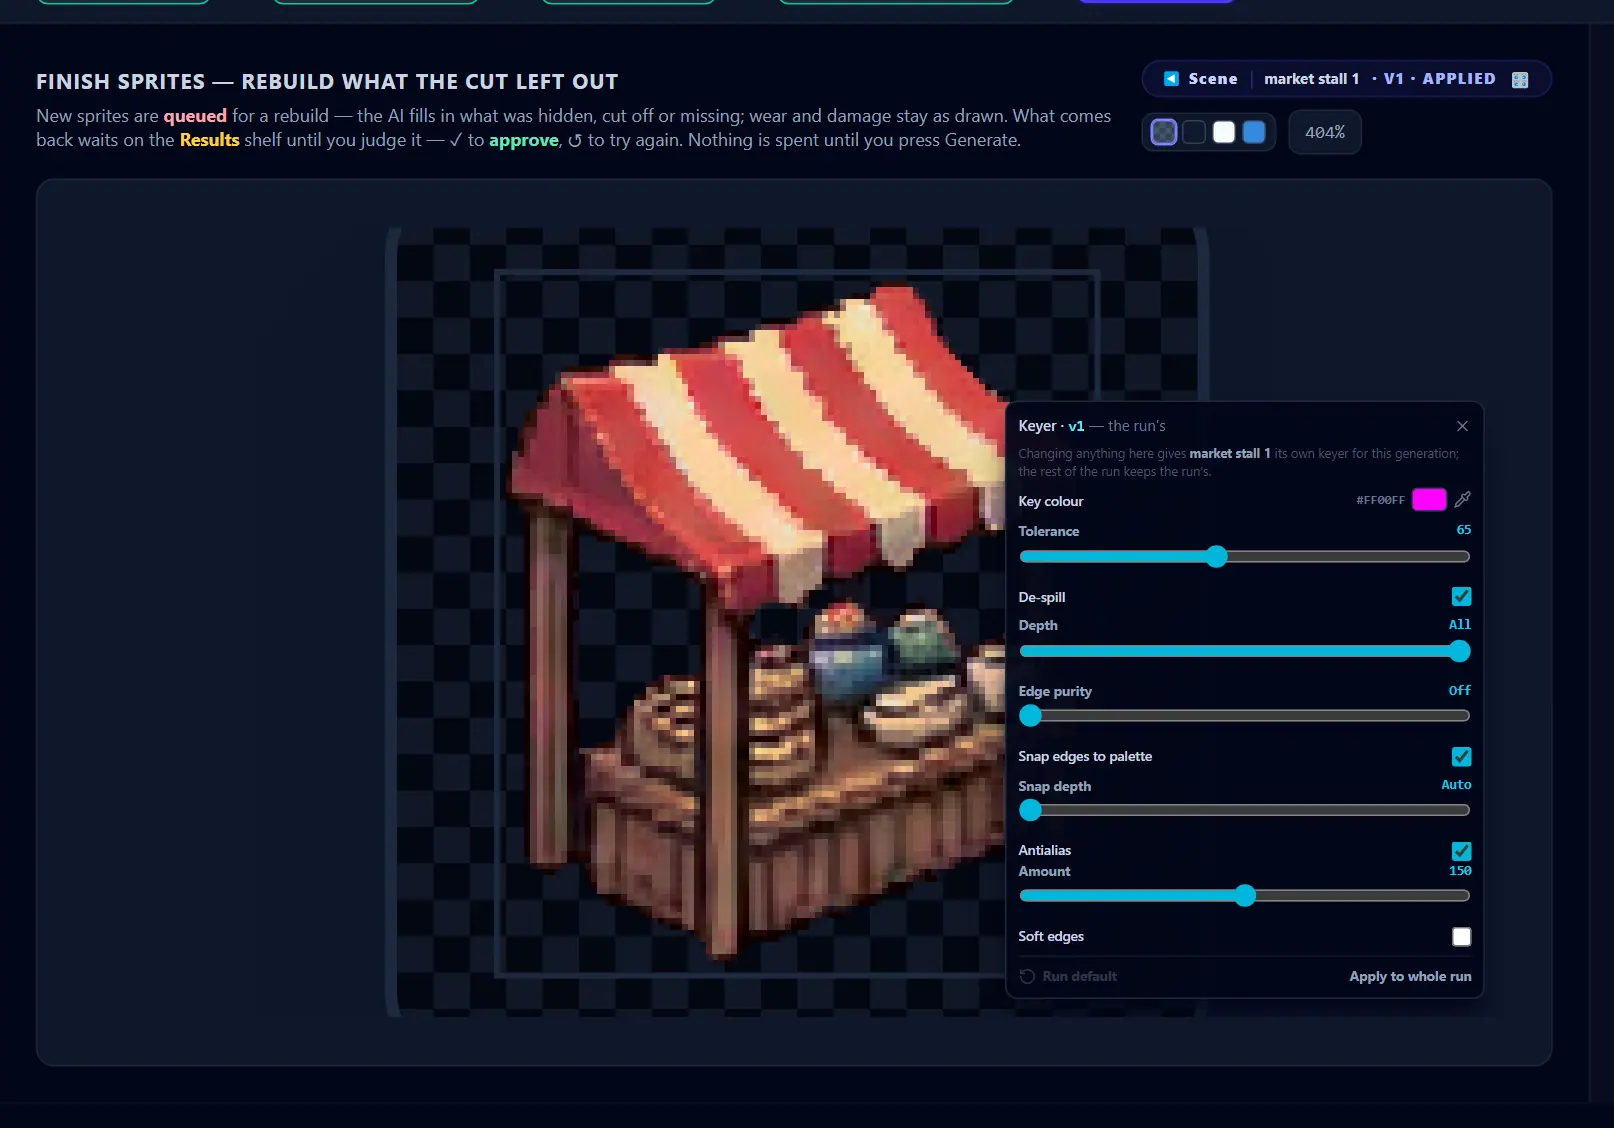
Tip. A colored fringe that shows on one result but not another was painted by the AI, not by your art. Re-keying is free and instant, so tune it after generating instead of paying for another try.
✏ Fill zones… and the ✥ frame
Click a sprite on the scene and an action pill appears under its box with three buttons: ✏ Fill zones… (with a ● when this sprite already carries a painted zone), Retouch, which opens the repair window on whatever version the sprite is applying, and Mask (also with a ● when it is on), described at the end of this section. Retouch is dim on a sprite that is showing another sprite's ⧉ result, because there is nothing of its own to repair — the tooltip sends you to the sprite it was borrowed from. ✏ Fill zones… is always clickable — on a sprite that is not queued it queues the sprite again, un-approves it exactly as ↺ would, and opens the editor in one gesture, with a short note saying so. The 🖌 corner on a queued tile is the same door.
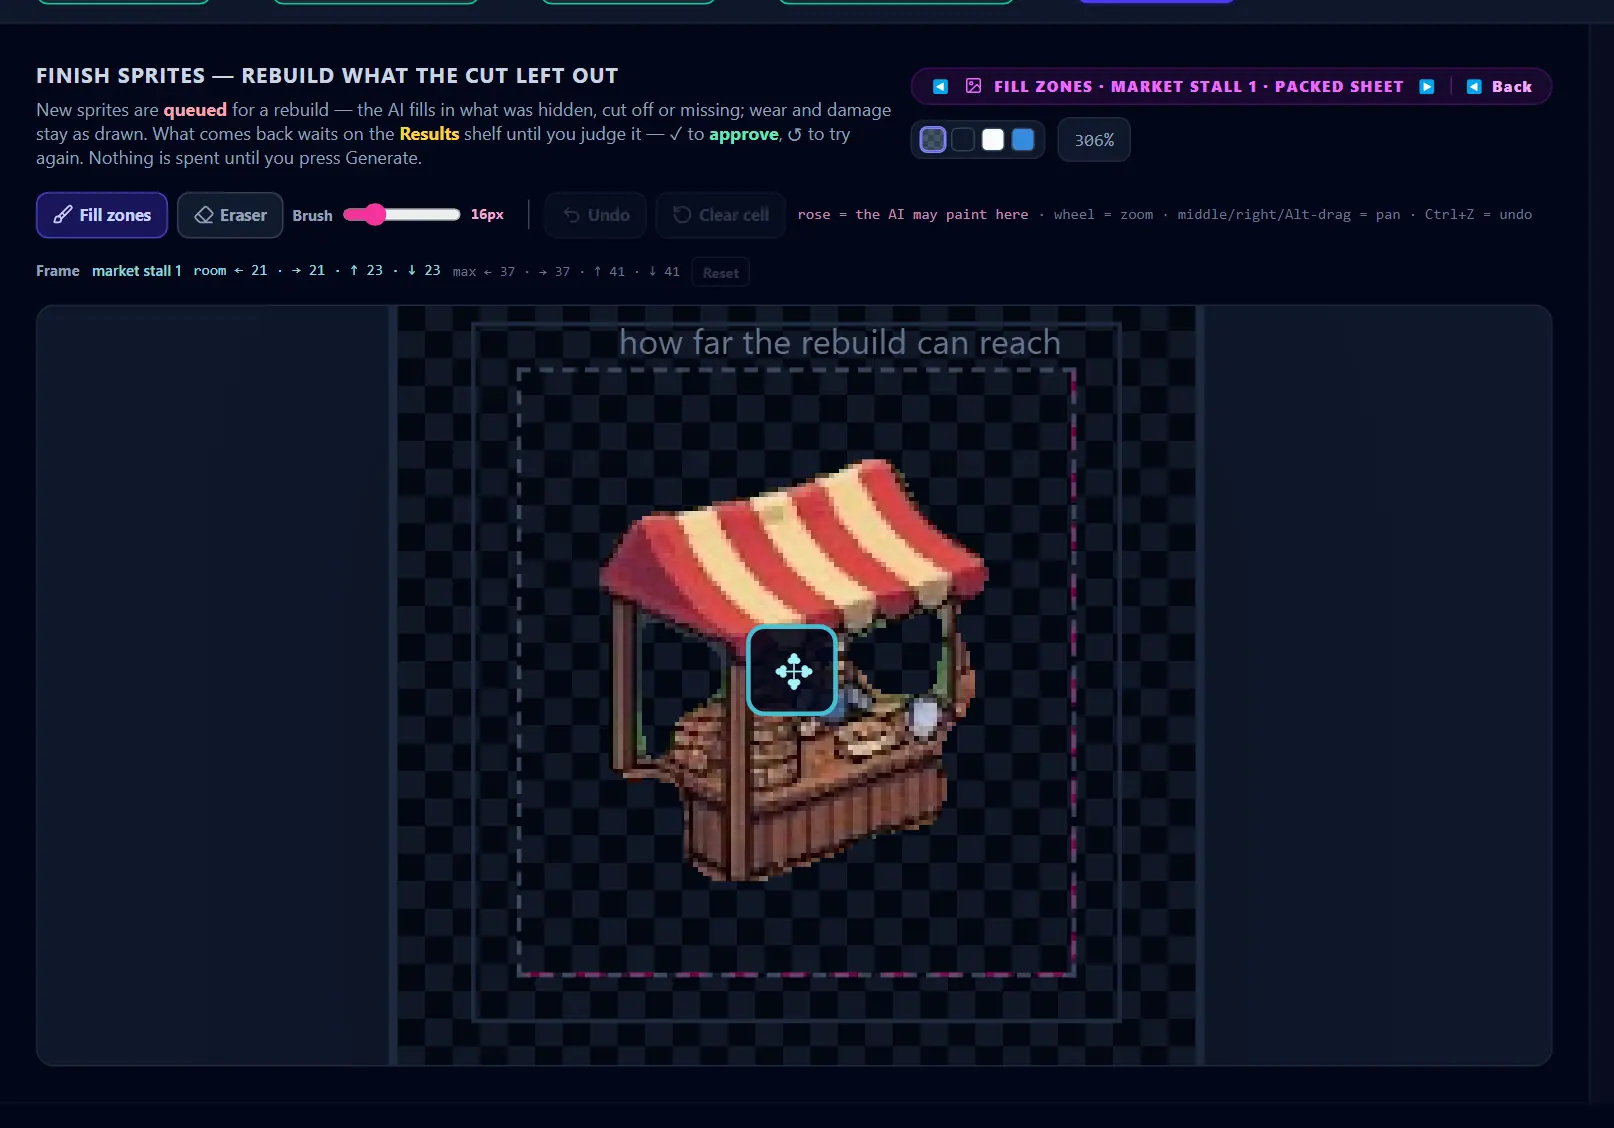
The editor replaces the left column with the packed sheet the sprite will be sent on, headed ◀ ▶ {label} · packed sheet with ◀ Back to the scene; the two arrows page through the other sheets when the queue holds more than one. Before you switch the brush on, a line under the picture says what the outlines are: The outlined boxes are each sprite's packing cell — a guide only, never sent to the AI. The editor has two jobs.
Where the AI may paint. The zone tells the AI where to rebuild, and that is all it does — the sprite still comes back redrawn. A zone aims the call; it does not fence off the pixels around it, and nothing of your original is pasted back over the result.
Fill zonestoggles painting,Erasertakes area back out, andBrushsets the size in the sprite's own pixels (2–64).Undosteps back one gesture — one stroke, or one clear however many cells it emptied.Ctrl+Zdoes the same.Clear cellclears the selected cell's zone;Clear all zonesclears the whole sheet's, and only appears when the sheet holds more than one cell.- A stroke stays inside the cell it started in. The rose you paint sits at 55 % over the normal cut-out view, and the toolbar says
rose = the AI may paint hereand· wheel = zoom · middle/right/Alt-drag = pan · Ctrl+Z = undo. Each cell that carries a zone wears a rose●.
Where the sprite sits is the other half, and it is direct manipulation — there is no rectangle to resize.
- Drag the
✥in the middle of the sprite to put it where it should sit. It follows the pointer 1:1 and stops at the faint dashed rectangle around it, which is this sprite's own cell on the sheet, labeledhow far the rebuild can reach. That boundary is as far as any rebuild goes, and the brush is clipped to it too. - The gap the sprite leaves on each side is the room the rebuild gets. The
Framerow says so live, in the sprite's own pixels:room ← {l} · → {r} · ↑ {t} · ↓ {b}. Push the sprite right and the left side gets the space, which is how a sprite cropped on its left gets its new pixels there. max ← … · → … · ↑ … · ↓ …beside it is the most one side can be granted — the cell's whole free margin, which a side only reaches by leaving the opposite side nothing. A side that is there goes amber and readsat the ceiling, and a drag that has run out of cell says which wall it is against:✥ ← at the cell wall.Resetputs the frame back on its default (+25 % per side) and the sprite back in the middle of its cell, in one click.- Three quiet lines keep it honest.
ⓘ extends past the scene— an aimed side may reach past the canvas, and the rebuilt sprite is allowed to follow it out there: layered exports keep the full sprite, while the flattened scene crops what falls outside.⚠ past the scene edgeappears instead on a side that is still centered, where that room is asked for and not granted.⚠ past the cell edgemeans the two sides of an axis together want more than the cell holds. - The editor only ever opens on a call that has not run yet. A finished run's packed picture says so instead:
🔒 Placement is locked — this sheet already generated (recut & history stay aligned). Want different positions? Queue the sprites again as a new sheet.
▨ — how a zone travels
A zone always steers the call. The ▨ toggle decides how: through the prompt and the rose overlay, or as a real alpha mask on the request itself. It is one violet control in two places — the Mask button on the action pill and the ▨ corner on a queued tile — and both are the same switch on the same sprite. It is free to toggle, and it is per sprite: the choice used to belong to a whole call, and does not any more.
- It needs a zone. Without one it is inert and says
Draw Fill zones first — the mask is derived from them.— the mask is derived from what you painted with the fill-zones brush and from nothing else. - Both states promise the same thing about the result:
The mask steers the AI, but the whole sprite is redrawn — no pixel guarantee. Off = the classic run: zones steer the AI the same way, through the prompt and the rose overlay.Nothing of your original is held or pasted back on either path. - When it is worth turning on:
Worth it on a large flat surface that had objects removed, where an unmasked run paints a phantom panel. Elsewhere the classic run is usually the safer one. - It changes the shape of the run, and therefore the price. A call cannot mask half of itself, so a sprite with
▨on always travels in a call of its own — on the section's model when that model can carry a mask, otherwise on the model a mask needs, and the violet line names which. A violet line under the money row counts it before you press —{n} sprites with the mask on leave their call and go out as {N} masked calls— and the matching card in the👁panel wears a violet border and reads· ▨ masked. WithAuto-reduce sheetsticked the split has already happened, so the same line says the sprites are packed into those calls instead. A version row's↺follows the same rule: a masked solo re-roll says so in its tooltip. - The
⚙drawer points at it rather than owning it:The mask is per sprite — the violet ▨ corner on a queued tile. Toggled sprites go out as their own call. - One case the split cannot serve, and the app says so rather than staying quiet: a one-piece call carrying
▨on only some of its sprites goes out unmasked, on the classic rose transport, because a call cannot mask part of itself.
GENERATION HISTORY
At the foot of the panel sits a collapsed disclosure, GENERATION HISTORY · {N} runs. Nothing here is needed to finish the step; it is the record and the repair kit. Every finished run is one slim row carrying its generations, the packed picture each one returned, a read-only record of exactly what it went out with, a free re-key of the whole generation, Run again on a model and a sentence you pick there, a free Re-cut G{n} for a generation that came back on the wrong flat color, and the two deletes. All of it is on Calls & sheets.
When something comes back wrong
These surfaces only exist when something is actually wrong — an untouched step never shows them.
- A failed call shows a dismissible rose notice above the section, not a pop-up. Two failures each get their own line.
- A dropout notice counts who did not come back:
{n} of {m} sprites didn't come back in {run}: …. It names two different failures — the AI skipped or mangled a sprite, or painted it in the background color so it keyed out to nothing — and ends withThey keep their previous image — generating a new variant usually recovers them.It re-counts itself as sprites are rescued by any route and disappears when the last one is back;✕only silences it early. - A run whose reply came back in the wrong shape is withheld rather than applied over good sprites, behind an amber banner with three buttons:
Use anyway(apply it after all — free, and a version-row click undoes it),Regenerate(send the same sprites again, on the same model and sentence — a new paid call that asks before it spends), andView output(look at exactly what came back, before any keying or re-cutting — offered whenever the run's own returned image was recorded). Every take is in each sprite's version row either way. - A generation the output check flagged is applied to the sprites exactly like a healthy one — there is no banner and no decision to make. The verdict survives as a quiet
ⓘnote on the run's row, in the strip cell's tooltip and in the raw-output viewer. If the result is wrong, a version-row click puts an earlier version back, and↺sends it out afresh.
Approval, and Continue to Add Shadows
Approval is the gate. A sprite reaches Step 6 · Add Shadows, Step 8 and every export when it is ✓-approved, or when nothing is being generated for it at all. A result you have not judged does not: the moment a run lands, the sprites it landed on wait here for a ✓ instead of flowing on, so what you carry into the rest of the app is only ever what you have said yes to. The moment there is nothing left to look at, an emerald banner appears under the section: ✓ All {N} reviewed — approved sprites continue to Add Shadows. It stays quiet until that is genuinely true — one unjudged result keeps it away.
Continue to Add Shadows at the foot of the panel advances to Step 6. Nothing forces you to generate anything here.
Careful. The gate only narrows what ships once there is something to judge. A project that has never generated anything and has never been approved passes everything through; the first ✓ switches the gate on, and so does the first generation nobody has judged — including one you sent back with ↺, because the sprite keeps the take until another one replaces it. From then on an un-approved sprite is left out of Add Shadows, the previews and every export. If a sprite goes missing downstream, this is the first place to look — and right after a ⚡ Generate all, with no ✓ given yet, that is every sprite the run touched. Steps 7 and 8 say so in amber when it applies, and an export refuses with the same sentence rather than handing you a file with no sprites in it.
Tip. Color that still reads slightly off on a rebuilt sprite does not need another paid re-roll. MATCH ORIGINAL in the repair window fits that version's colors back onto its own cut-out, and the bulk ◐ Match chip does the same for a whole selection — both instant, both free. See Sprite repair.