Step 6 · Add Shadows
Step 6 · Add Shadows plants your sprites on the floor instead of leaving them to float. Each sprite is grounded two ways at once: a ground shadow cast on the floor beneath it, and base shading that darkens the sprite's own lower edge where it meets the ground. Both are drawn in your browser from the sprite's silhouette, and both are stored as live parameters — nothing here ever repaints your art. Two rules run the panel: shape is per target (contacts, mode, size, tuned per shadow group or per sprite) while style is global (blend, strength, steps, set once for the whole scene, because overlapping shadows flatten into one plate). You are done when every sprite reads as standing on the ground; Continue to Final Polish then carries the shadows into Step 7 · Final Polish.
Costs. Nothing on this step spends credits, and nothing on it calls the AI. Every shadow is computed locally from each sprite's silhouette, so tuning contacts, switching shapes, restyling the scene and the live preview are all free — as often as you like. There is no AI action anywhere on this step and no button on it that can charge you. See Credits & plans for where credits actually go.
The preview and its toolbar

The left pane is a live whole-scene composite with the shadows baked in. It re-renders about a quarter-second after every edit — an updating chip appears in the top-right corner while it recomputes — and the render is capped at 1600 px on the long edge, so dragging a slider stays smooth on a big document. Before an image is loaded the pane reads No scene to preview yet.; while it builds the first frame, Rendering preview….
The preview always draws the whole scene. Selecting a group or a sprite never hides anything; it only adds outlines — a group draws an indigo union box with a faint dashed box around each member, a single sprite draws just its own box, and every sprite in a bulk set gets its own amber box, the same color the tree uses for a bulk selection.
Selection works the other way round too: click a sprite in the preview to select it, and its row in the tree on the right opens its group, scrolls into view and takes focus. Ctrl/Cmd-click adds or removes a sprite from the bulk set, and Shift-click takes a range — exactly as they do on a tree row, and the two surfaces share one anchor, so a range started in the tree can be finished on the picture. Clicking the letterbox around the image, or the panel background on the right, clears the selection; so does Esc. A pan gesture, an Alt-drag and a Compare wipe drag never change the selection.
- Scroll to zoom, and middle-drag, right-drag, or Alt + left-drag to pan — the same view gestures as every other step: the wheel zooms at the cursor from 50% up to 1000%, and the pan gesture works anywhere over the pane, letterbox included. Neither changes anything in the output.
{NN}%— the zoom readout; click it to reset to 100% and recenter (tooltipReset zoom).White bg— a preview-only aid that composites onto plain white instead of your background, so pale shadows read clearly. It changes no export.Hold: original (C)— one of two floating buttons in the top-left corner of the preview. It shows the original image — the same baseline Step 4 wipes against — for as long as you hold the button or the C key, and releases the moment you let go.Compare— the other one. It wipes between the two: the original stays left of the divider, the shadowed scene right of it, so the wipe answers what has the whole pipeline done to my picture, shadows included. Press anywhere over the image with the left button to jump the divider there, then drag it; middle-drag, right-drag and Alt-drag still pan. This is the same pair of controls Steps 4, 5, 7 and 8 carry.
Where the groups come from
Every time you open this step — and again when you reopen a project that was saved on it — Pixploder mirrors your sprite tree into the shadow tree: each top-level group becomes one shadow group, named after it and created collapsed, holding that group's leaf sprites however deeply they were nested. Standalone sprites stay in Ungrouped with no shadow until you give them one.
The mirror only ever adds. It never removes a member, never deletes a group, never renames one, and never touches parameters you have set — so regrouping in Step 3 · Find & Cut and coming back tops up the matching shadow group instead of rebuilding it. A sprite is skipped when you have already made a call about it: it is in some other shadow group, it has its own individual shadow, you deleted its shadow, or it is not approved. Disbanding a mirrored group holds as well — for the rest of your session it will not be rebuilt on the next visit.
Only approved sprites appear at all, the same gate as Preview & Export. That gate stays off while the project has nothing to review — no ✓ anywhere and nothing generated that you have not said yes to — so a scene that has never been generated arrives here whole; once it is on, a sprite missing from the tree is one that is neither ✓-picked nor sitting in no call at all. Approve it in Step 5 · Finish Sprites and it comes back. Arriving straight from a ⚡ Generate all with nothing judged yet, the tree is empty on purpose and says so: every take is still waiting for its ✓.
Shadow groups
The Shadow groups card lists every approved sprite as a two-level tree: named groups on top, an Ungrouped drop zone below, a {n} grp · {m} solo counter in the header, and a caret that collapses the whole card. Every sprite in a group shares that group's shape; an ungrouped sprite either carries its own shadow — marked with a small indigo dot, tooltip Has its own shadow — or none at all.
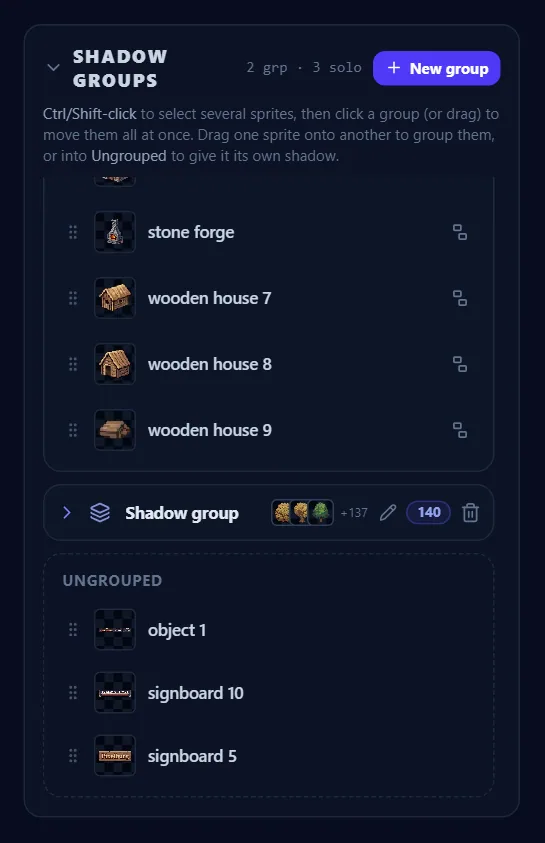
Membership is drag-and-drop plus multi-select:
New group— creates an empty group namedShadow group {n}with its name field already open, ready to rename and drag sprites into (tooltipCreate an empty shadow group — drag sprites into it).- Drag one sprite onto another — forms a new group called
Shadow groupfrom both (or from your whole selection); each sprite's individual shadow gives way to the shared one. Drop onto a sprite that is already in a group and it joins that group instead. - Drag a sprite onto a group header — joins that group and adopts its shadow. The row you are about to drop on gets an indigo ring.
- Drag a sprite into
Ungrouped— lifts it out to standalone, seeded with a copy of its old group's shadow so the look is preserved. - Ctrl/Cmd-click or Shift-click a row — builds an amber multi-selection (Shift takes a visible range; collapsed members are never included). A bar appears reading
{n} selectedandclick a group to move here, withNew group(Group all selected into a new shadow group),Ungroup(Move all selected out to Ungrouped), and anX(Clear selection). While that bar is up, clicking any group header drops the whole selection into it instead of selecting the group.Escclears the selection as well.
Each group header carries its own controls, and every member row has a lift-out button:
| Control | What it does |
|---|---|
| caret | Collapse a group to stacked member thumbnails (up to three, then +N) plus a count, or expand it to show member rows. |
| pencil | Rename this shadow group — inline rename; the name updates as you type, and Enter, Escape, or clicking away closes the field. |
| count badge | The number of approved members in the group. |
| trash | Disband this shadow group — deletes it; members fall back to Ungrouped with no shadow. |
| ungroup (member row) | Lift out of the group to give it its own shadow, seeded from the group's current settings. |
Careful. Group shadows and individual shadows are mutually exclusive. Dropping a sprite into a group discards any individual shadow it had; lift it back out to give it its own again. An empty group is allowed and stays visible (empty — drag sprites in); when every sprite is grouped, the Ungrouped zone reads every sprite is in a group.
Shadow settings
The Shadow settings card edits whatever is selected, and its title says which target that is: · Group: {name} or · {sprite}. Click a group's header row to edit the group; click a member row, an Ungrouped row, or the sprite itself on the preview to edit that sprite. A caret beside the title folds the whole card away. The states you can land in:
- Nothing selected —
Select a group or a sprite above to edit its shadow. - A grouped member —
Editing the whole {group} group — every member shares this shadow.with aDetachbutton (Detach this sprite and give it its own shadow) that breaks just that sprite out with a copy of the group's settings. The editor stays open under that banner, and every slider in it writes to the whole group. - A standalone sprite with no shadow —
No shadow yet.with anAdd a shadowbutton. - A standalone sprite with its own shadow — the full editor, plus a trash icon in the card header (
Remove this sprite's shadow) that deletes that one shadow and returns the row toNo shadow yet.For the rest of your session that stays true — the mirror will not quietly sync the sprite back into a group shadow.
Everything below is the shape half of the step, tuned per target. Each of the three sections has its own caret and starts open, so you can fold away the ones you are not working on.
Contacts
The Contacts section (where the sprite meets the ground) tunes the contact detector every shadow shape is built on. On the preview, the sprites of whatever is selected get their contact line drawn as a colored gizmo: green is a full-weight contact, amber is partial weight, red dashed is a run the gate rejected as floating — a belly, an eave, a canopy — and a faint dotted stretch means the line is only joining two contacts up across a wall or step that this shape leaves without shadow. Where the line meets a jump taller than one ground step — a table leg down to the floor — it simply breaks and resumes on the next plateau, in every color, and Fan casts nothing along that jump either: what the line does not draw, the fan does not cast. (Blob and Per-foot are pools, not lines — a pool under a merged contact can still span the gap.) The only vertical lines the gizmo ever draws are Fan's vertical shadows, and only with their checkbox on.
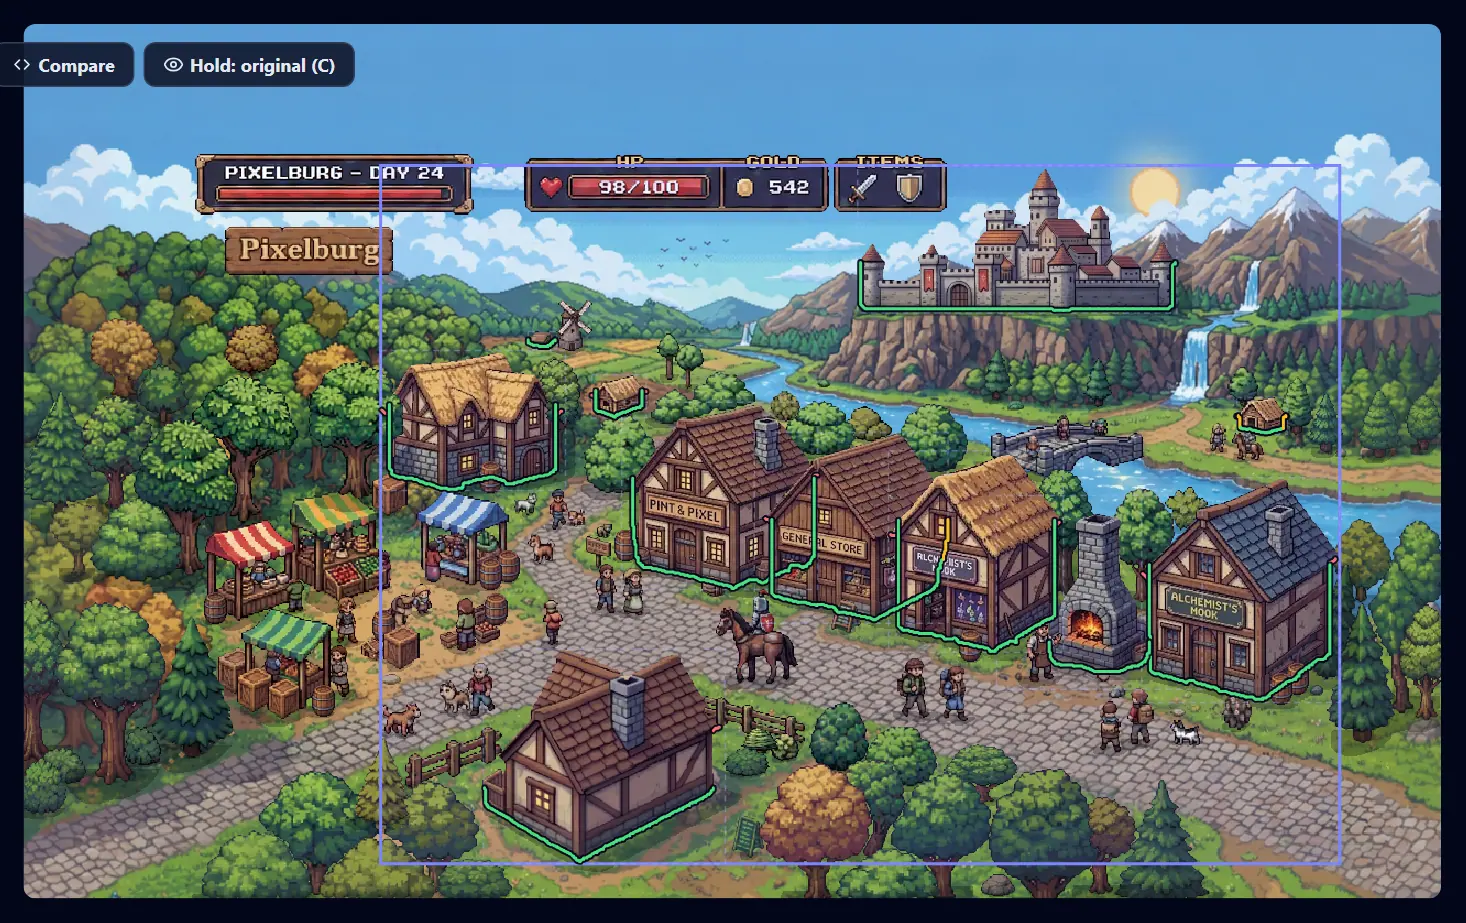
- Contacts are ground-only. The section's subtitle reads where the sprite meets the ground — there is no edge picker: the contact scan always reads the silhouette's bottom edge. The case that used to need one — a table, whose underside is all a bottom scan can see — lives at the top of
Floor band εinstead; see the two bullets below. Show contacts on the preview— toggles the gizmo overlay. On by default. It declutters the picture only: the readouts below keep measuring either way, and draggingKeeporRejectflashes the lines back up even with the box unticked.Floor band ε— how close to the sprite's lowest row still counts as touching, read as a percentage of the sprite's height from2% of heightup to200% of height. Wider treats more of the base as ground contact.- ε up to
100% of heightis the band, and it works exactly as it always has. Nothing about a sprite you have already tuned changes: every ε in that range detects the same contacts it did before the slider was lengthened. What it cannot do is take in a part that does not stand on anything — an eave, a canopy, a table's underside between its legs. WithUse vertical shadowsoff, those stay red dashed however far you push it, and the readout says so — unless you widenGround stepenough that the jump onto that part counts as a step. (With vertical shadows on, the ground rule steps aside — there the band alone decides, as it always has in that mode.) 100%to200%is new ground. Up there ε also raises how high above the base row the detector is allowed to start looking for floor — from the heightGround stepsets — so a part that never touches the ground can still count as resting on something; that is what finally reaches the tabletop underside. At200% of height, withKeepandRejectboth at their tops, every run the preview draws comes back a full green contact, and the ground rule has stepped aside entirely: at that one settingGround stepno longer changes which columns are contacts, only where the line and the shadow break. (Runs narrower than 1% of the sprite's width are the one exception, at any setting: they are too small to draw and too small to anchor a shadow, so the detector never draws them and never contacts them.)Keep · touches within— the lower gate,0.10to1.00: a column whose bottom sits within this fraction of the height above the sprite's lowest row is a full-weight contact.Reject · floating beyond— the upper gate,0.20to1.00: anything higher than this above the base is rejected as floating. Between the two, contacts fade to partial weight.Ground step— how big a step still counts as the same ground,2% of heightto30% of height, default10%, as the line under it says. One number decides three things at once: how far the detector may step while walking along the base to see what stands on the floor (that walk runs whileUse vertical shadowsis off), where the contact line breaks, and whereFan's shadow stops being cast; past ε100%it is also the base the seed climbs from (the ε bullet above). Widen it and a tall doorstep, a plinth or a stone course reads as ground; narrow it and only near-flat ground counts, so a doorstep becomes a cliff the walk will not cross.
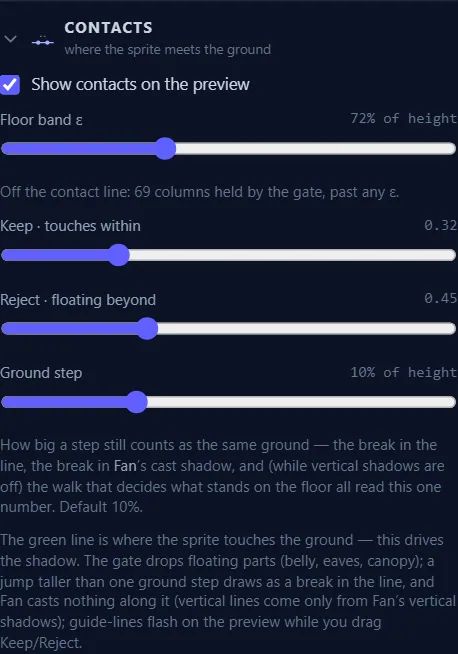
The section also writes back what it measured on the sprite in front of you, so you never have to guess which knob is holding something out. A reading only ever speaks for the current target at the current settings, and it says so in two different ways: pick a different group or sprite and the lines vanish until the new target has been measured, while moving a slider leaves them up but dimmed — and the one-click button below waits, its tooltip reading Re-measuring for this selection… — until the measurement catches up.
Off the contact line: …splits what is missing by cause — columns held byFloor band ε, columns held by the gate past any ε, and columns on parts that do not stand on the ground, which an ε past100%or a widerGround stepcan reach. When some of those sit in runs too narrow to draw, the line turns amber and offers anε {n}%button: one click widens the band to the smallest value that reaches every column it is holding.ε {n}%–100% are all the same picture at this Rejectappears once the band has grown past the point where it can change anything, so you stop dragging a slider that has nothing left to give — the band is out of the test from there to100%. Past100%ε starts working on the other half of the problem, the parts that do not stand on the ground. The line stays away whileUse vertical shadowsis on, because there ε is also setting how tall the walls climb.Neither of these is changing a contact hereappears whenKeepandRejectare inert on this particular silhouette at this ε.
Tip. Watch the preview while you drag Keep or Reject — a green line, a red dashed line, and an amber band between them flash across the sprite and fade about a second and a half after you stop, so you see exactly what the gate keeps versus drops. The detector always holds Reject at least 0.02 above Keep, so pushing it below buys nothing.
Ground shadow
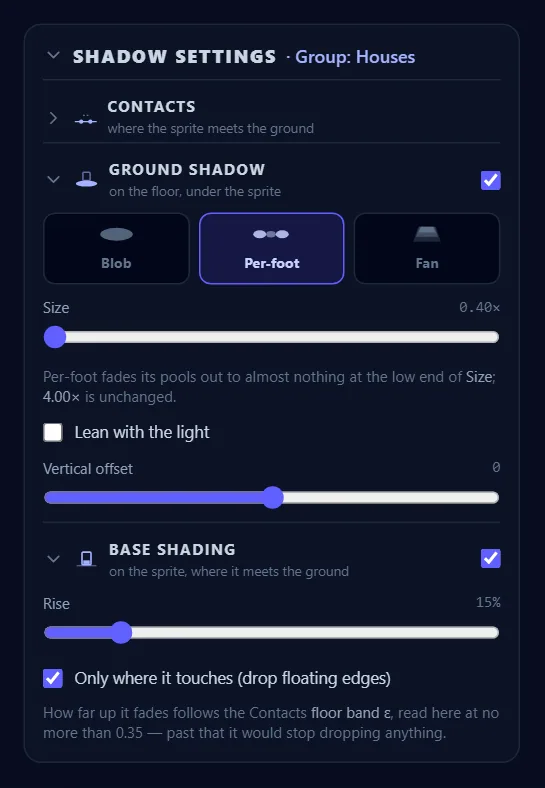
The Ground shadow section (on the floor, under the sprite) has an on/off switch in its header. Off, it reads Off — nothing is drawn on the floor under this target.; switching it back on restores the shape you switched off in this session rather than resetting to the default — and it is remembered per shadow owner, so flipping it from any member of a group brings the group's own shape back. When it is on, pick a shape and tune its geometry.
Blob·Per-foot·Fan— the shape, chosen from three icon buttons that preview what you will get.Blob(Soft ellipse under the footprint) is one soft ellipse under the whole footprint.Per-foot(One shadow per contact (feet)) pools one shadow per detected contact — per foot, per tower leg.Fan(Directional fan sweep) sweeps the contact line itself outward along the light: every feature of that line, including a porch step or a notch in the middle, opens into its own soft fan, and the posterized bands stay parallel to the shape the sprite actually stands on.Size— overall ground-shadow scale,0.40×to4.00×. OnPer-footthe panel adds a note: Per-foot fades its pools out to almost nothing at the low end ofSize;4.00×is unchanged. That remap isPer-foot's alone —BlobandFanread the slider straight.Lean with the light— shearsBlobandPer-footby the light angle for a directional cast. It is hidden forFan, which always leans.Light angle— the light direction,0°–180°, with a small arrow that rotates to match. It appears only whenFanis selected orLean with the lightis on.Fan spread— the fan's opening angle,5°–180°; wider spreads open every feature of the contact line further (Fanonly).Use vertical shadows— lets the vertical steps in the contact line cast too, so a porch wall or a plinth throws shadow sideways instead of being ignored. On by default, and offered only forFan. With it on, the contact line climbs the sprite's sides up to theFloor band εlevel, and the panel says so: raise ε to raise those walls, up to the whole sprite at 100%. That is where the walls top out — and with vertical shadows on, the100%–200%half of the slider has nothing left to act on: the ground rule that ε loosens up there is switched off in this mode, and a climb never goes above the sprite's own pixels anyway. For the same reasonGround stepcannot change which columns are contacts here either — with the ground rule off it only decides where the line and the cast break.Vertical offset— nudges the shadow up or down off the contact line,-40to+40.
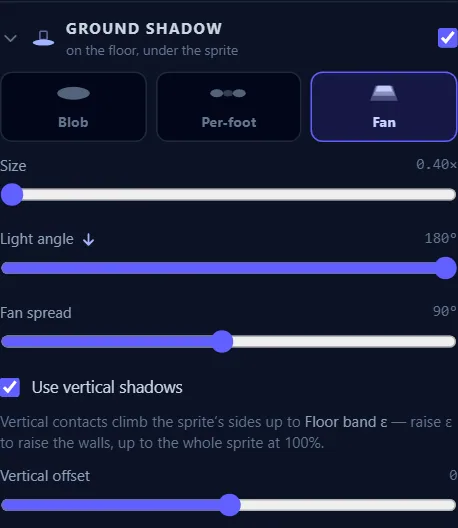
Per-foot and Fan both read from the contact line, so fixing the green line in Contacts fixes both shapes at once. Opacity and posterize levels are deliberately not here — Strength and Steps live in Style — all shadows, because the whole scene renders as one union plate.
Base shading
The Base shading section (on the sprite, where it meets the ground) paints self-occlusion onto the sprite's own lower edge, clipped to its silhouette. It has its own on/off switch — off reads Off — the sprite keeps its original colours down to the base. It is independent of the ground shadow: a sprite can have base shading with no floor shadow, or the reverse.
Rise— how far up the sprite the shading climbs, shown as a percent from5%to70%.Only where it touches (drop floating edges)— gates the shading to where the sprite actually meets the ground. Off, the whole lower edge is shaded. On, the panel notes that the fade follows the Contactsfloor band ε, read here at no more than0.35— past that the gate would stop dropping anything.
Style — all shadows
The Style — all shadows card sets one look for every shadow in the scene — ground shadows and base shading, across every group and every individual sprite, exactly as the card says: One look for every shadow in the scene (groups and individual sprites alike). Any edit here writes through to all of them, because the renderer merges everything into a single posterized union plate. As the card's footer puts it, overlapping shadows merge into one plate and, where they cross, the strongest setting wins — transparencies never stack. A caret in the card's header folds it away like the other two.
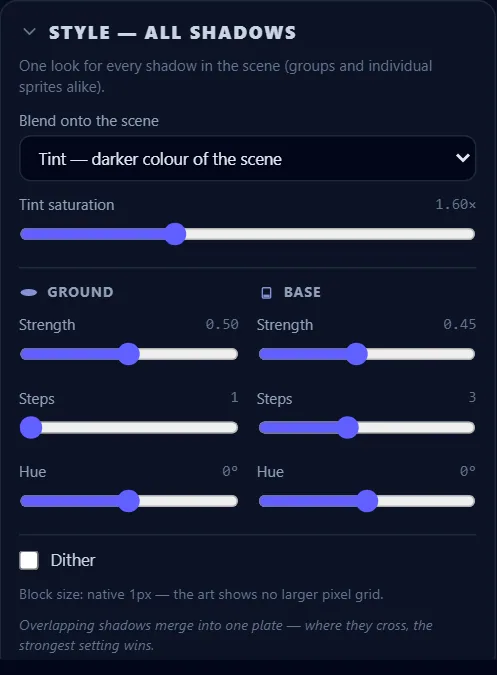
Blend onto the scene— how shadows recolor what is beneath them:Tint — darker colour of the scene,Multiply — darken, keep hue,Color-burn — deep / dramatic, orNormal — flat ink (best on dark).Tint saturation— boosts the tint's saturation,1.00×–2.80×(shown only when the blend isTint).
Below the blend, a two-column grid pairs the same knobs for Ground and Base, each column headed by its own icon:
Strength— shadow opacity,0.00to1.00, set separately per column.Steps— posterize levels,1(flat) to6, per column.Hue— a tint hue shift,-60°to+60°, per column (shown only forTint).
One more setting sits under the grid and applies to both:
Dither— adds ordered dithering at the posterize boundaries. Off unless you turn it on, and it works on its own: there is noPixelatecheckbox to turn on first.
Shadows are always drawn on the block grid. Pixploder used to offer a Pixelate switch beside Dither; it is gone, because the block grid is the posterize grid — dithering, the Steps ladder and the shadow's own pixels are one thing, and with the switch off the dither box did nothing at all. Every shadow now snaps to the block size below, and on art whose pixel cell is 1 px a block is a pixel, so the ground shadow lands exactly where it always did. Base shading is the one part that shifts even at a 1 px cell on a project that had the switch off: it used to sit outside the posterize grid and keep a smooth gradient, and it now follows the Steps ladder like everything else. And if you had ticked Dither back when Pixelate was off — where it did nothing at all — that project picks up the blocks and the dithering together on its next visit. Nothing is lost either way: both settings are still saved with the project.
There is no block-size slider — the block is your art's own pixel. Pixploder measures the pixel cell of the working document once, the moment that art is installed — an upload or a generated scene on Step 1 · Source Art, an applied Step 2 · Extend Canvas result, or a reopened project — and snaps the shadow ink to exactly that: art drawn at 2 px cells gets 2 px shadow blocks, 1:1 art gets 1 px, never more than 8. That is what makes a shadow read as part of the picture instead of sitting on top of it. Art with no pixel cell to read — a photo, a painted scene, most AI-generated art — gets the native block: 1 px, one block per document pixel. Nothing is estimated from the canvas there, because how many pixels wide a document happens to be says nothing about how big one drawn pixel is. Either way the measurement is taken on the full-resolution source art, so a ★ Repixelize output size chosen on Step 7 · Final Polish does not move it — the number this card prints is the one your exports ship, and it is the same number when you reopen the project. The line under Dither always prints it and says which of the two it read: Block size matches your art's own pixels — 2px here. or Block size: native 1px — the art shows no larger pixel grid.
A new shadow copies whatever this card is set to, so the second shadow you add already matches the first. On a project that has never touched the card, that is the shipped look: the blend on Tint — darker colour of the scene, both Strength dials at 0.45, both Steps at 3, and Dither off. Touch any control here once and the new value writes straight through in one gesture — to the template new shadows copy, to every shadow group, and to every individual sprite shadow.
Tip. You cannot give two shadows different blends, strengths, or steps — style is global on purpose, since a single merged plate could not honor per-group values. Only shape and contacts differ per target, so if two sprites need visibly different shadows, that difference has to come from Contacts, the shape, or Size.
What is stored, and how shadows reach your exports
Nothing on this step is destructive: shadows stay live parameters — the shape per group or per sprite, the global style, and nothing else — so a slider just re-renders the preview. There is no apply or bake button here and nothing to undo. Your sprite images are never repainted; the shadows are drawn on top of them at composite time, which is why you can come back on any later visit and move a slider again. All of it saves with the project: each group (name, members, collapsed state, its shadow), each standalone sprite's own shadow, and the global style template.
Shadows follow your layer order. A shadow lands on every sprite its caster is stacked above, and stays under everything stacked higher — so a table sorted above a carpet on Step 5 · Finish Sprites casts its shadow onto the carpet instead of disappearing beneath it. Reorder the stack there and the shadows re-stack with it. This costs you nothing in the panel: the merged plate above is still styled as one piece, then split so each part can sit at its caster's height, which is why overlaps still never darken twice. The preview here, the flattened 2D composite, the diorama, every packaged export and the Unity and Unreal projects all draw that same order.
They also ride along automatically into Step 8 · Preview & Export. The diorama and the flattened 2D composite show them; the layered PSD bakes each sprite's base shading into that sprite's own layer, while the ground shadows arrive as their own layers stacked in your layer order — a <sprite name> shadow layer directly beneath each caster that needs one, inside that caster's folder, and a bottom Ground shadows layer only for ink that belongs beneath everything (a scene where every shadow rides its caster has no bottom layer at all). Every export bakes the Blend onto the scene and the Strength you set here into the shadow ink, so the exported layers need no blend mode of their own and land at the same weight the preview shows. See Export formats for what each format does with them.
Note. Ground shadows are flat, and there is no projection switch anywhere on the panel — no floor-fold, no isometric variant. Projects carry a projection field, but no control in the app writes it: it starts flat and stays flat for the life of the project. The Step 8 · Preview & Export diorama keeps each shadow in its own sprite's plane for exactly that reason, so what you tune here is what every view and every export shows.
Continue to Final Polish advances to Step 7 · Final Polish.