Step 4 · Rebuild Backplate
Step 3 · Find & Cut cut your objects out of the picture and left a hole where each one used to sit. Step 4 · Rebuild Backplate repaints those holes into one clean, complete backdrop — the art behind your sprites, rebuilt in your scene's own style. The panel says the same thing in its heading, REBUILD BACKPLATE — FILL THE HOLES, THEN REFINE: stage ① rolls whole-scene takes and installs the one you like, stage ② repaints any single spot that came back wrong. You are done when the backdrop reads as one seamless scene with no ghost of a lifted sprite. Continue to Finish Sprites then flattens everything here into a single image — the plate every later step stands on.
Costs. Four buttons spend credits, and each prints its price before you press it: Generate take and + take (both roll a new whole-scene take), Generate this region (the first attempt of a new touch-up), and Regenerate this touch-up (another attempt at the same spot). The number on each of them follows what you pick in the AI model menu under Settings — today the three AI models on this step cost 10 credits per generation on the recommended one and 25 on the other two, while the two prompt-free fill methods in the same menu cost free and 1 cr. Everything else here is free: switching views, painting the masks, Grow / Shrink, Undo, Reset mask, the hole swatches, Compare, Hold: original (C), the Seat dropdown (measuring Region fit for an older take included), installing or peeking a take, swapping attempts, THIS FIX COVERS, deleting a take or a touch-up, and Continue to Finish Sprites. Pixploder asks you to confirm the spend first, and stops with a notice if you are signed out or short on credits. See Credits & plans.
Getting here, and how the step is laid out
You arrive from Step 3 · Find & Cut by pressing Confirm & Proceed, and the 4. Rebuild Backplate chip in the step bar brings you back at any time. On the first visit Pixploder seeds the step for you: a single Background layer whose picture is your scene and whose hole mask is pre-filled with the silhouettes of everything Step 3 segmented. Come back later after segmenting more objects and the mask picks up their holes too, while your own brush edits survive — anything you painted in stays in, anything you erased stays erased.
The screen is two halves. On the left, a chip toolbar over the canvas. On the right, a rail with two stacked cards — ① FILL HOLES in indigo and ② REFINE in amber — and Continue to Finish Sprites pinned at the foot.
Both cards can be open at once, but exactly one is armed: the glowing label in its header, ARMED · red brush or ARMED · amber brush, names the brush the canvas is using right now. Clicking anywhere inside a card arms that stage — arming ① jumps the canvas to Mask view and selects the Background, so the holes are in front of you, and arming ② jumps to Result, where the installed take is. A click on the header row does both jobs at once: it arms the stage and folds the body open or shut, which is what the chevron at the right end tracks.
The brush also follows what you are looking at, so you rarely need to arm anything by hand. Paint while the holes are showing and you edit the hole mask; put an installed take on screen in Result view and the brush chip relabels itself Refine brush and paints amber, the first stroke arming stage ② for you.
The view gestures match the rest of the editor, and the step's own subheading lists them: the wheel zooms at the pointer, middle-drag, right-drag or Alt+drag pans, and the 100% chip in the header resets zoom and pan in one click. See Keyboard & pointer.
Stage ① — Fill the holes
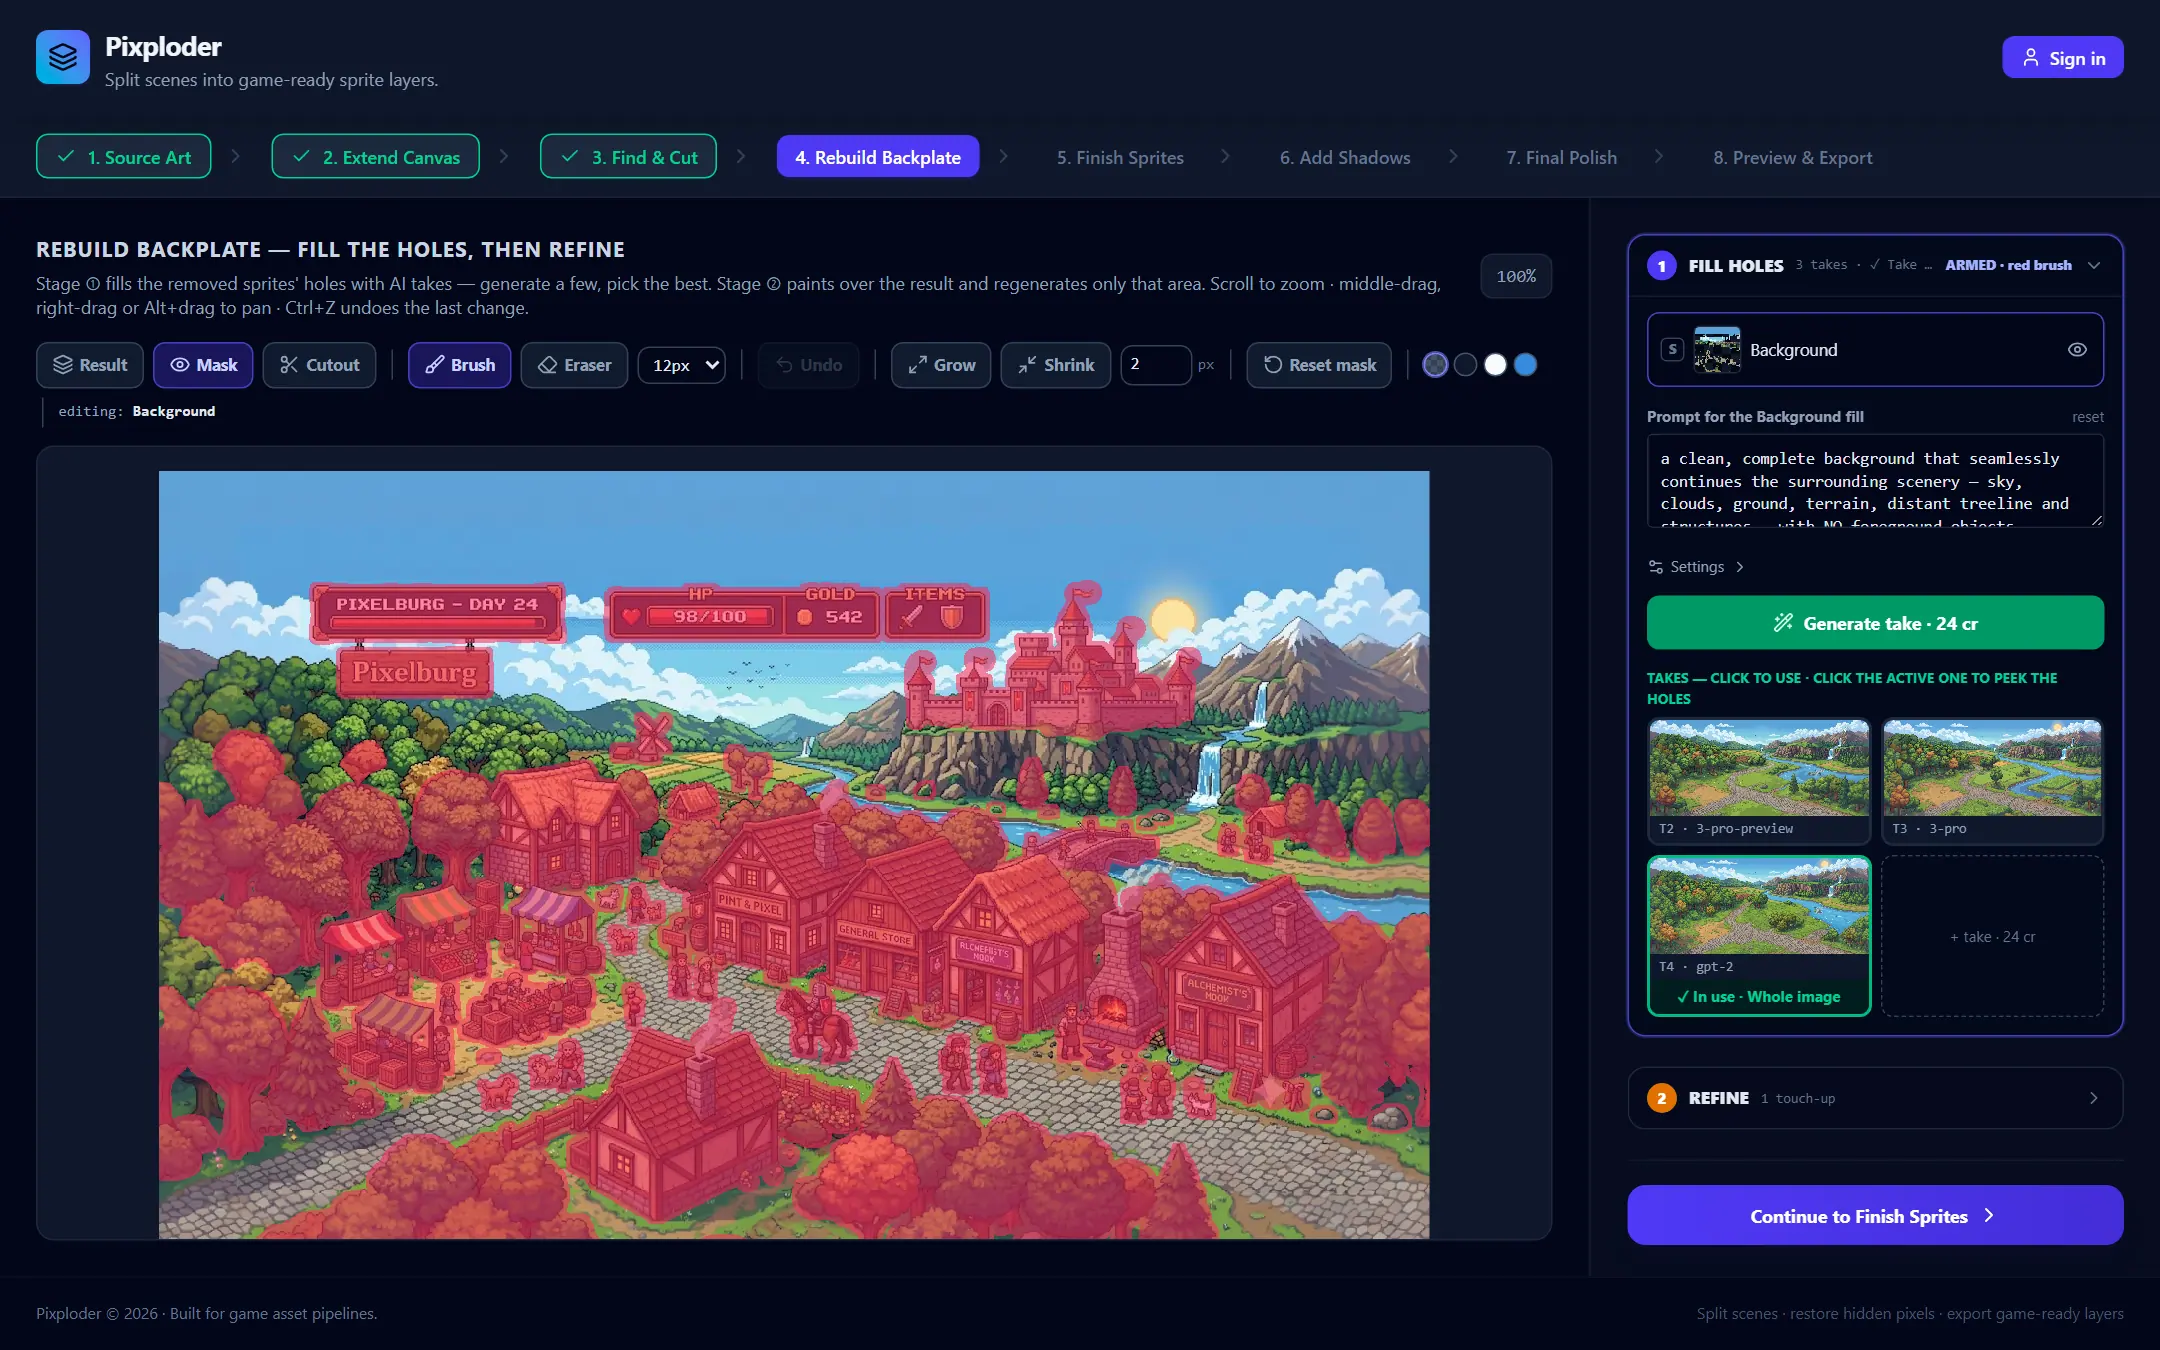
As long as no take is installed, this is the armed card and the canvas opens in Mask view, the red hole mask laid over your original scene. Everything red is a hole the AI will be asked to repaint. Come back to a step that already has a take and Pixploder opens on ② instead, with ① collapsed and the canvas in Result. The header keeps a running summary beside the title — how many takes you have rolled and which one is installed, as in 3 takes · ✓ Take 4 in use · WHOLE IMAGE.
- The
Backgroundrow — the scene layer, and the only one you cannot delete. Click it to edit its hole mask (that is what puts the canvas inMaskview); theSbutton solos it, the eye hides and shows it, and a double-click renames it. Prompt for the Background fill— the instruction sent with every take. Its default asks the AI to continue the exact surfaces, materials, lighting and colors that touch each masked area — wall continues as wall, floor as floor, shadow as shadow — in the image's own art style and palette. Edit it to steer the repaint, andresetputs the default back. Emptying the box falls back to the same default, as the placeholder says.Settings— a disclosure holding theAI modelmenu, described in the next section.Generate take · N cr— spends credits, repaints every hole, and drops the result into the grid below as a new take. Hovering it flashes the red hole mask over the canvas whenever a take is not already on screen, so you can check what it is about to fill without changing view. It readsGenerating take…while it runs, and is disabled during any generation or when the Background has no holes left to fill.- The takes grid — headed
TAKES — CLICK TO USE · CLICK THE ACTIVE ONE TO PEEK THE HOLES. Each tile carries a thumbnail and aT-number with a short tag for the engine that made it. - Click a tile to install it. Selection is installation — there is no separate apply, and the tile grows a green footer reading
✓ In use · Whole image. - Click the active tile again to peek. The footer switches to
◌ hidden — holes showand the canvas drops back to your original scene with its holes open, so you can check what the take is covering. Nothing changes underneath; click the tile again or press Escape to bring the take back. + take · N cr— the dashed tile at the end of the grid rolls another take from the same prompt. Variety is the point: roll a few and keep the best.
A freshly generated take installs itself, so the first Generate take lands you straight on a filled backdrop. Every take is rolled from your pristine scene rather than from whatever is currently installed, so takes stay independent alternatives — one bad roll can never poison the next. Every fill-holes take also carries a built-in ground rule the prompt box does not show: continue a partly visible dirt yard, path, floor or patch of gravel across the hole instead of covering it with the surrounding terrain, and never redraw one of the removed objects.
To remove a take, hover its tile and click the small red ×. That opens the Delete this background source? dialog, which shows the image, spells out that the take leaves Background sources and your saved project, notes that anything already using it keeps its own copy, and says that ↶ Undo (Ctrl+Z) brings it back — until you leave this step. Cancel backs out and has the focus; Delete goes through.
Careful. ↶ Undo (or Ctrl/Cmd+Z) puts a deleted take straight back, but only while you are still on this step — the history is dropped the moment you leave it. After that the source is gone from the grid and from the project and you can never install it again. The backdrop you already have installed survives either way, because it holds its own copy of the image.
Note. A hole the AI leaves unpainted comes through as honest transparency, never as a neon patch: Pixploder keys the untouched marker color out of every take and every touch-up before it lands. So a bad roll shows as a gap on the canvas rather than as a wrong color — re-roll it, switch what is doing the filling under Settings, or paint the spot in stage ②.
A take you install becomes the background whole: the entire frame comes from that take, so there are no interior seams at all. A take is already a complete backdrop, so there is nothing to choose and nothing to flip — installing is the whole decision. Anything you want kept exactly as you drew it is a repair for stage ② REFINE, which changes only the area you paint.
Projects made on an older version of this step can also show an EXTRA BACKDROP LAYERS (LEGACY) list at the bottom of the card. Those rows behave like any other layer — solo, hide, reorder, delete — and nothing new is ever added to the list.
The AI model menu and the fill methods
Settings is one disclosure shared by both stages: open it in ① and it opens in ②, and the choice inside applies to every paid button on the step. It holds the AI model menu, and the menu holds two kinds of entry.
- The AI models. Three of them, each printing its own price in credits — 10 on the one carrying the
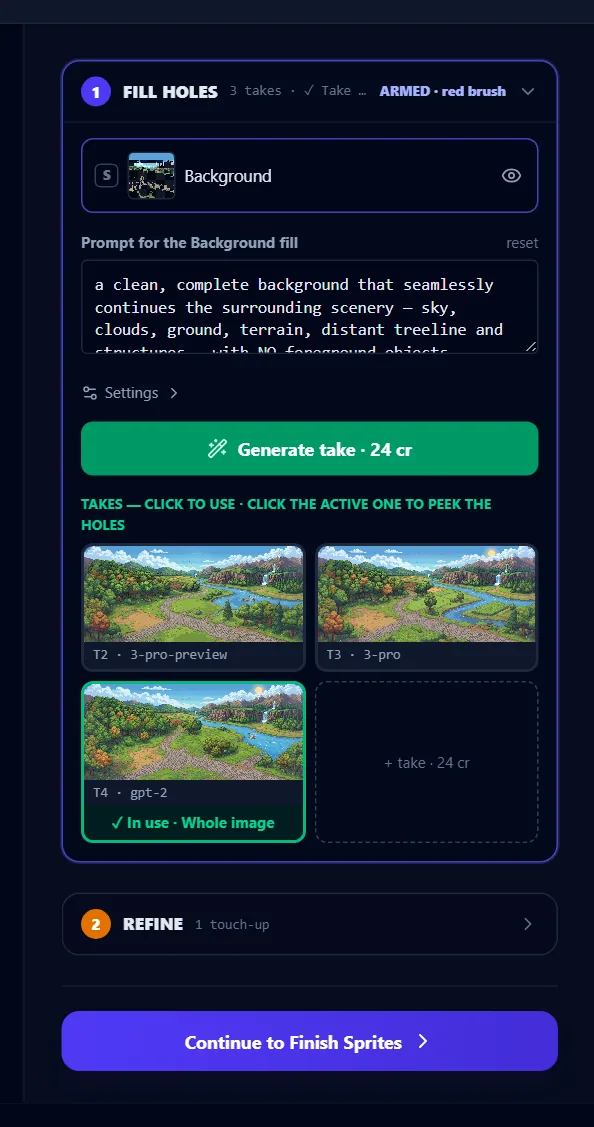
· recommendedtag, 25 on the other two. Your pick sets the number on every paid button here and is remembered between sessions. If every model for this step is switched off, the menu is replaced byAI model unavailable. Fill methods (no prompt)— a separate group at the bottom with two prompt-free repair engines.Period clone · free · instantruns entirely in your browser: no network, no credits and palette-exact, because it clones the fill out of the art surrounding each hole and never reads a hole pixel.LaMa · 1 crsends the holes to a prompt-free eraser instead of a picture generator, for one credit a roll.
Picking a fill method changes what Generate take does, not where its result goes: the fill lands in the takes grid as an ordinary take, tagged with the method's name, and installs the same way. While one is selected the prompt box grays out with the note This fill doesn't use a prompt. — it is disabled rather than hidden, so nothing on the panel moves. Choose an AI model again and the prompt comes back. The same two methods are available to touch-ups in stage ②.
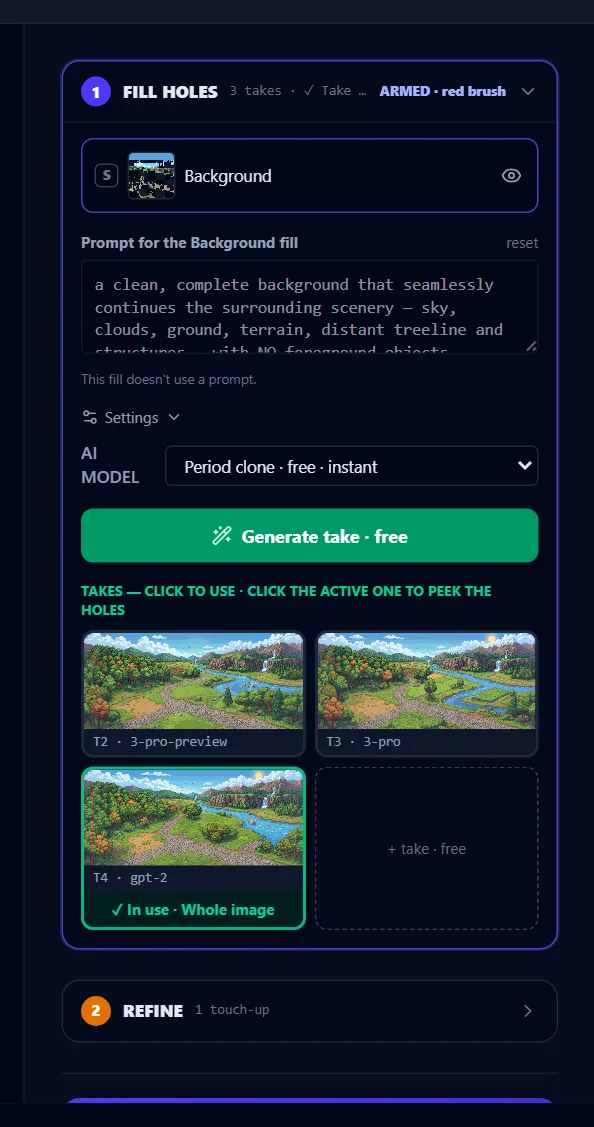
The two fill methods are opposites, and that is the point of having both. The free one is at its best where the art is flat or repeats — a wall, a floor, sky, a tiled path — and honestly bad on unique detail. Roll one of each and keep whichever tile looks right; a take that misses costs you nothing but a click to delete. Both have one ceiling the AI models do not: on a canvas larger than four megapixels the run stops before it spends anything, with a notice reading This canvas is too large for this fill method — use one of the AI models for it.
Some AI models also offer a Send real mask checkbox directly under the menu — it appears only for those models, and it goes away again while a fill method is selected, because a fill method never sends a mask anywhere. It changes only how the holes are described to the AI — a real transparency mask instead of the holes being painted over in a flat marker color — and nothing else: same model, same price, and the take still installs whole. A take rolled that way is named with a · mask suffix, which the ① header shows while it is in use.
Seating a reply back onto your original is not something you decide before the roll, and there is nothing for it under Settings. It happens on every AI take, and you judge it afterwards on the tile. A returned take is almost never seated exactly where the scene was: it can come back nudged sideways, a whisker wider or taller, or with some details redrawn a few pixels away from where they were. Pixploder measures the reply against your original and puts it back, always by moving whole pixels of the reply itself — nothing is blurred or softened, and nothing of your original is pasted into the take. The tile in use carries a Seat dropdown under its ✓ In use · Whole image footer, with three choices:
| Choice | What you see |
|---|---|
Region fit | Each area of your picture is seated on its own. Pixploder splits your original into areas along its own color edges and lets each area find the small shift that puts the reply back over it, so a detail the AI redrew a few pixels off lands where it was, and a straight line inside one area stays straight. The whole-frame fit is always one of the options, and an area only gets a shift of its own when that clearly fits better. |
Whole frame | One slide and stretch for the entire take: how far the reply moved and how much wider or taller it came back, undone as a whole. |
Off | The take exactly as it arrived. |
Wherever a seat pulls the picture in from an edge, the outermost row of pixels is repeated to fill the sliver. The choice marked · recommended is the one that suits the AI model that made the take, and a new take starts on it: today, takes from the 10-credit model start on Whole frame, because that model's replies move as a whole, and takes from the two 25-credit models start on Region fit, because those redraw details slightly off in different places. Hover the dropdown and the tooltip describes all three, the one in use first; for Whole frame it spells out what moved — how far the frame slid in pixels and how much it was stretched in percent.
Switching is free and you can always switch back. All three versions are drawn from the one frame the AI returned, so nothing is generated again and no credits are spent; the choice belongs to that take alone and is saved with your project. The quickest way to judge is to hold C to flash your original, switch, and hold it again: details that jump are the ones the seat did not catch. Region fit does need a measurement of its own, and a take that never had one — a take that started on Whole frame, or one made before Region fit existed — is measured the first time you pick it: the label above the dropdown reads Measuring… for a few seconds, then the take switches. That costs no credits either, but it saves one small extra file with your project, which counts toward your storage. It is measured against the Background's hole mask as it is at that moment, so if you have edited the holes since the take was rolled, the measurement follows your new mask. If your storage is full, or the measurement cannot be made, the take keeps the seat it had and a notice says so.
Two things to know while you compare: the small thumbnail on the tile always shows the reply exactly as it arrived, so it is the canvas beside it that changes when you switch, not the tile; and if you go back and extend the canvas, every take is re-saved the way it looks at that moment and the dropdown retires, because the other versions no longer exist to go back to. The dropdown is absent when there was nothing to seat, and on a take from a fill method, because those repair the picture you already have and never hand back a re-drawn frame.
The canvas toolbar
A single row of chips sits above the canvas. In stage ① it carries the full mask-editing set; every control here is free.
| Control | What it does |
|---|---|
Result · Mask · Cutout | Switch what the canvas shows: the composited stack as it really looks, the red hole mask over your original scene, or the selected layer alone with its holes punched over a color swatch. Mask and Cutout exist in stage ① only. |
Brush · Eraser | Paint the hole mask. The brush adds a hole, the eraser takes one away and keeps those pixels. Over an installed take the brush relabels itself Refine brush and paints amber instead. |
| brush size | A menu of ten fixed sizes from 1px to 50px. A ring on the canvas previews the size you picked, and it scales with the zoom. |
Undo | Steps back through everything this step can throw away: one entry per brush stroke, a Grow, a Shrink, a Reset mask, a deleted touch-up, a deleted take. Its tooltip names what is next in line, as in Undo: delete take. It holds twenty-five steps, it is in the toolbar in both stages, and it clears the moment you leave the step. Undoing a mask edit while you are in stage ② puts you back in stage ① with the holes showing, so you can see what moved. There is no redo. A generation arriving is never on it — only deleting one is, so undo can never quietly spend or discard credits. |
Grow · Shrink · px | Dilate or erode the whole mask of the selected layer by the number in the px field beside them, from 1 to 64. Useful when a silhouette is a pixel or two tight and leaves a rim of the old sprite behind. |
Reset mask | On the Background, restores the silhouettes Step 3 detected, discarding your own strokes. On any other layer, clears the mask to no holes. |
| hole swatches | Four unlabeled dots — Transparent (checker), Dark, Light, Blue — set what shows behind the holes in Cutout view. Clicking one takes you to that view. |
editing: | Not a control, a readout: it names the layer your brush is currently landing on. |
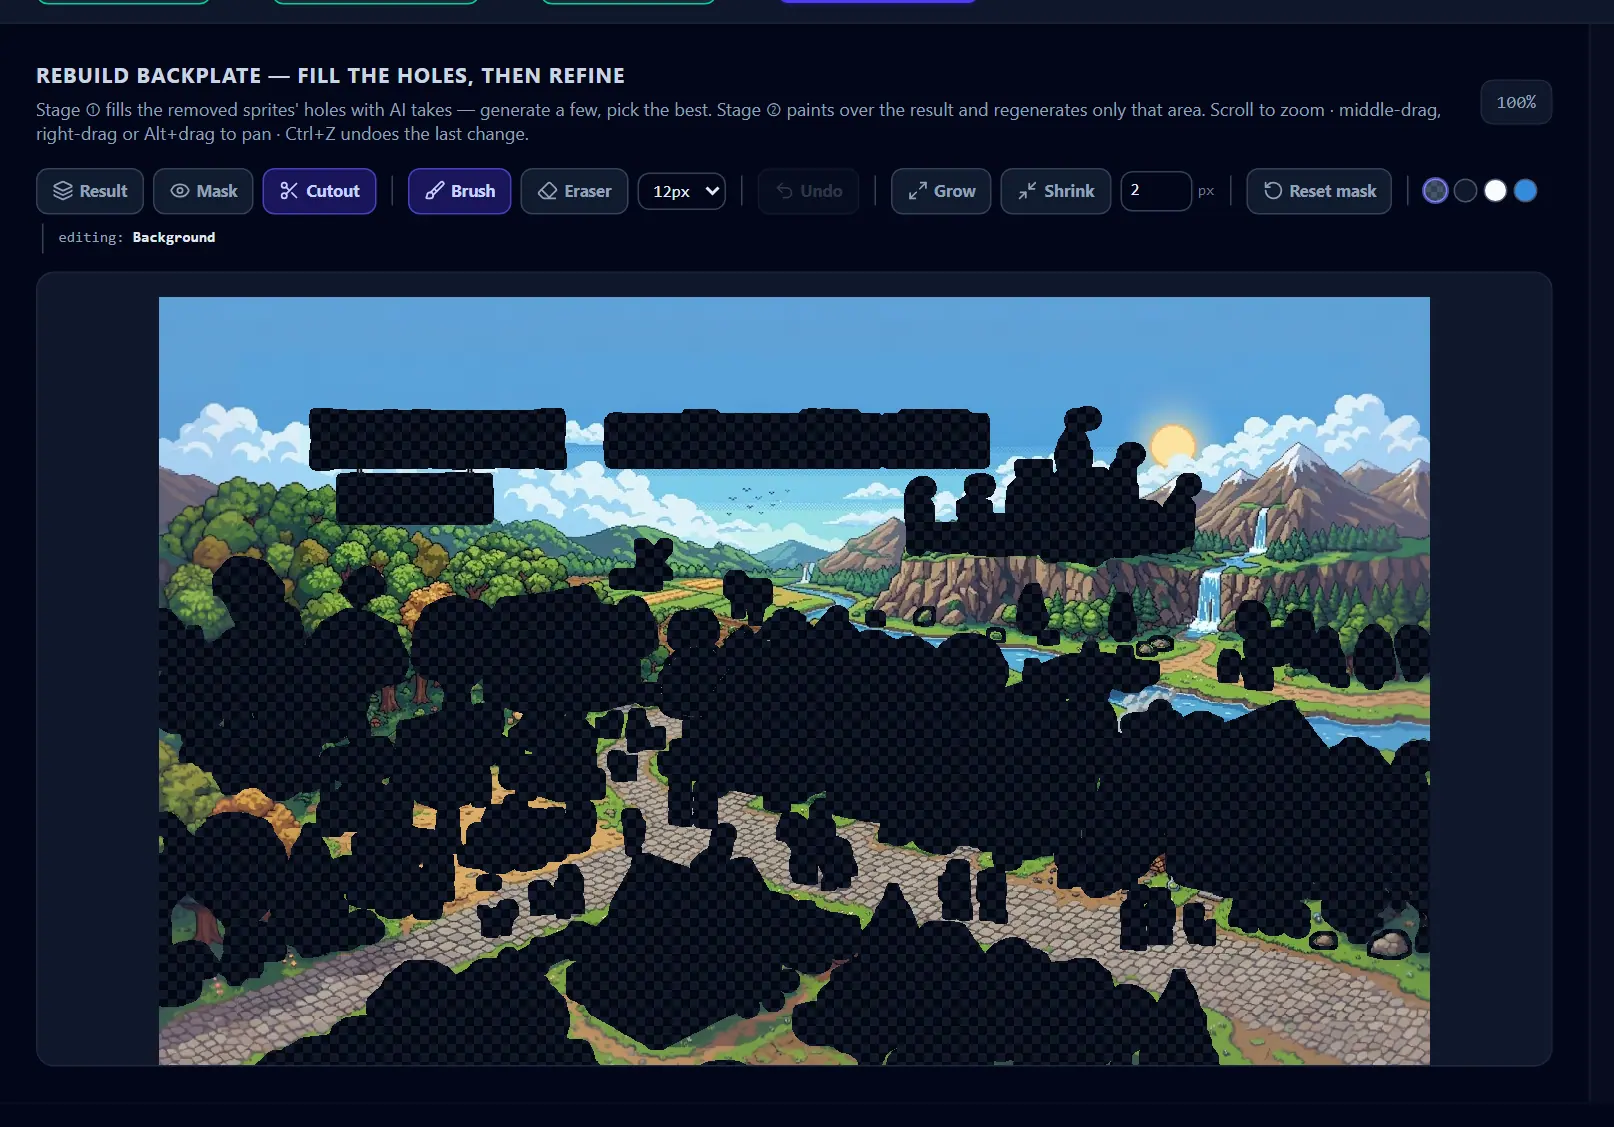
Switch to Result and three buttons float over the top-left corner of the canvas. Back to mask returns you to editing the holes (stage ① only). Compare drops a wipe divider between your original scene and the rebuilt backdrop — press anywhere over the image to jump the divider there, then drag. Hold: original (C) flashes the original for as long as you hold the button, or the C key.
In stage ② the toolbar shortens. The view chips collapse to Result, and the whole mask-editing group — Grow, Shrink, the px field, Reset mask, the swatches and the editing: readout — is replaced by one New region button. It clears the amber mask, drops the current touch-up selection and opens a fresh empty one — exactly what + new region in the rail does. The Refine brush, the Eraser, the size menu and Undo stay (a deleted touch-up is undone from here as often as from ①), a reminder sits at the end (paint what to redo — the next fix replaces ONLY that area), and on the canvas only Back to mask disappears: Compare and Hold: original (C) remain.
Stage ② — Refine a spot
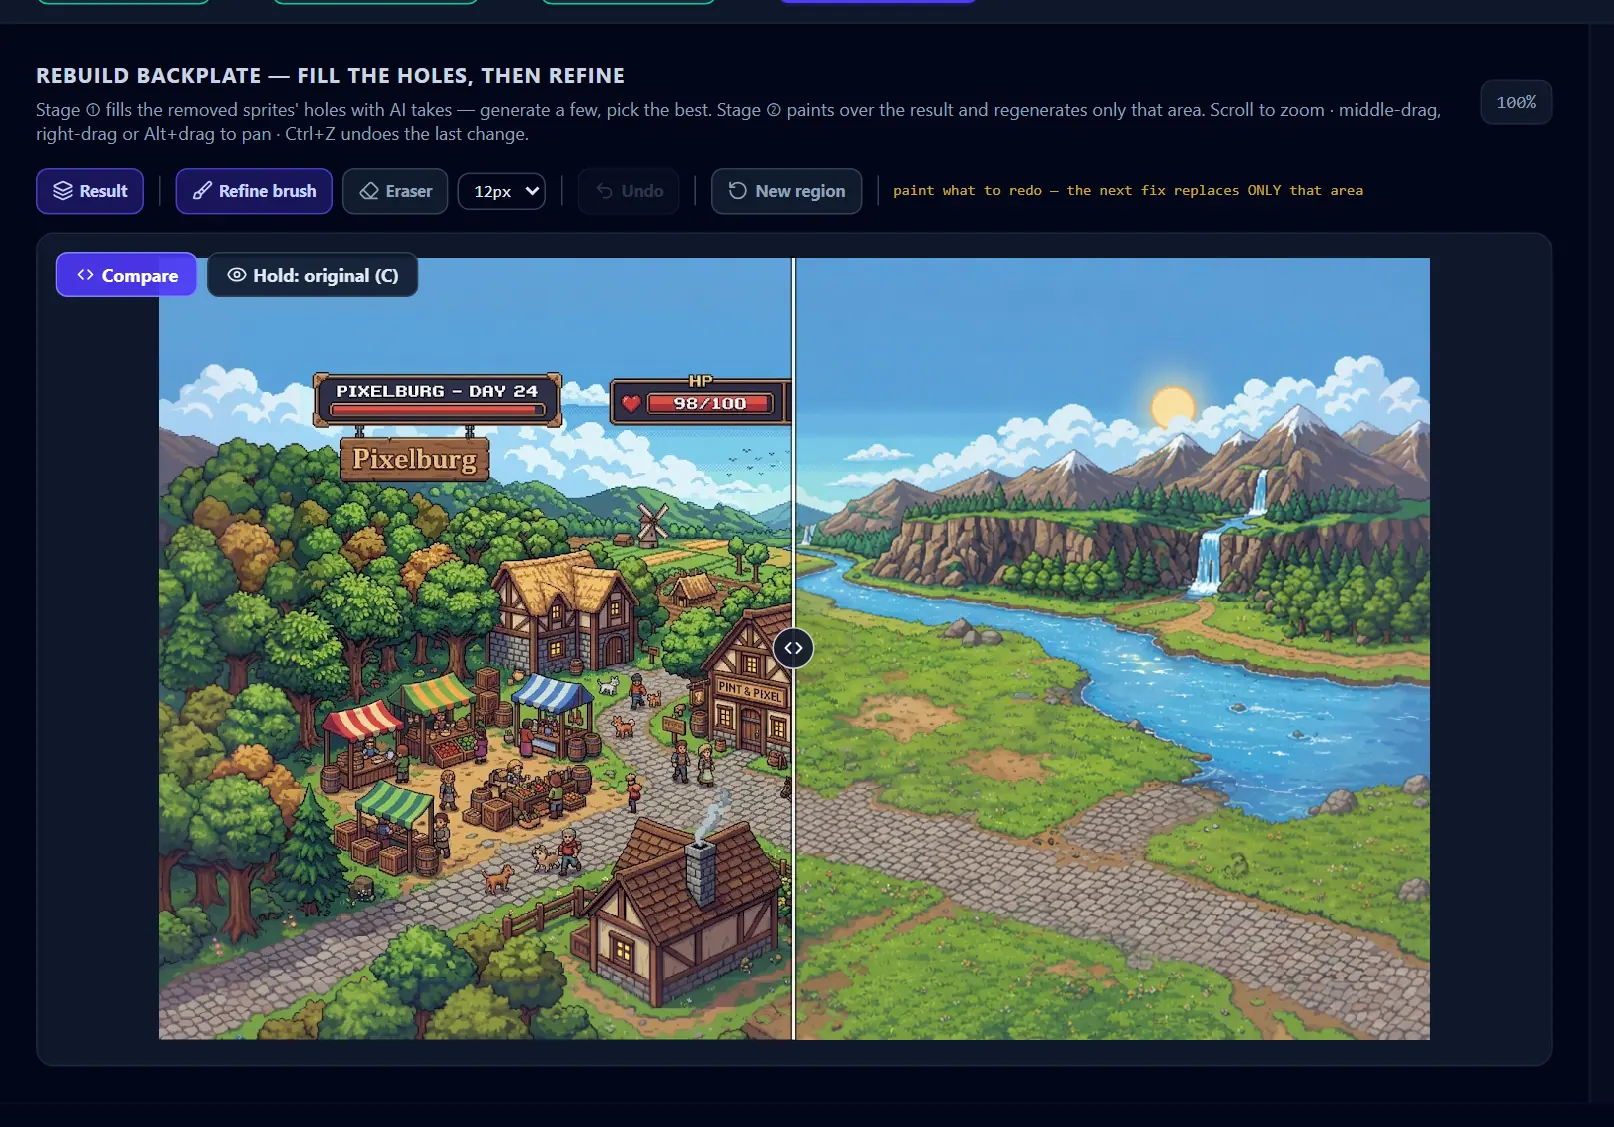
The amber card stays grayed out and reads locked — pick a take first until a take is installed; after that its header carries a running count of your touch-ups instead. Once a take is in, this is where you repair a single area instead of paying for a whole new scene. Each repair is a stacked touch-up with its own prompt, its own attempts, and its own coverage — and only the amber area ever changes, so a failed attempt simply leaves that spot as it was. A touch-up is filled from what you can currently see, not from the untouched scene, so it repairs the take you installed. Until you have made one, the card holds a single line telling you how: press + new region — or just paint on the canvas — to make your first fix.
+ new region— opens a fresh, empty touch-up section, namedTouch-up Nwith a· newtag. You can skip it: the first amber stroke on the canvas opens one for you.- Paint the area on the canvas. The new section's header tracks you, reading
paint the area…and thenregion painted; its✕discards the draft. - Write the prompt in the section's text box — describe what should be there. Left empty it falls back to a sensible default, as the placeholder shows.
Generate this region · N cr— spends credits and makes the touch-up's first attempt. It stays disabled until you have actually painted something.- The finished touch-up becomes a row:
Sto solo it, a thumbnail, its name and· 2 attempts(double-click the name to rename), the visibility eye, up and down arrows once you have more than one, a trash button on hover (↶ Undobrings the whole touch-up back, attempts included), and a chevron. Click a row to open it — its amber region reappears on the canvas and the header notesregion on canvas. Regenerate this touch-up · N cr— another attempt at the same spot, including any brush edits you just made to the amber region.Attempts— a thumbnail per attempt, appearing once there are at least two. Click one to make it the shown result; the counter beside them reads#2 shown.THIS FIX COVERS—Region ★means only the painted clip changes and everything else stays pixel-locked;Whole imagemeans this attempt's full frame replaces the entire backdrop, covering everything below it. Flipping is free and never regenerates anything, and the line beside the switch confirms which you are on —only its region changesorreplaces the entire frame.Whole imageis grayed out for attempts made before the option existed — regenerate once and it lights up. A new attempt always lands asRegion ★, so a touch-up you had flipped toWhole imagesnaps back when you re-roll it.
Touch-ups are listed in the order you made them, and the header says how they stack: TOUCH-UPS · LOWER WINS OVERLAPS. The up and down arrows move a row through that order when two regions overlap — up paints earlier and loses them, down paints later and wins them.
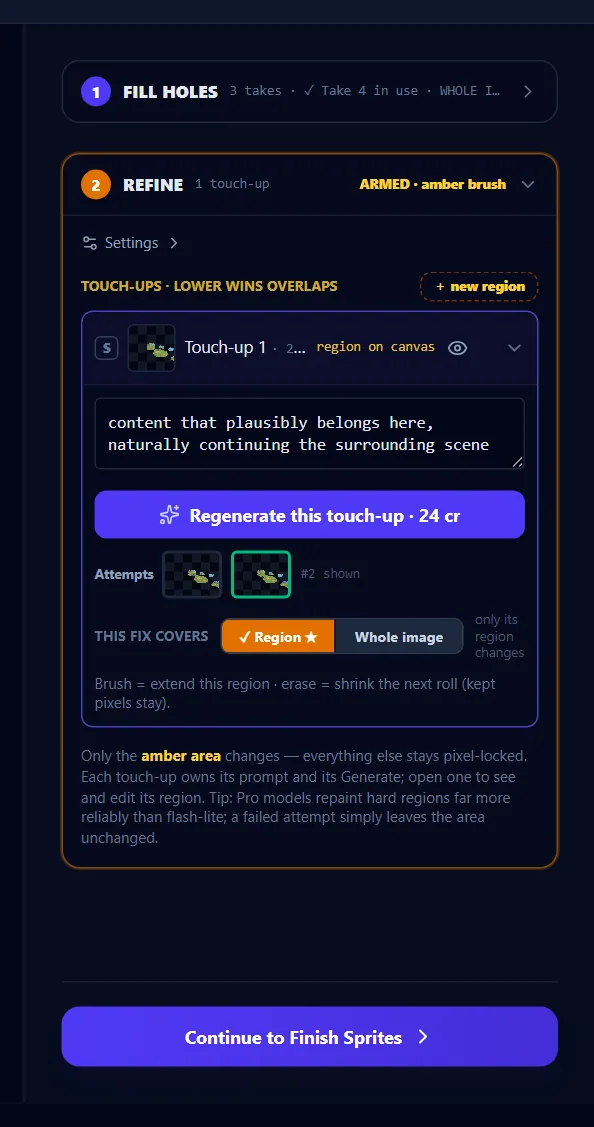
Tip. The brush extends a region and the eraser shrinks what the next roll will touch — pixels an earlier attempt already generated outside the new region are kept. So re-rolling with a smaller region polishes one detail without re-exposing the original underneath. The section says it in one line: Brush = extend this region · erase = shrink the next roll (kept pixels stay).
If an attempt comes back with most of the painted area still unfilled, Pixploder says so in a notice rather than letting it look silently broken, and suggests a more specific prompt before you re-roll.
Continue to Finish Sprites
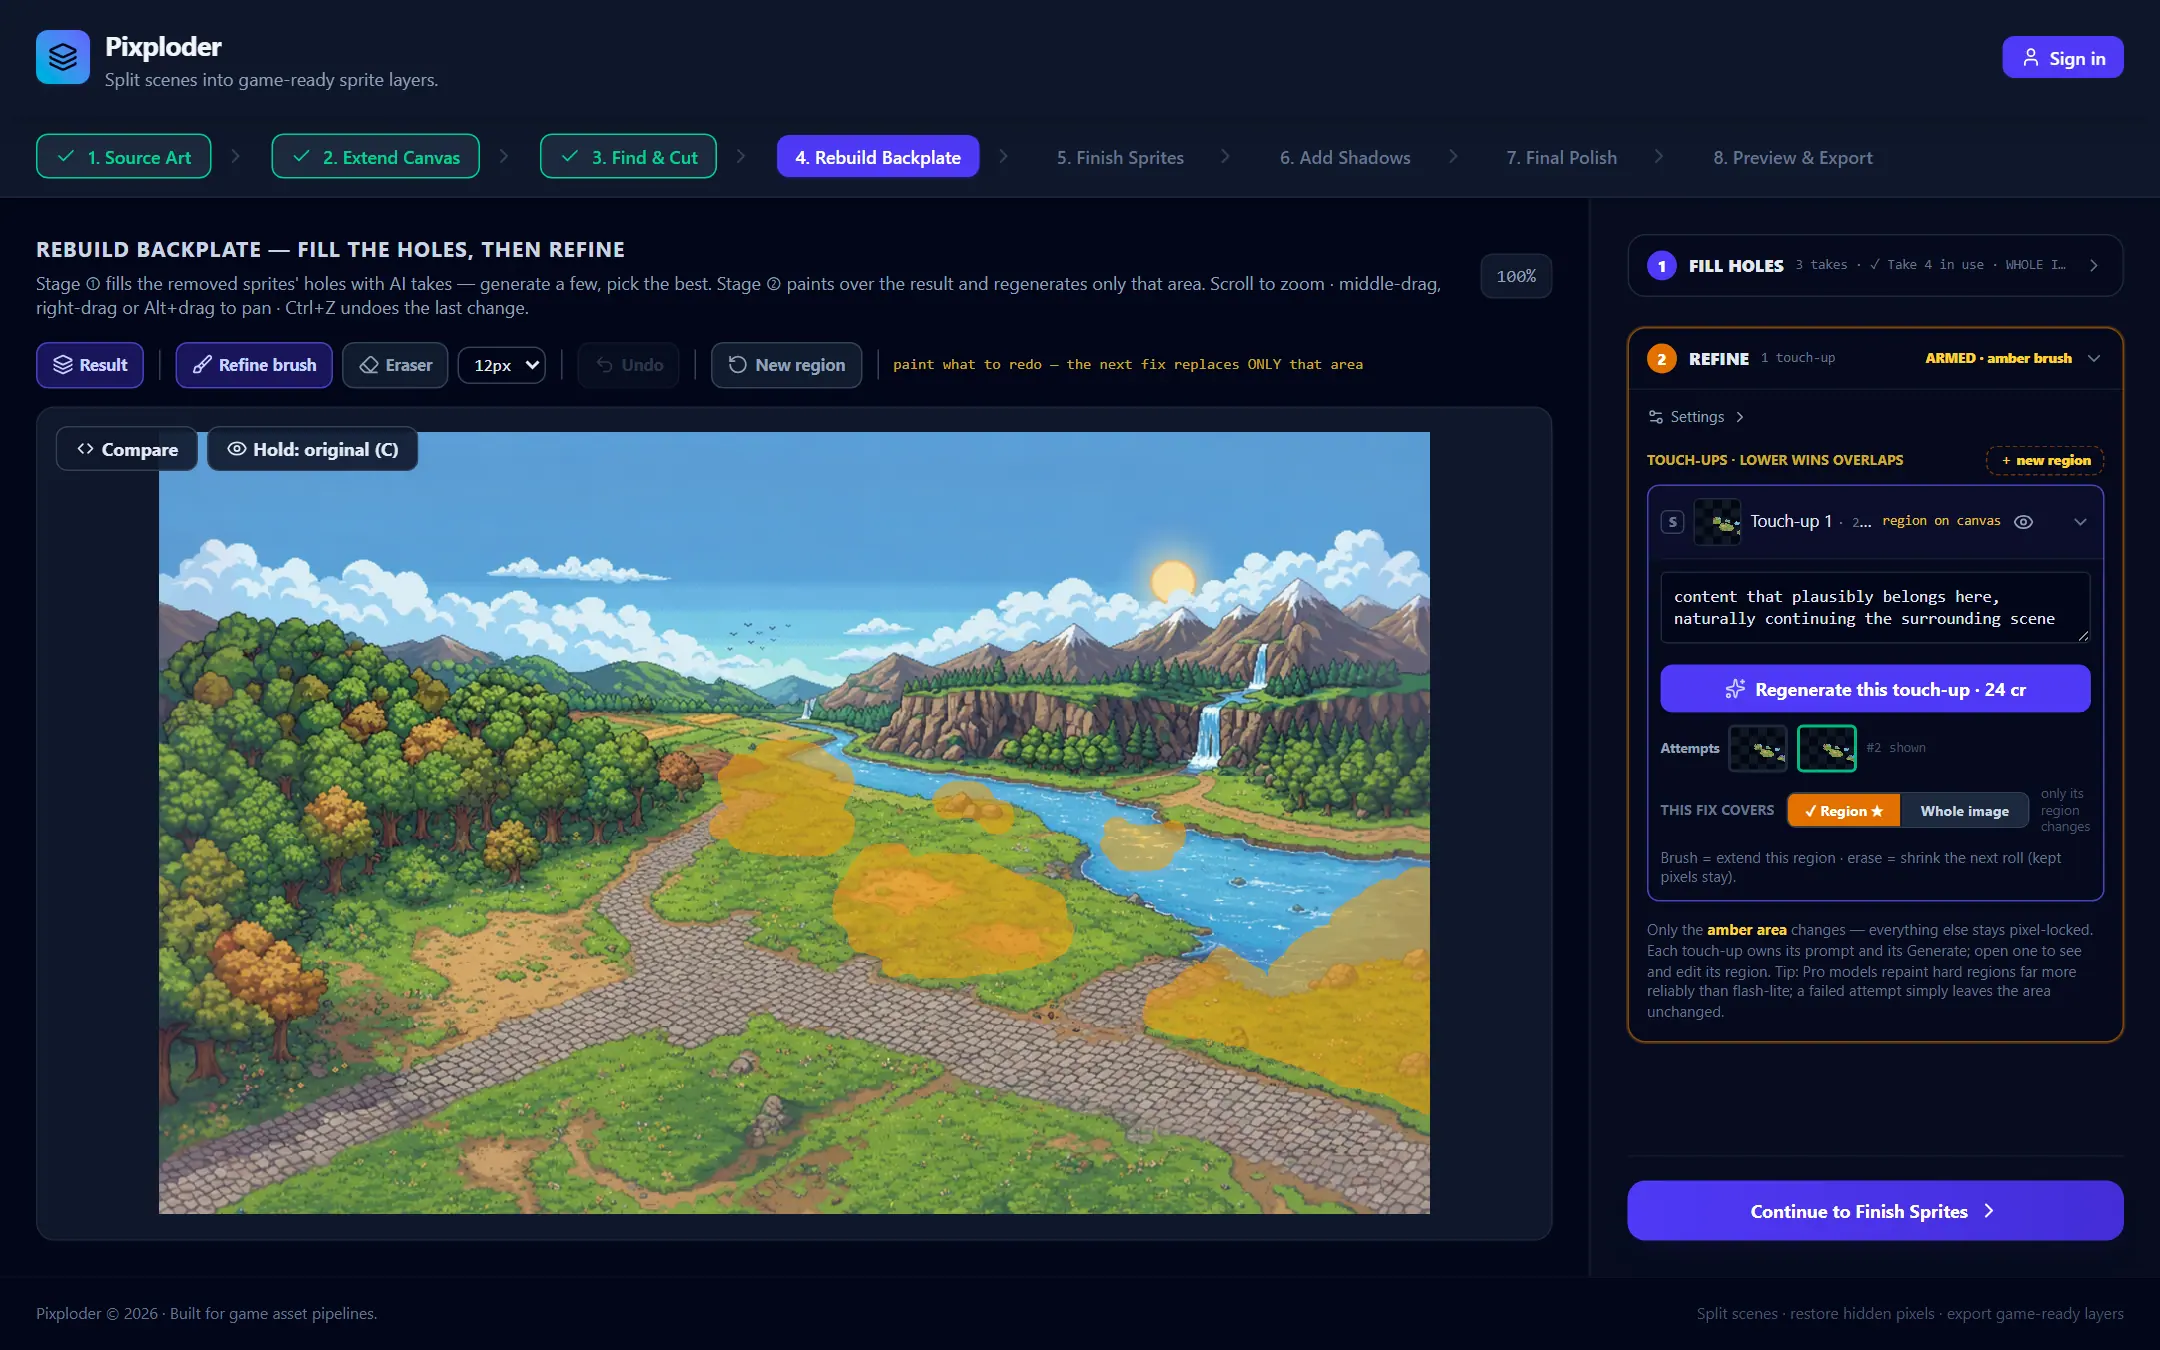
Everything on this step — the Background, the installed take, and every touch-up — is a layer in a stack that belongs to this step alone. Continue to Finish Sprites flattens that stack into one background image and moves you to Step 5 · Finish Sprites. That flattened image is not just a preview: it is the plate the next step paints your sprites onto, and the one every later step, every shadow and every export builds on. A weak fill here shows up under every sprite later, so it is worth one more take.
You can leave and come back as often as you like. Your brush edits survive, the takes stay in the grid, and anything you segment afterwards punches a fresh hole for you to fill.
Note. Nothing downstream repaints this backdrop for you, so a seam you can see is a seam to fix here in ② REFINE. The plate is also what every later step reads: the Step 5 scene, the shadows, both Step 8 previews and every export are all drawn on it. Whatever you leave here is what the rest of the scene sits on.