Features overview
Pixploder is one editor with eight steps in a fixed order, and this page is the tour of all of them: what each step can do, what it costs you, and where to read the whole story. Every step is a full workspace rather than a wizard page — a live preview on the left, that step's own controls on the right, and the numbered stepper across the top, which you can jump around in once art is loaded. Steps you have moved past wear a green check.
You do not have to walk every step. Step 2 wears (optional) in its own heading, Step 1 offers Skip — go straight to Find & Cut, and a layered PSD lands you on Step 5 with its sprites already made.
Costs. Only AI actions spend credits: generating a scene, extending the canvas, finding and segmenting objects, sweeping up the leftovers, re-masking or AI-carving a single element, rebuilding the background, rebuilding sprites, and the AI fill in the repair window. Every one of those buttons prints its own price on its face before you press it, and a confirm dialog names the cost once more before anything leaves your balance — unless you tick Don't ask again this session. Everything else is free and runs on your own machine: hand-masking, the local split algorithms, keying, hole-filling with a flat color or a pattern clone, outline repair, color matching, snapping a sprite back onto its original, shadows, repixelizing, palette snapping, the diorama, and all eleven exports. See Credits & plans.
Step 1 · Source Art
The front door. You arrive with art, or you describe the art you want.
- Upload a scene. The
Upload your 2D game artdropzone takes a PNG, a JPG, or a layered PSD by drag-and-drop or by click. Any style is fair game — pixel art, painted, anime — and the panel beside it says as much:Any art style works. - Generate a scene.
Generate a scene with AIgives you a prompt box, anAI modelpicker — three entries, each printing its own credit price — and anAspectmenu.Generatestacks each result in aYour generationsgrid; click one to preview it and pressUse this imageto commit it. Each result carries a download and aRestore this promptbutton. - Import a layered PSD. Dropping a
.psdor.psbon the Step 1 upload box reads it entirely in your browser — no AI, no credits — turns each of its drawn layers into a sprite with its alpha intact, up to sixty of them, and drops you at Step 5 · Finish Sprites. - A 4096 px ceiling. Art you bring in is capped at 4096 px on its longest side. A local detector reads each intake and picks two starting points from it: whether
★ Repixelizeon Step 7 arrives switched on, and where the keyer'sSoft edgesswitch starts — off, on the hard silhouette pixel art wants, or on with a light feather for art that does not read as pixel art. - Source Art Review. Once an image is loaded the panel becomes a read-out:
Dimensions, anElementscount, thenContinue to Extend Canvas,Skip — go straight to Find & Cut, and↺ Replace imagefor a clean restart.
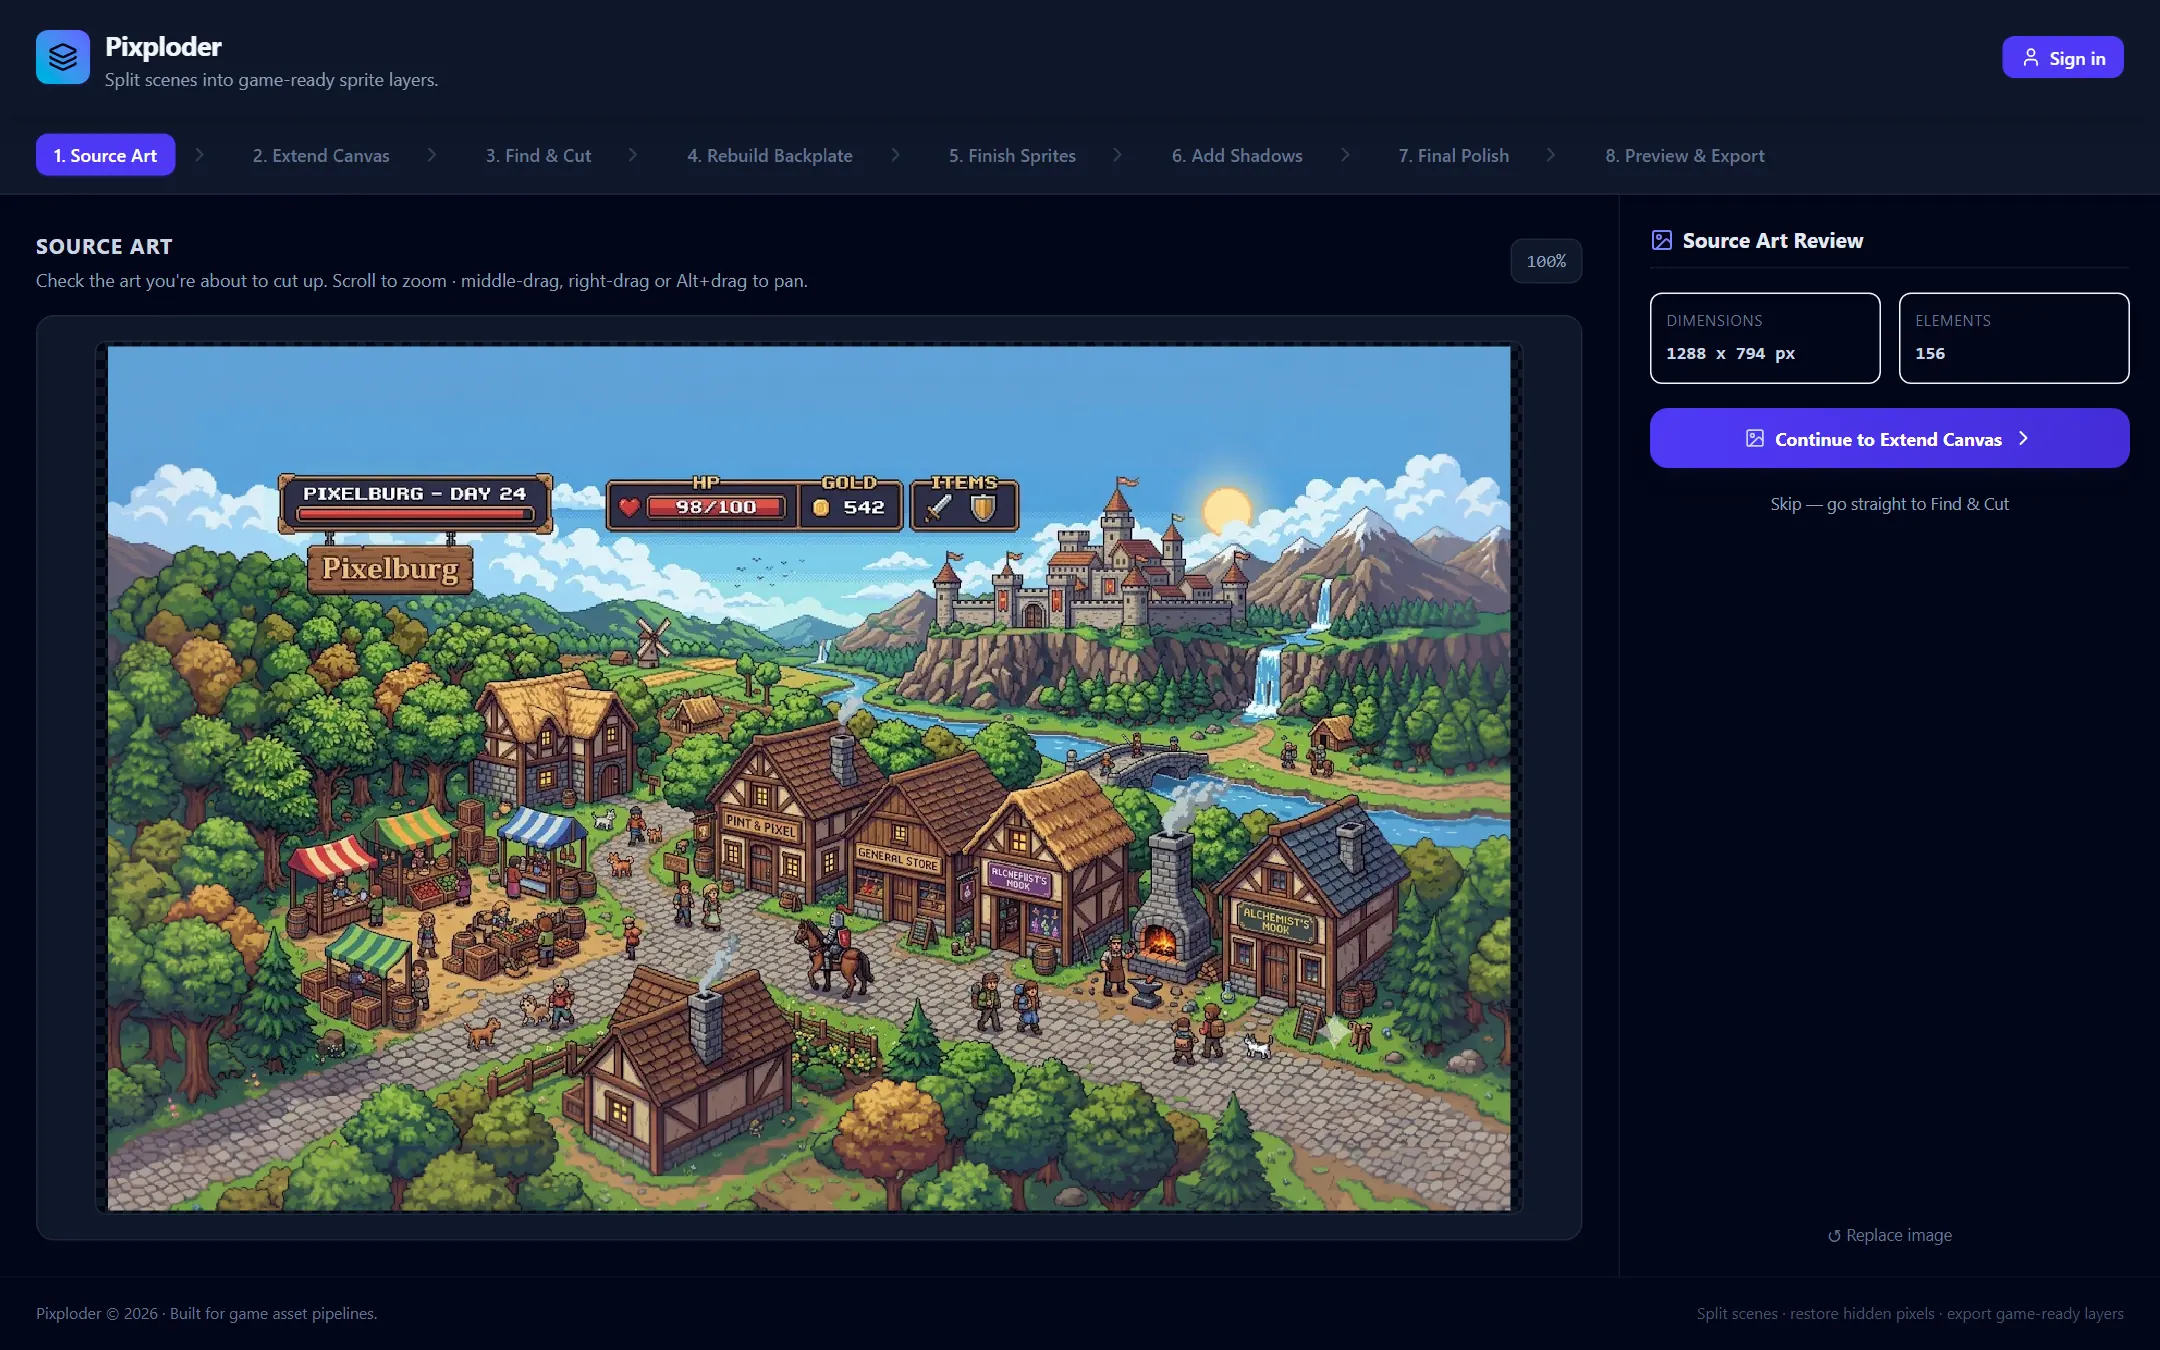
Full guide: Step 1 · Source Art.
Step 2 · Extend Canvas
More room for the camera to move, without touching a pixel you already have.
- Per-side growth.
Canvas size — px per sidetakes a number forTop,Right,Bottom, andLeft. Positive grows, negative crops. A nine-cell anchor beside them decides where your existing art sits when a preset distributes the margin. - Or drag the frame. Eight handles sit on the canvas itself — drag outward to extend, inward to crop, with
Shiftsnapping to 16 px. The magenta hatch is exactly the area the AI will paint, and per-side chips print each margin. - Ratio presets.
Snap to ratiocomputes the margins for a target shape in one tap, and two number boxes plusSetcover any other aspect. - The AI paints only the new area.
AI fills the new areaholds the fill prompt and theAI modelpicker; the primary button readsExtend canvaswith its price, orApply crop (free)when nothing grows. A guard line above it says whether the growth you asked for is a sensible size before you spend anything. - Chain or reshape. When the canvas already has a recipe, an
Extend fromrow lets you build onthis version— its fill is kept and only the new margin is painted — or go back to thebaseand reshape the whole margin as one fill. - Takes. Every extend lands in
Extend takes — click to useas its own version with its size and recipe, and takes survive undo and reloads. Click one to make it the canvas,↻buys a new fill for the same margins, and a download and a delete sit beside them.↺ Undo extendreverts the last extend.
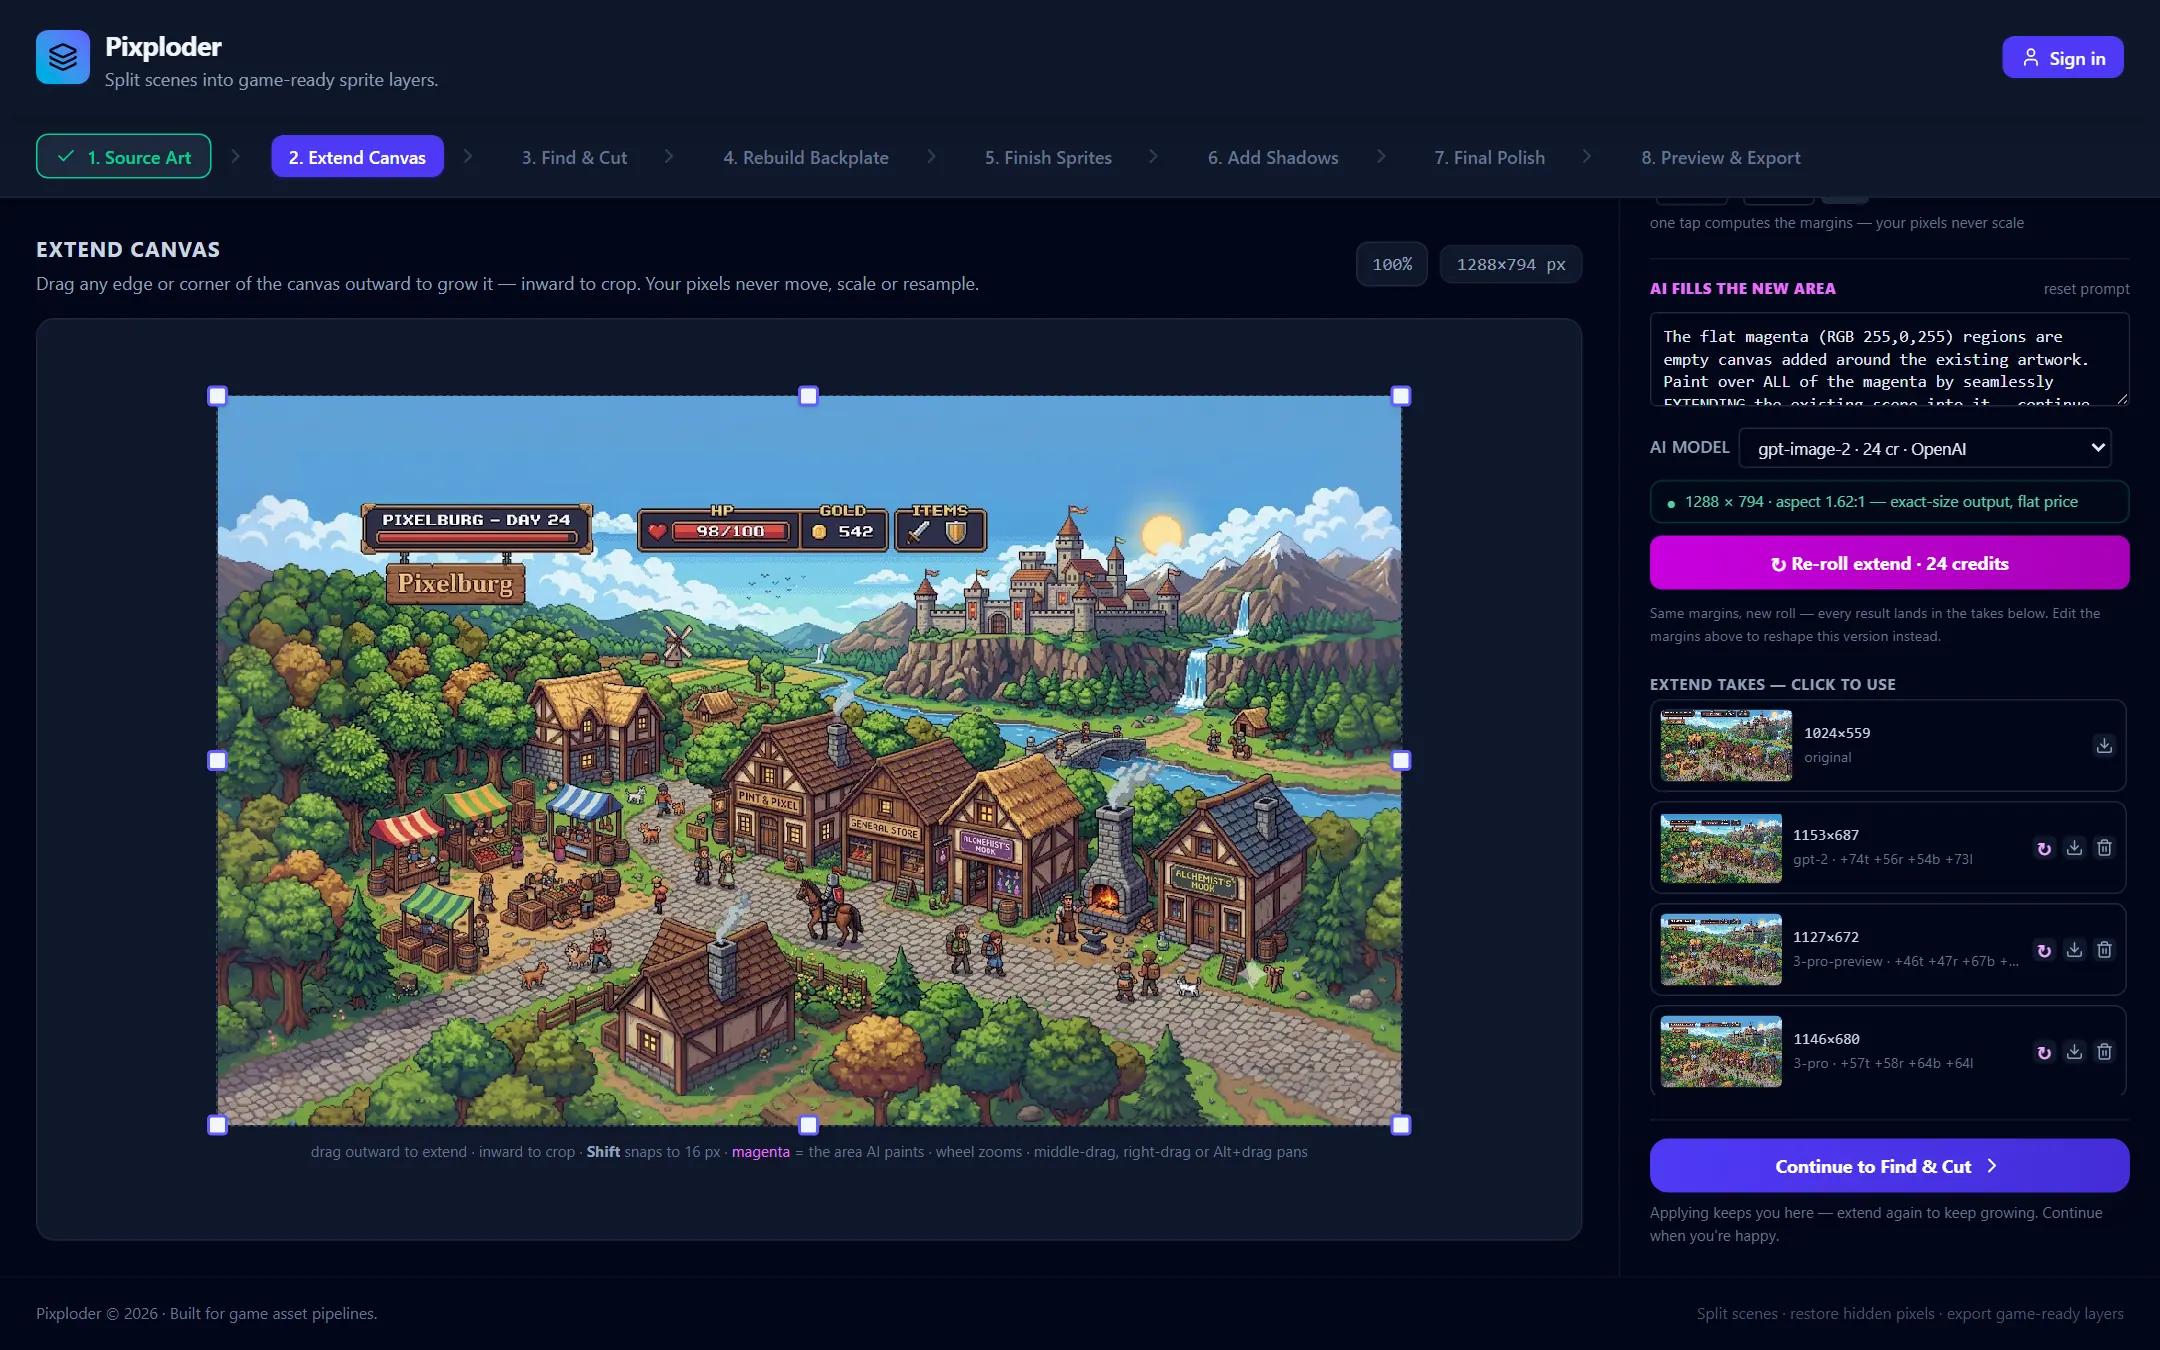
Full guide: Step 2 · Extend Canvas.
Step 3 · Find & Cut
Where a flat picture becomes a stack of individually masked elements.
- The AI names what it sees.
Find Objectslists the contents of your scene as tags; run it again asFind More Objectsto append more without disturbing what you have. TheFIND & SEGMENTcard's header gear holds this run'sAI model, aStudy only what's leftoption, and Segment's own dials. - Tags you curate. A filled chip has masks behind it, a hollow one does not, and you can type your own tag for anything the AI missed.
- The AI cuts them out. The Segment button names both the job and the price as it goes —
Segment 5 tags (5 cr),Find more "market stall" (1 cr),Mask 2 boxes (1 cr)— every drawn box rides in one batch, so any number of them adds a single credit. Its settings —Min confidence,Hunt only what's left,Max instances per tag,Input upscale (sharper edges)and a↻ Re-segment all from scratchescape hatch — steer Segment and only Segment. - One pass for the leftovers.
Sweep Leftovers · SAM 2segments everything that is not an element yet, at a flat price whatever the rung, with its own gear holdingDetail, aHold back pieces smaller thanfloor in% of canvas, and its ownInput upscale (sharper edges). - A real layer tree. Everything collects in
FOUND ELEMENTS: nesting groups you build withGroup n elements, drag-and-drop between folders, inline renaming, an eye to hide, aKeep in backgroundtoggle, anUngroup, and a delete that returns those pixels to the background. Rows wear aGROUP · norBOX ONLYbadge so you can see what still needs a mask.New elementlets you draw a box for anything the AI will not find. - The background is a row. A dashed
Backgroundrow at the bottom is the live remainder —scene − n elements— and the toolbar'sBackgroundpin previews it full-frame over a backdrop swatch.Confirm & Proceedcarries the stack onward.
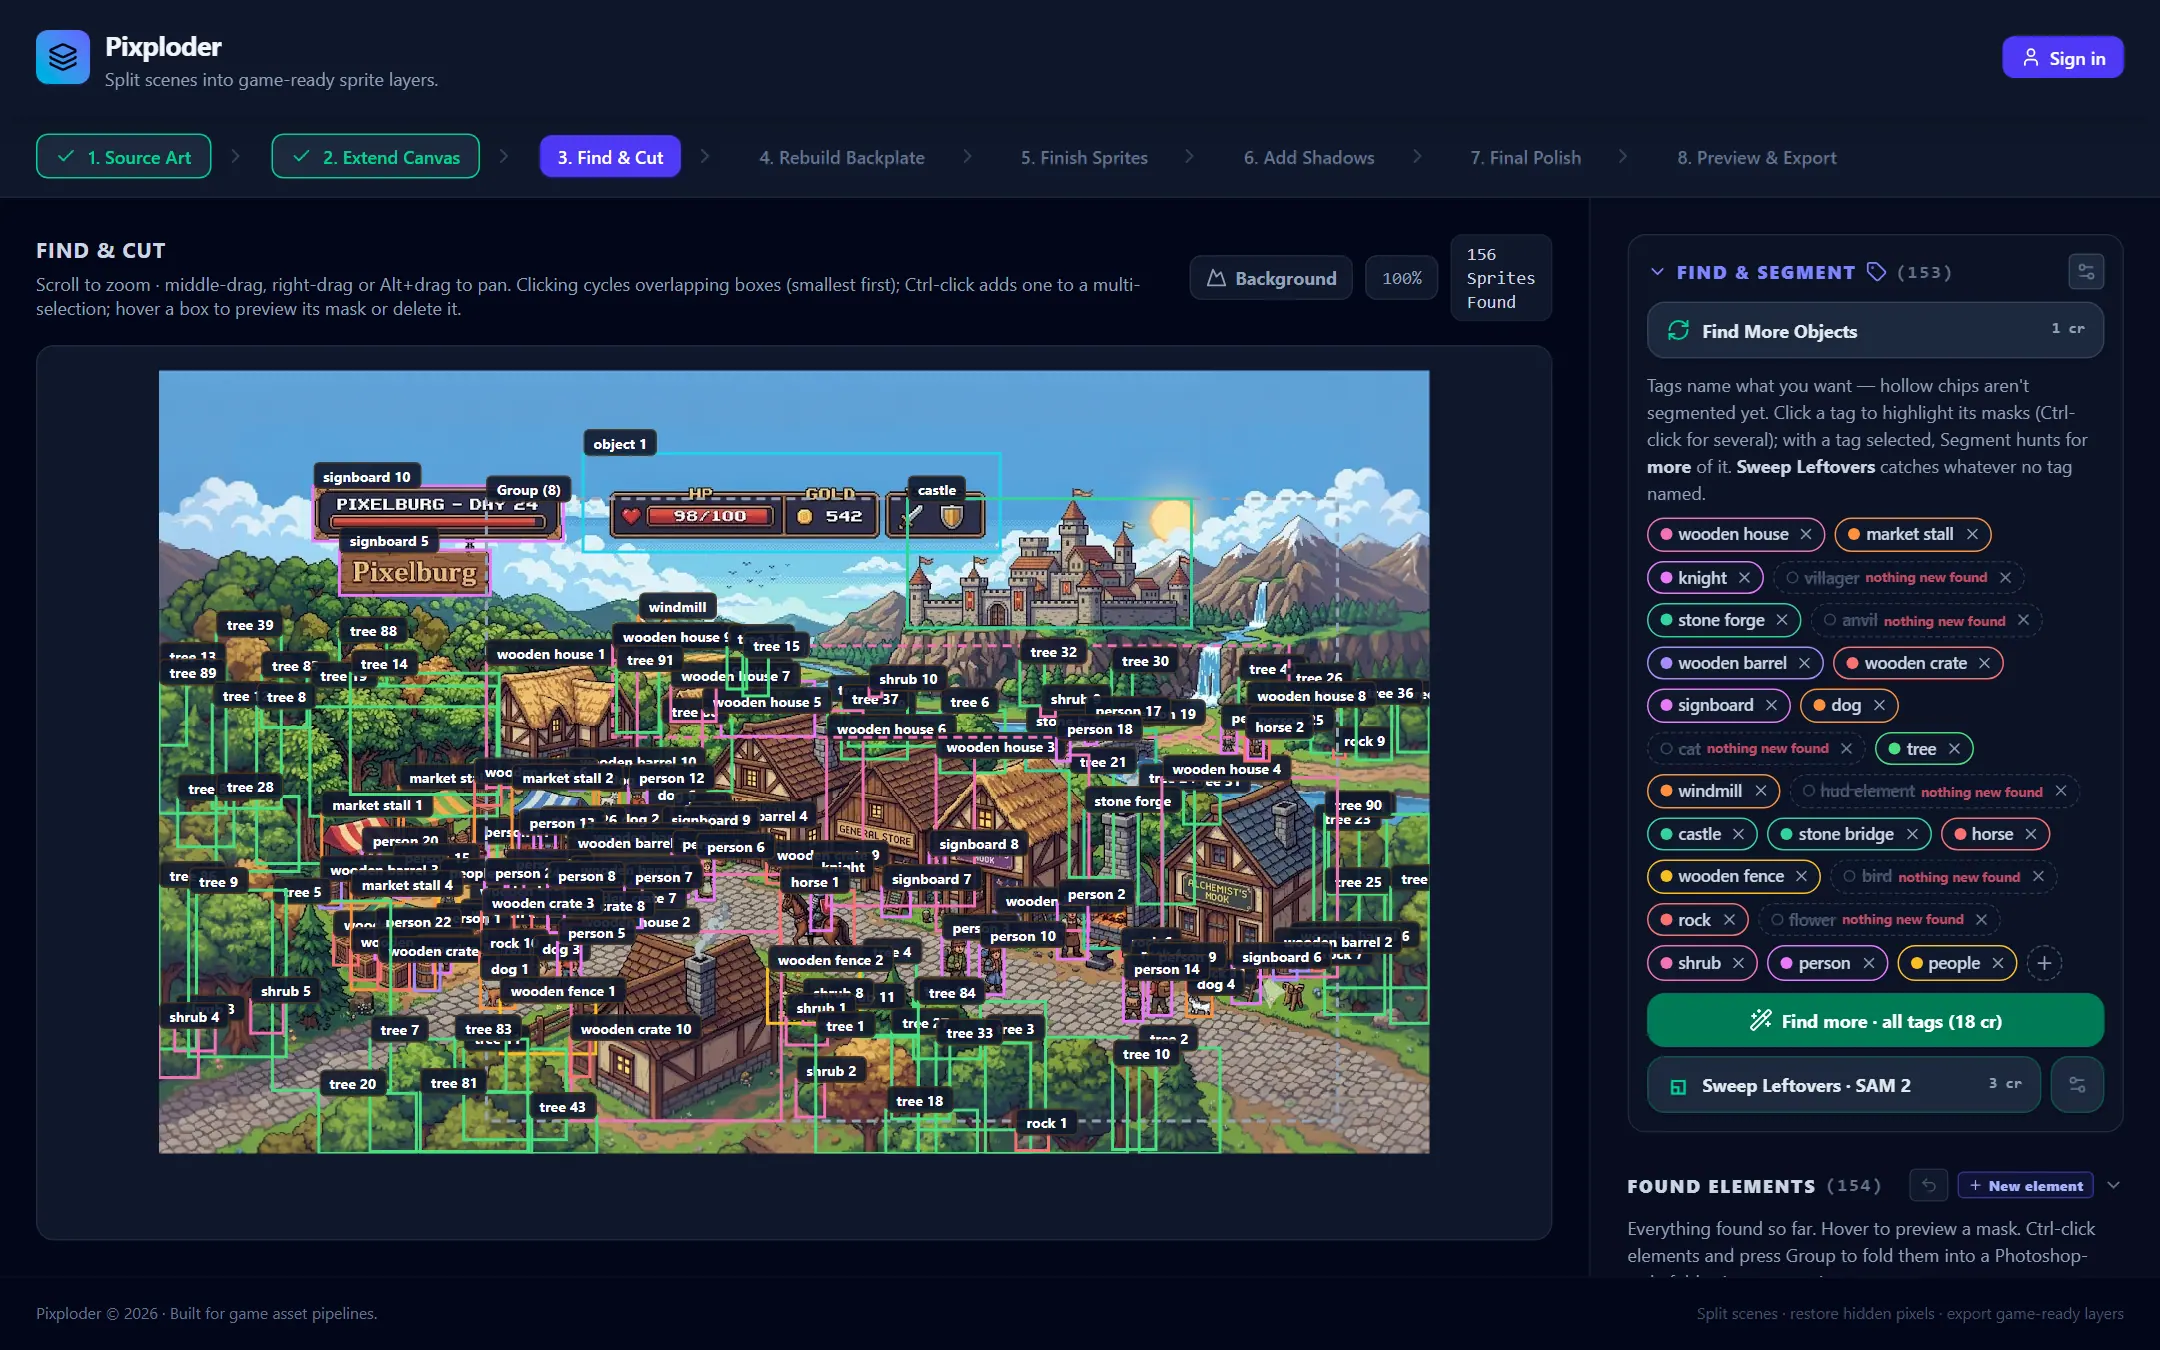
Full guide: Step 3 · Find & Cut.
Step 4 · Rebuild Backplate
Cutting an object out leaves a hole. This step repaints every hole into one seamless backdrop, in two numbered stages.
- Stage ①,
FILL HOLES. The hole mask starts as the Step 3 silhouettes and stays editable:BrushandEraserwith a size,GrowandShrinkby a pixel amount, andReset mask.Result,MaskandCutoutviews (with backdrop swatches) show what the AI will be asked to fill. - Takes, not overwrites.
Prompt for the Background fillsteers the repaint and aSettingsfold holds theAI modeland aSend real maskoption.Generate takeprints its price and stacks each attempt underTAKES — CLICK TO USE · CLICK THE ACTIVE ONE TO PEEK THE HOLES. - Installing is the whole decision. A take lands as the
Whole image— the entire frame comes from that take, so there are no interior seams at all, with no mode to pick and nothing to flip. The installed one reads✓ In use · Whole image. - One
Undofor the whole step.↶ Undo— orCtrl/Cmd+Z— takes back a brush stroke, aGrow, aShrink, aReset mask, a deleted touch-up or a deleted take. A generation arriving is never on it, so undo can never spend or discard credits. - Stage ②,
REFINE. For any spot that came back wrong,+ new regionlets you paint an area over the result, give it its own prompt, and pressGenerate this region. Only the amber area changes. Touch-ups stack as their own list —TOUCH-UPS · LOWER WINS OVERLAPS— each with its own prompt and its own generate. Continue to Finish Spritesflattens the whole stack into the single background image every later step consumes.
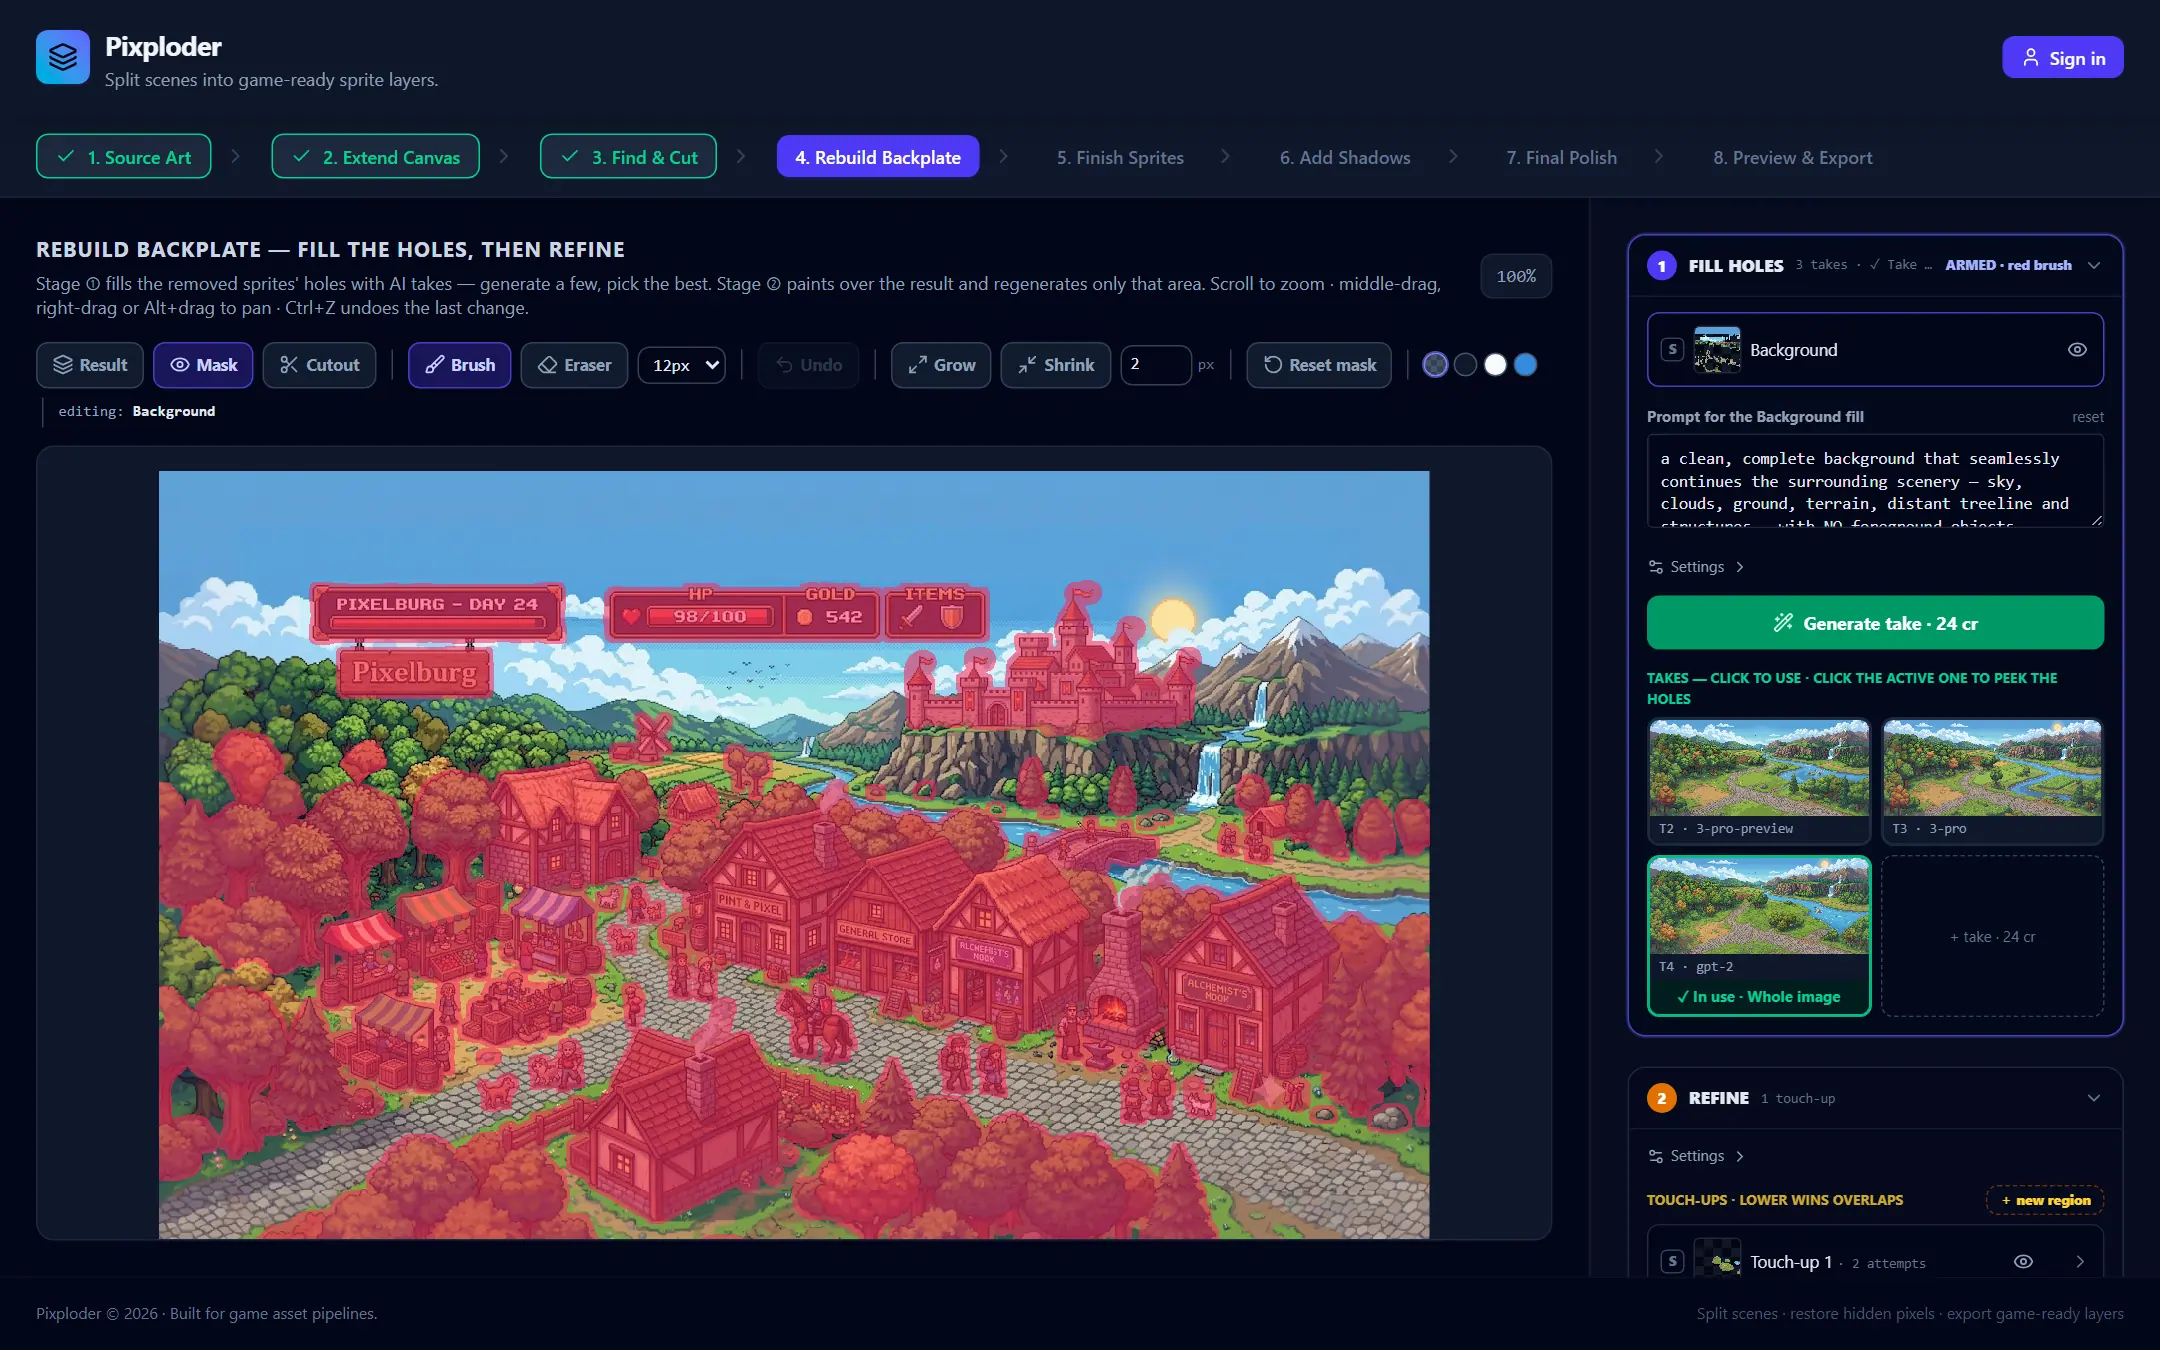
Full guide: Step 4 · Rebuild Backplate.
Step 5 · Finish Sprites
A sprite that sat behind something else is missing pixels. This is where those pixels come back — and where every sprite gets a verdict before it ships.
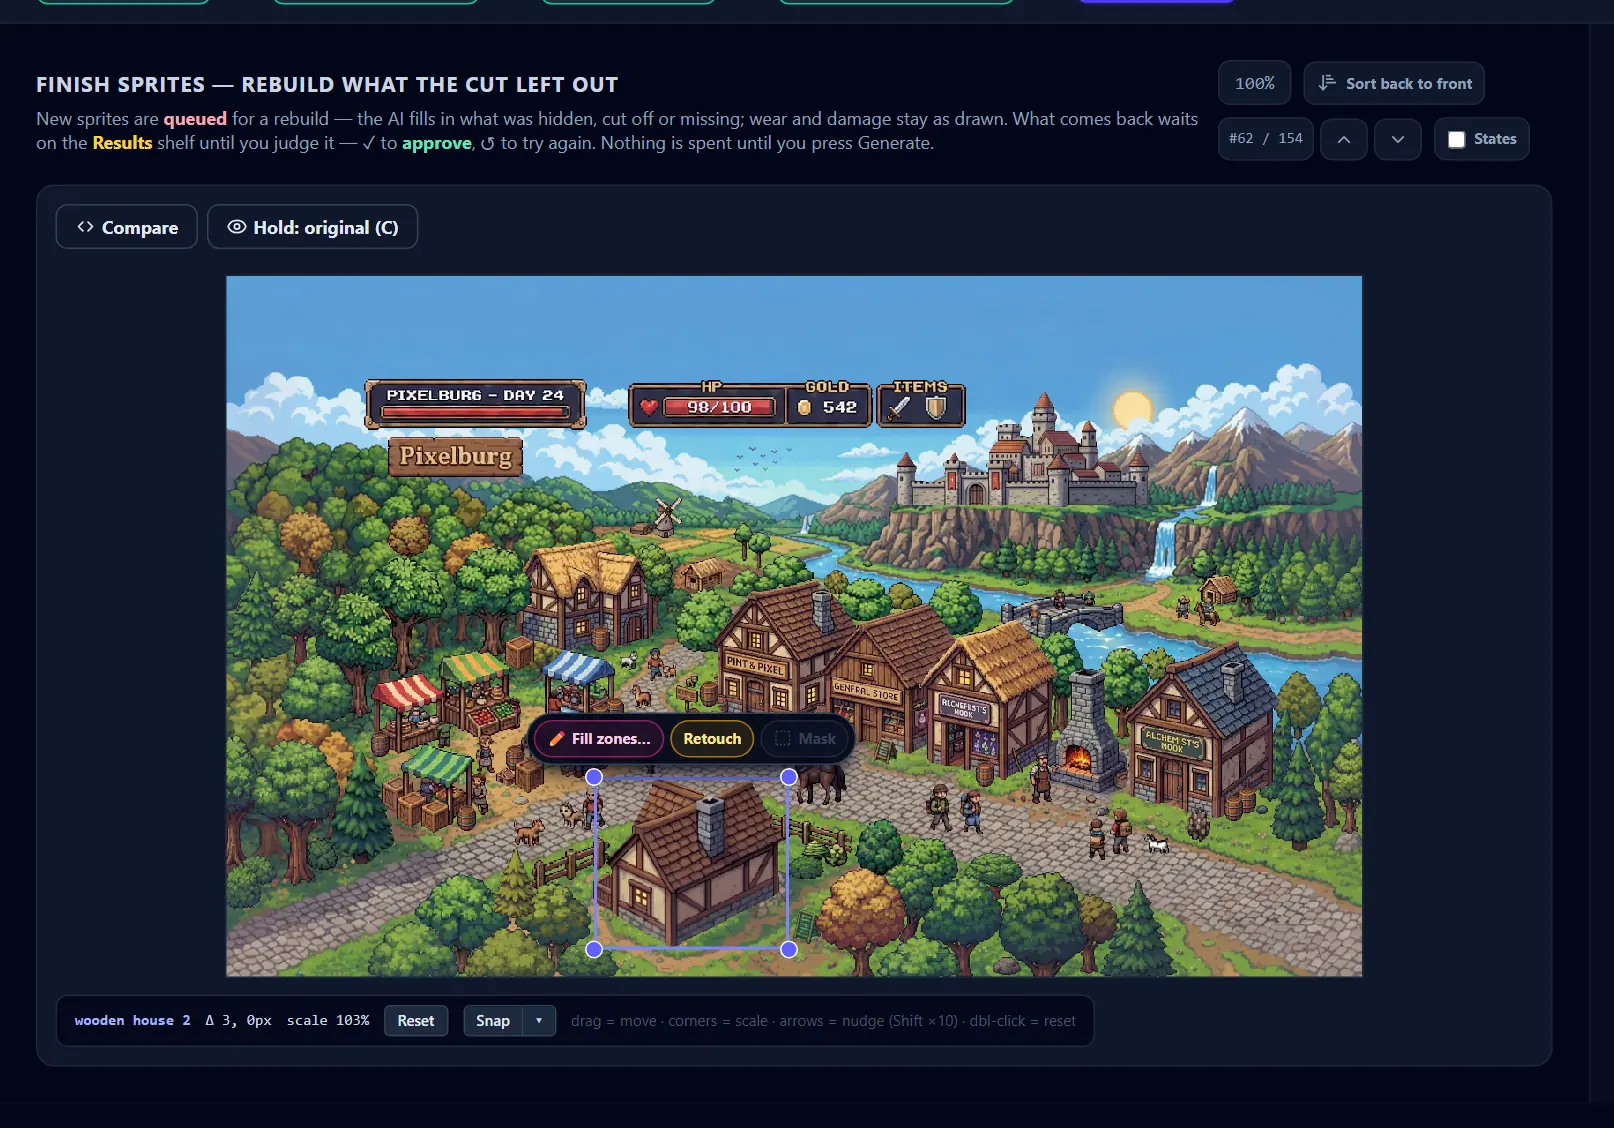
- One section, three shelves. The rail holds a single card,
Rebuild sprites, and every sprite sits on exactly one of its shelves:QUEUED(a new sprite arrives here, and the next run spends credits on it),RESULTS(it came back and nobody has judged it) andAPPROVED(done, and on its way to Add Shadows). The header prints the sprite count, how many calls are packed, the credit total, how many are approved, and an ambern to review. - Two corners judge. Every tile carries
✓to approve and↺to queue another try, and those two are the only things that move a sprite between shelves. A queued tile also carries🖌for its fill zone and▨to send that zone as a real mask, and tapping the picture opensVersions of {name}— the original plus every generation, the applied one ringed,Ⓢfor solo and🔧for the repair window. - One batched call, many sprites. Queued objects are packed into the cells of a single sheet on a solid magenta field, redrawn together, then keyed back to clean transparency. One money row under the queue reads
⚡ Generate · n calls · n cr, the rail foot repeats it as⚡ Generate all · n calls · n cr, and the section's⚙holds theModelpicker and the onePromptsentence every queued call runs with. - Spend the whole queue, or hand-pick it. The
QUEUEDheader carries anAll | Picksegment.Allspends every queued sprite;Picklights only the ones you tap, prices the picked run on the same button, and offersPick allandClearbeside it. - Place it by hand. Drag a sprite on the scene to move it, pull a corner to scale it, arrow-key it a pixel at a time (
Shiftfor ten) and double-click it to reset.Snapfits the applied version back onto the original cut-out — five fit methods behind its▾— andResetputs the sprite back where it was cut from.Sort back to frontand the⌃/⌄chips set the paint order every export ships. - The pill under a selected sprite. Clicking a sprite on the artwork floats a pill under it:
✏ Fill zones…opens zone painting (and queues the sprite if it was not queued),Retouchopens the repair window on the version it is showing, andMaskmirrors the tile's▨toggle. - Read the scene at a glance. The
Statescheckbox tints every sprite in the artwork by where it stands — emerald approved, rose queued, orange rebuilt and still to review. Fill zones aim the AI inside a sprite's cell, and the✥handle sets theFrame, the room the finished sprite gets on each side. - Work on many at once. Ctrl-click several sprites — on the scene or on their tiles — and the readout at the foot of the viewport becomes the set's:
Reset all,Snap n, and free bulkEdgeandMatchpasses. In the rail, a row splices in under the last tile you picked with⧉ Use one result for all n…, which gives one generation to every selected sprite and approves each as it takes it. - The gate. When every sprite has been reviewed — approved is ✓-picked, or nothing queued or generated against it — the rail says
✓ All n reviewed — approved sprites continue to Add Shadows, andContinue to Add Shadowscarries them on. Until then only what you have approved travels: a generation you have not said yes to is not in the shadows, the previews or any export, and that holds whether it is waiting onRESULTSor you have already sent it back with↺.
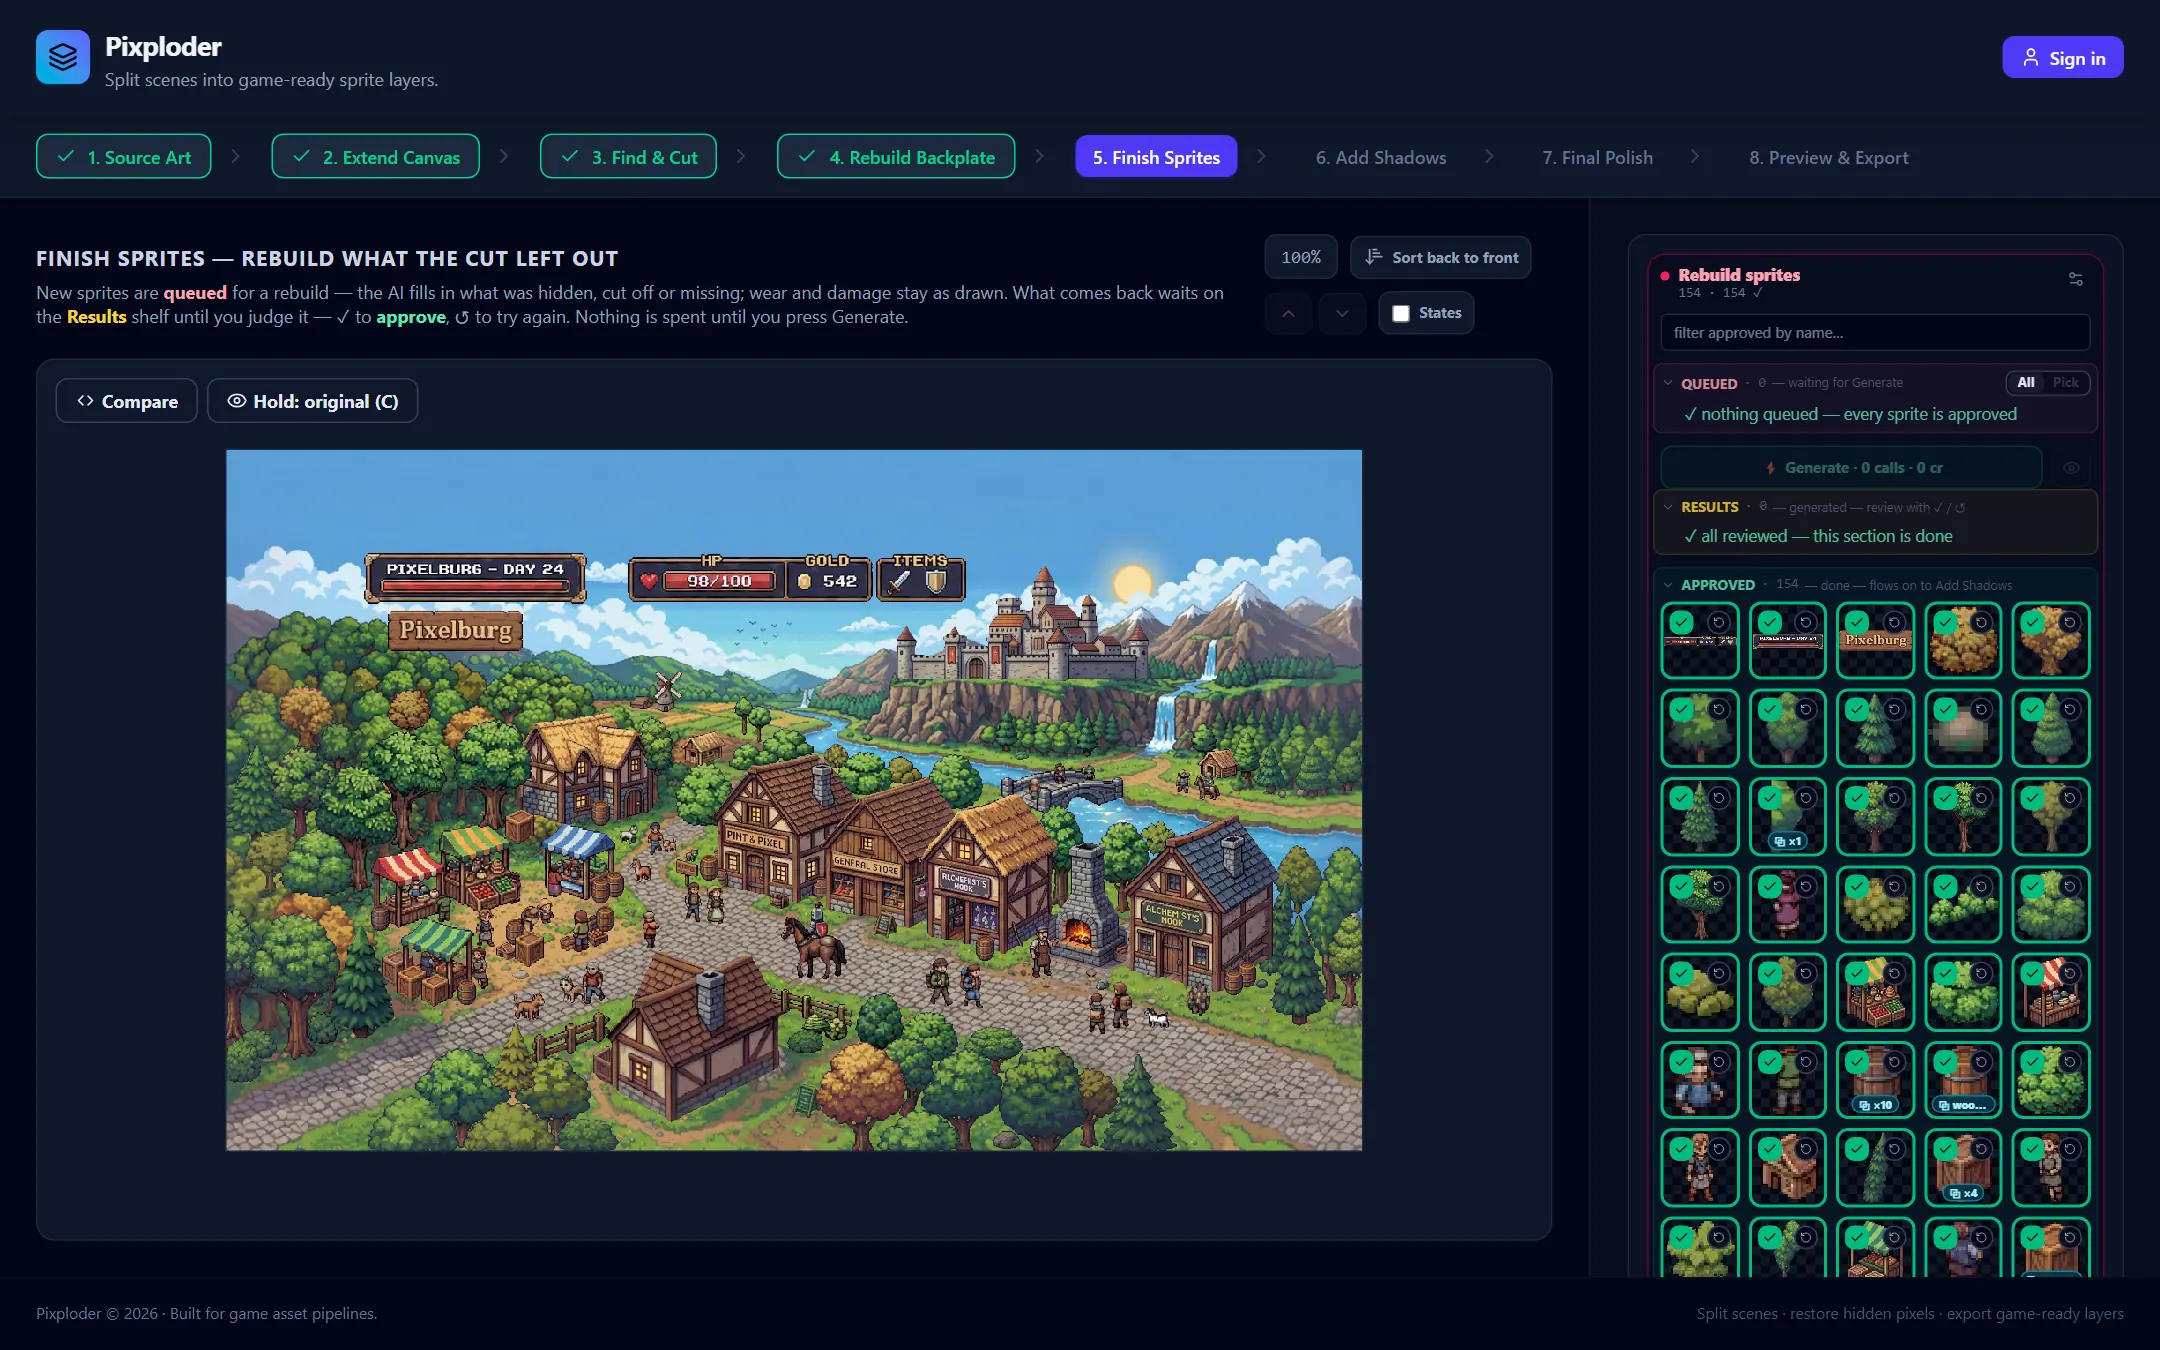
Full guide: Step 5 · Finish Sprites.
Tip. Most sprites never need a rebuild at all — a cut-out that nothing was covering is already the sprite. Press ✓ on those and spend credits only on the ones a mask bit into.
Step 6 · Add Shadows
Sprites that float read as stickers. This step plants them, entirely in your browser and for free.
- Two shadows per sprite. A ground shadow cast on the floor beneath it, and base shading that darkens the sprite's own lower edge where it meets the ground. Both are computed from the silhouette and stored as live parameters, so your art is never altered.
- Contacts first. The green line on the preview is where the sprite touches the ground.
Floor band εsets how much of the sprite's height counts as floor,Keep · touches withinandReject · floating beyonddecide which parts are grounded, andGround stepsets how tall a step the ground itself may take. - Shape per target.
Ground shadowoffersBlob,Per-footandFan, withSize, aLight angle,Fan spread,Lean with the light,Vertical offset, andUse vertical shadowsso a porch wall or a plinth casts too.Base shadinghas its ownRiseand anOnly where it touches (drop floating edges)switch. - Style for the whole scene.
Blend onto the scene, aStrengthandStepscolumn each forGroundandBase, and theDithercheckbox live inStyle — all shadowsand apply everywhere at once, because overlapping shadows flatten into one plate. The tint blend adds aTint saturationdial and aHueshift per column. - Grouped or individual. A
Shadow groupstree lets a set of sprites share one shadow, andShadow settingsbelow it edits whatever you picked there.Detachgives a member its own shadow,Add a shadowgrants one to a sprite that has none, and a trash takes an individual shadow away again. - Shadows respect your layer order. A shadow falls on every sprite its caster is stacked above and stays under everything stacked higher, so a table sorted over a carpet casts onto the carpet instead of vanishing beneath it.
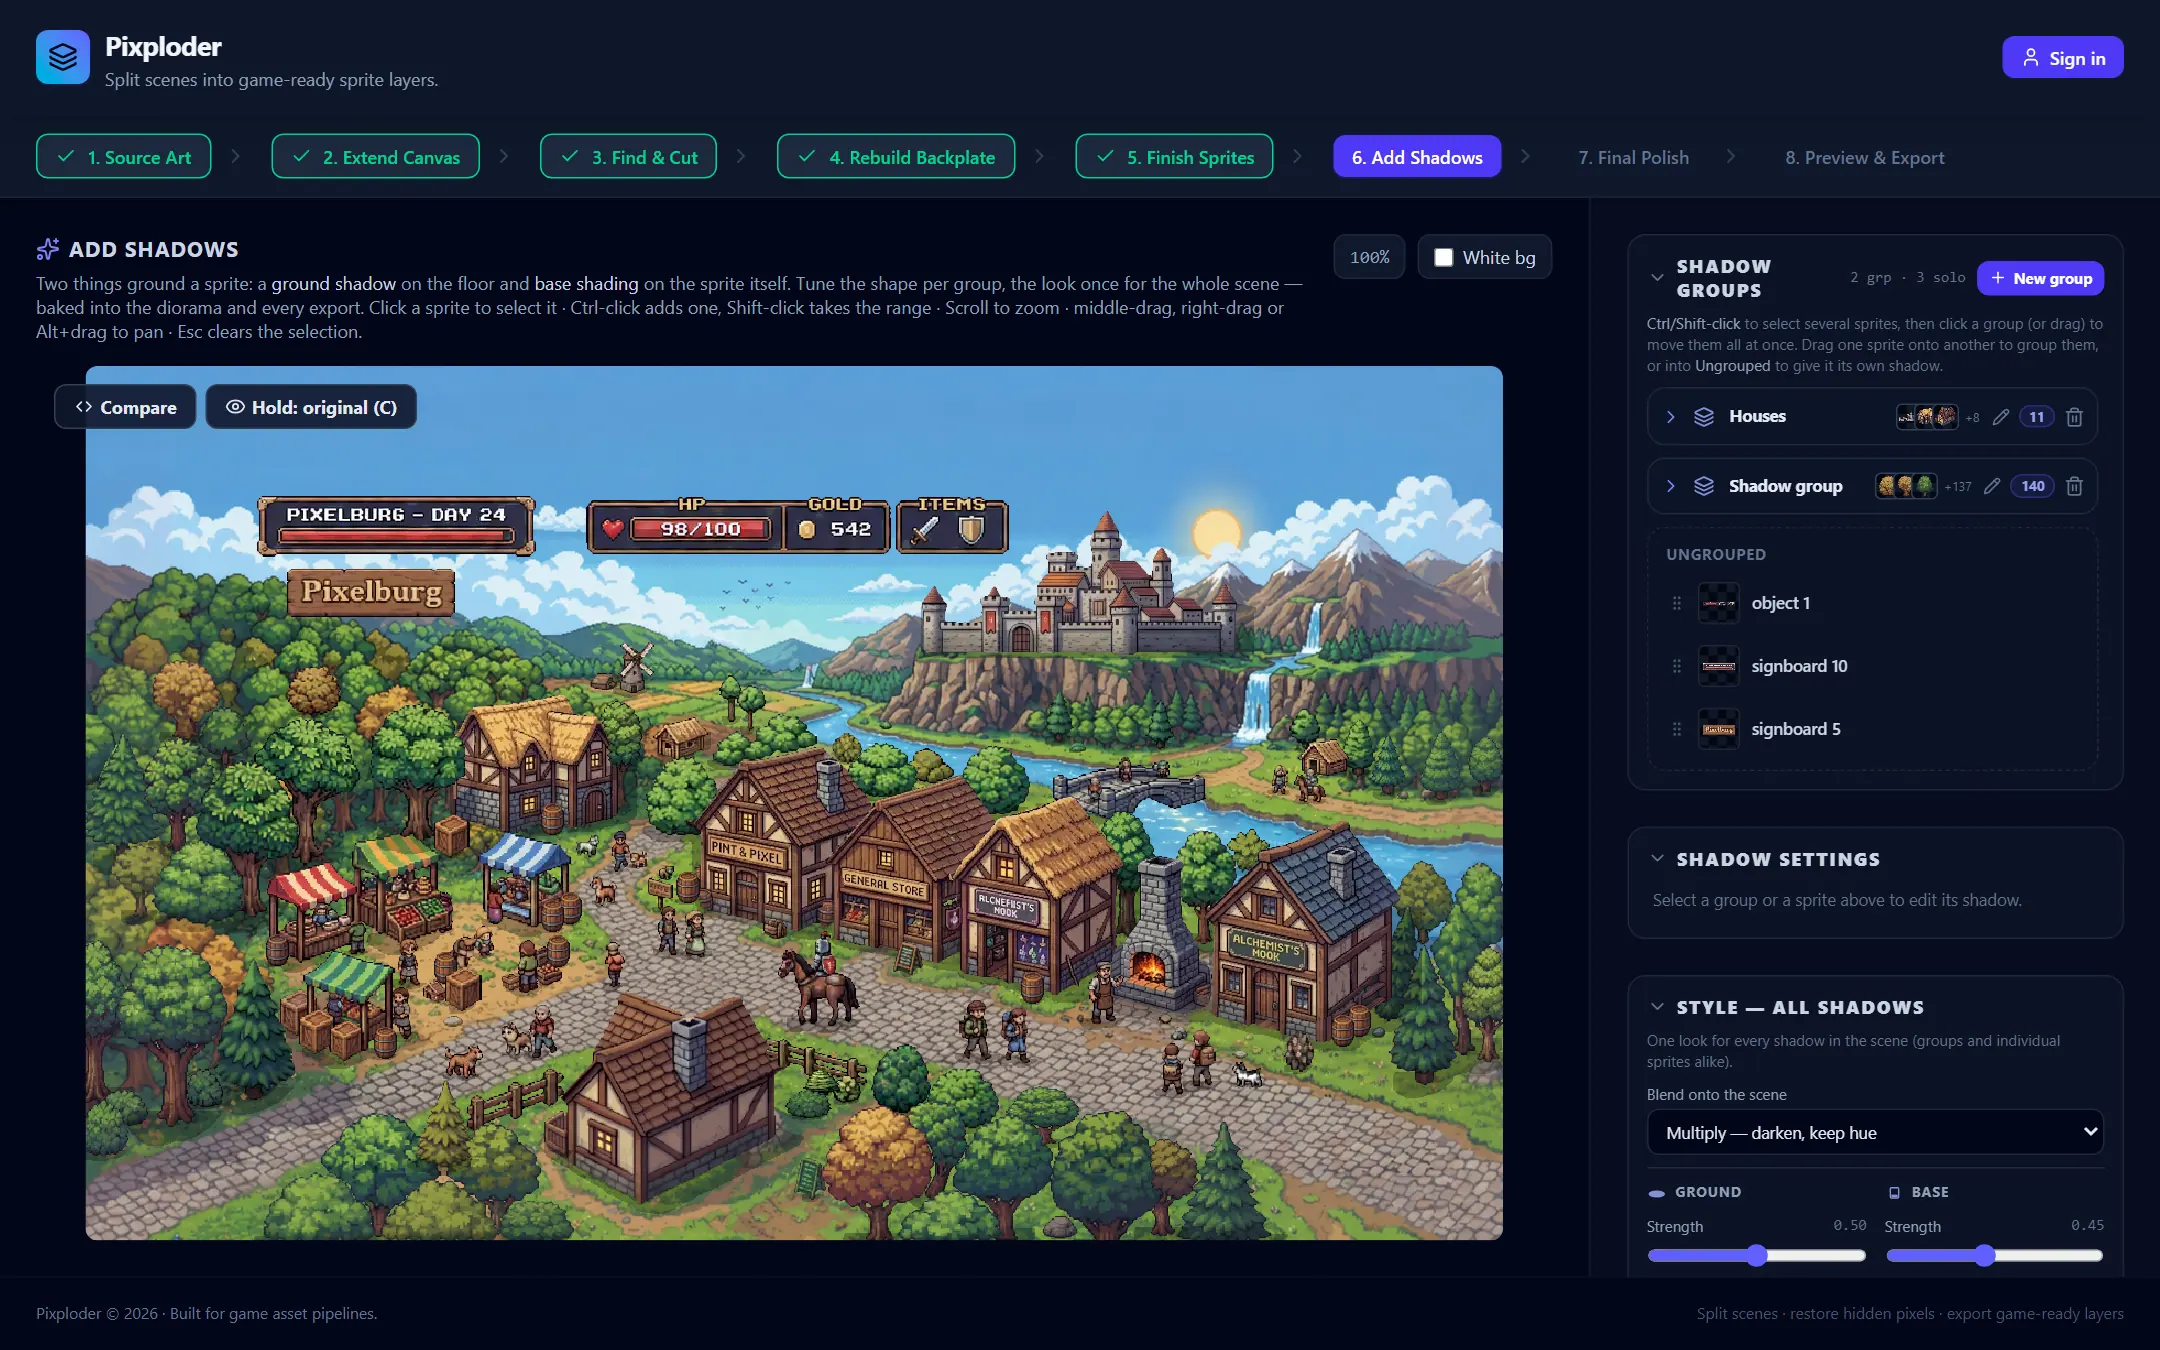
Full guide: Step 6 · Add Shadows.
Step 7 · Final Polish
The last polish pass, and also free and local. Two racks, and neither of them applies anything while you sit here.
- Repixelize the whole scene.
★ Repixelizebakes the background and every sprite onto a true pixel grid.Pixel sizeandOutput sizeset the resolution — type an exact size for in-between pixel sizes — and anAlgorithmlist decides how each output pixel takes its color. Turn the pass off and nothing is resampled. - Snap the whole scene to a palette.
Palette · whole imageputs the background, every sprite and the shadow ink on the colors of a palette you import — any image works, and every unique color in it becomes an entry. Fold away the near-duplicates an anti-aliased source arrives with, keep the import whole withuse as is, edit the entries in a built-in picker, or reduce a big import to a manageable set. - Choose how nearest is measured.
Color match — this paletteoffers perceptualOklabwith an optionalhue guard, plainRaw RGB, or the exactCIEDE2000formula, andDither — this palettelets a small palette stretch further. Auses {n}read-out says how much of the palette the scene actually landed on. - Nothing applies while you sit here. There is no Apply button: it all runs when you press
Continue to Preview & Export, and every later step and export rides on the result.
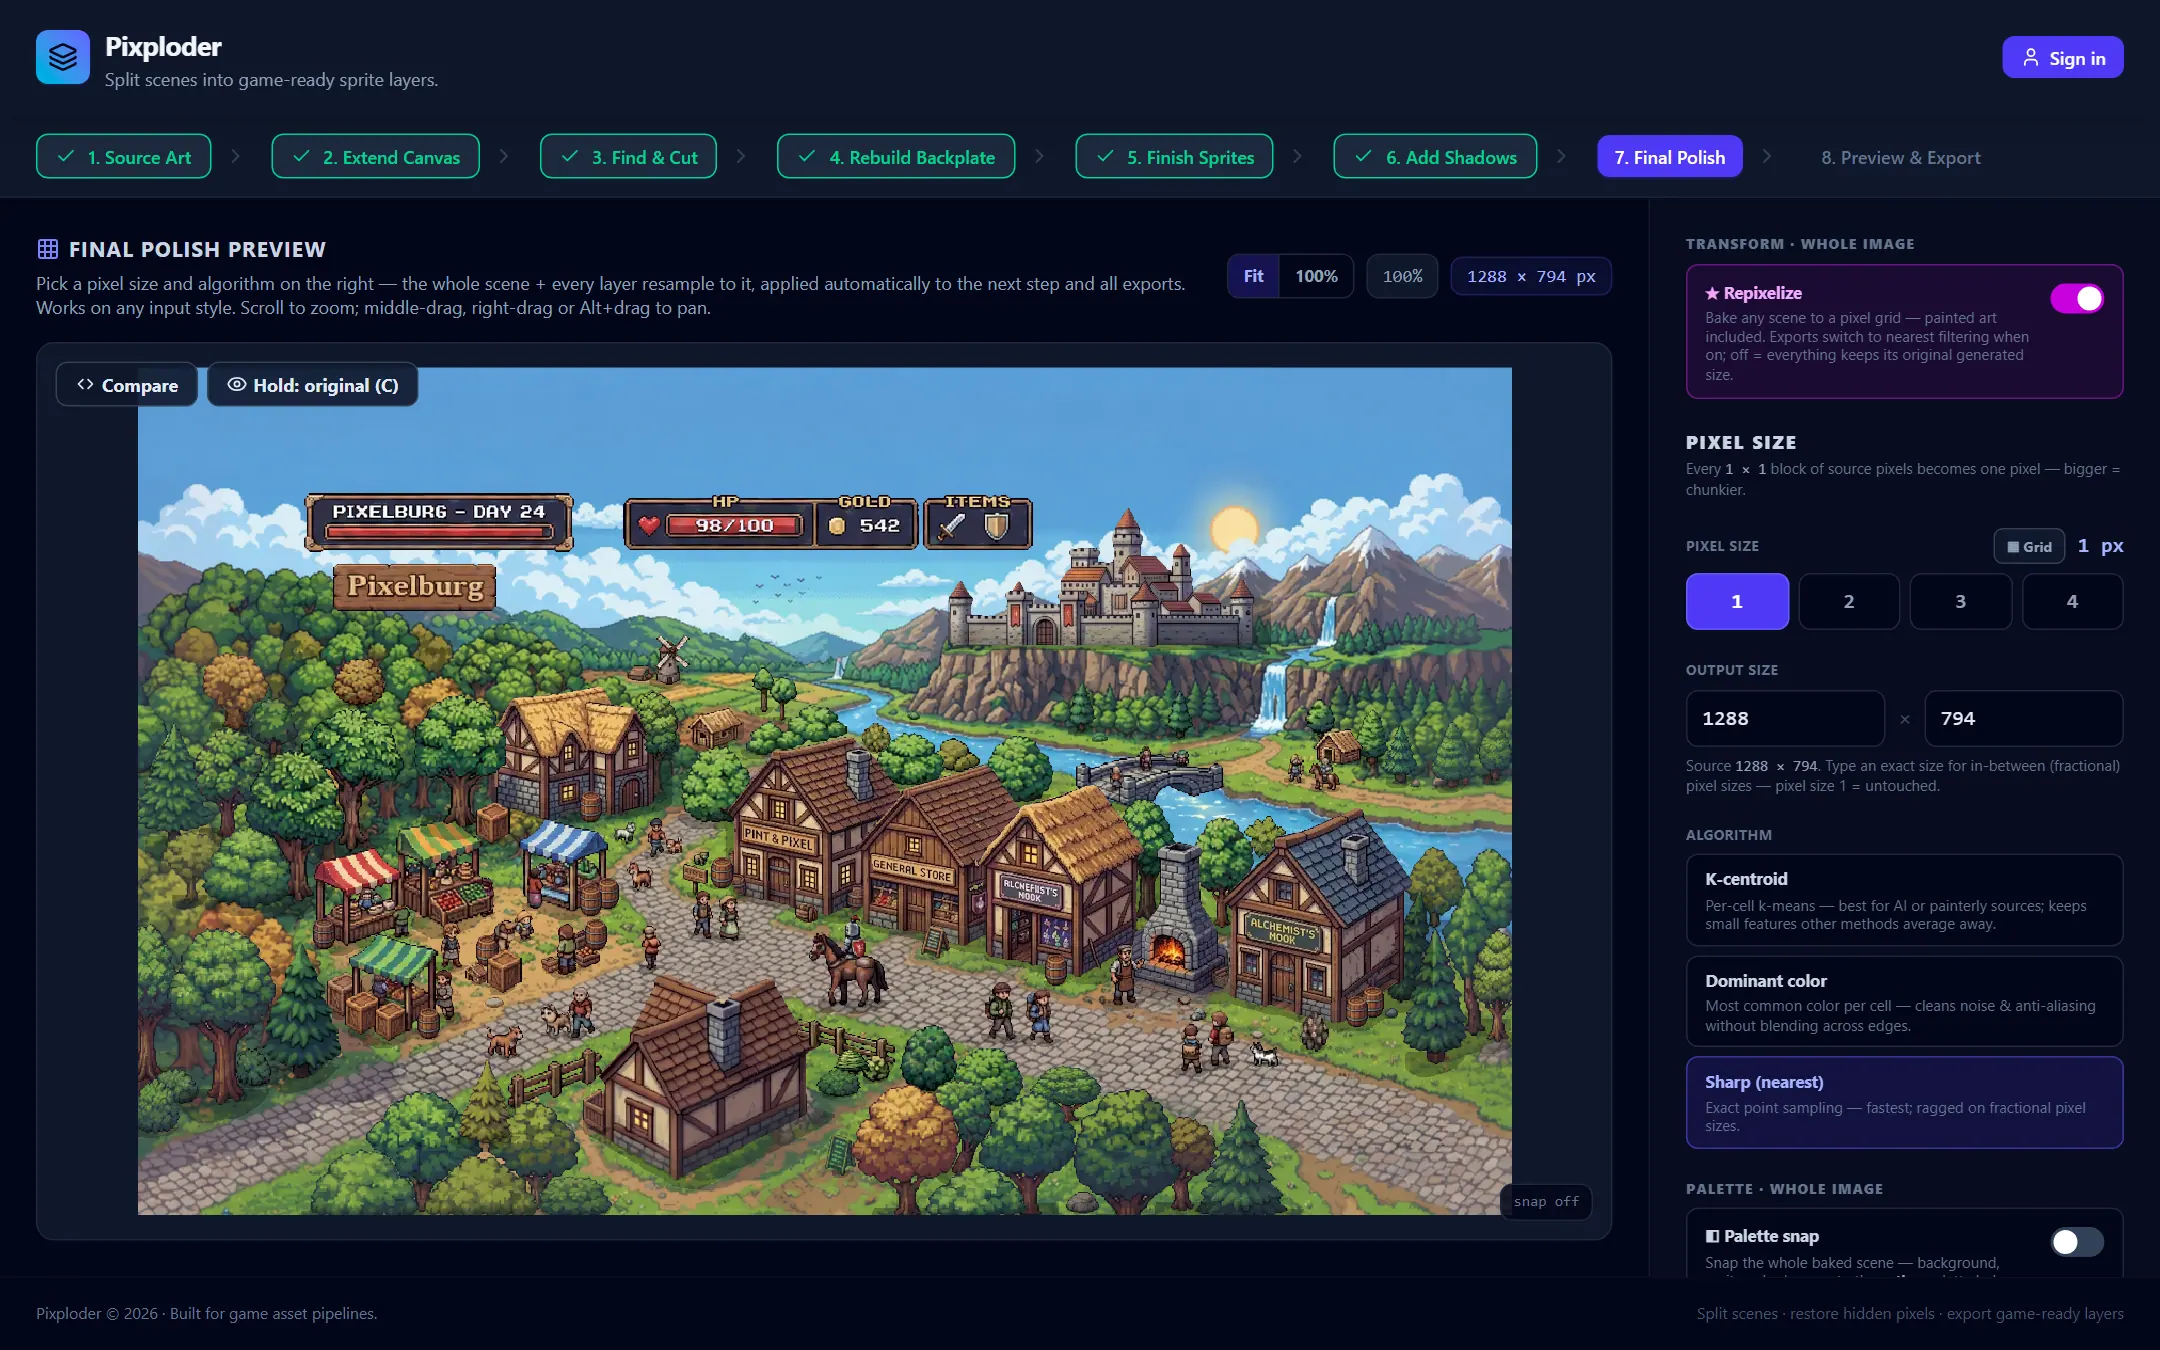
Full guide: Step 7 · Final Polish.
Step 8 · Preview & Export
The finished scene, inspected and handed off. Nothing on this step calls the AI.
- Two previews.
3Dis the3D Diorama— drag on the board to swing the depth stack and see behind your sprites. It zooms and pans on the editor's usual gestures, and the zoom chip beside the view, titledReset the view — zoom, pan and rotation, puts angle, zoom and pan back to the start in one click.2Dis the flat composite, the2D Preview. - Compare tools. In the 2D view,
Hold: original (C)swaps the original back for as long as you hold the button or theCkey, andCompareclips the original over the left of the frame behind a divider you drag anywhere over the image — the same pair of controls Steps 4, 5, 6 and 7 carry. - A preview, not an editor. Nothing on the 2D picture is clickable: placement and paint order are set back on Step 5 · Finish Sprites, and what you set there is what this view, the diorama and every export draw.
- A bake read-out. When the bake actually rewrote pixels, a chip beside the view names what it did — the texture filtering your exports declare, and the palette that was snapped when one was armed.
- The
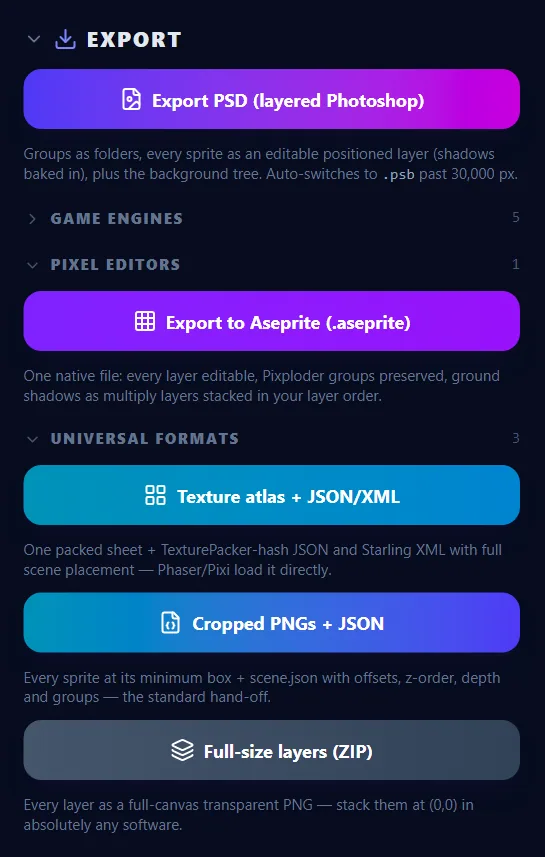
EXPORThub is the rail. Eleven formats, all of them free and built in your browser: the layered PSD first, thenGame engines,Pixel editorsandUniversal formats, each with its own count and each open at rest, so the whole roster is one scroll rather than three clicks away.
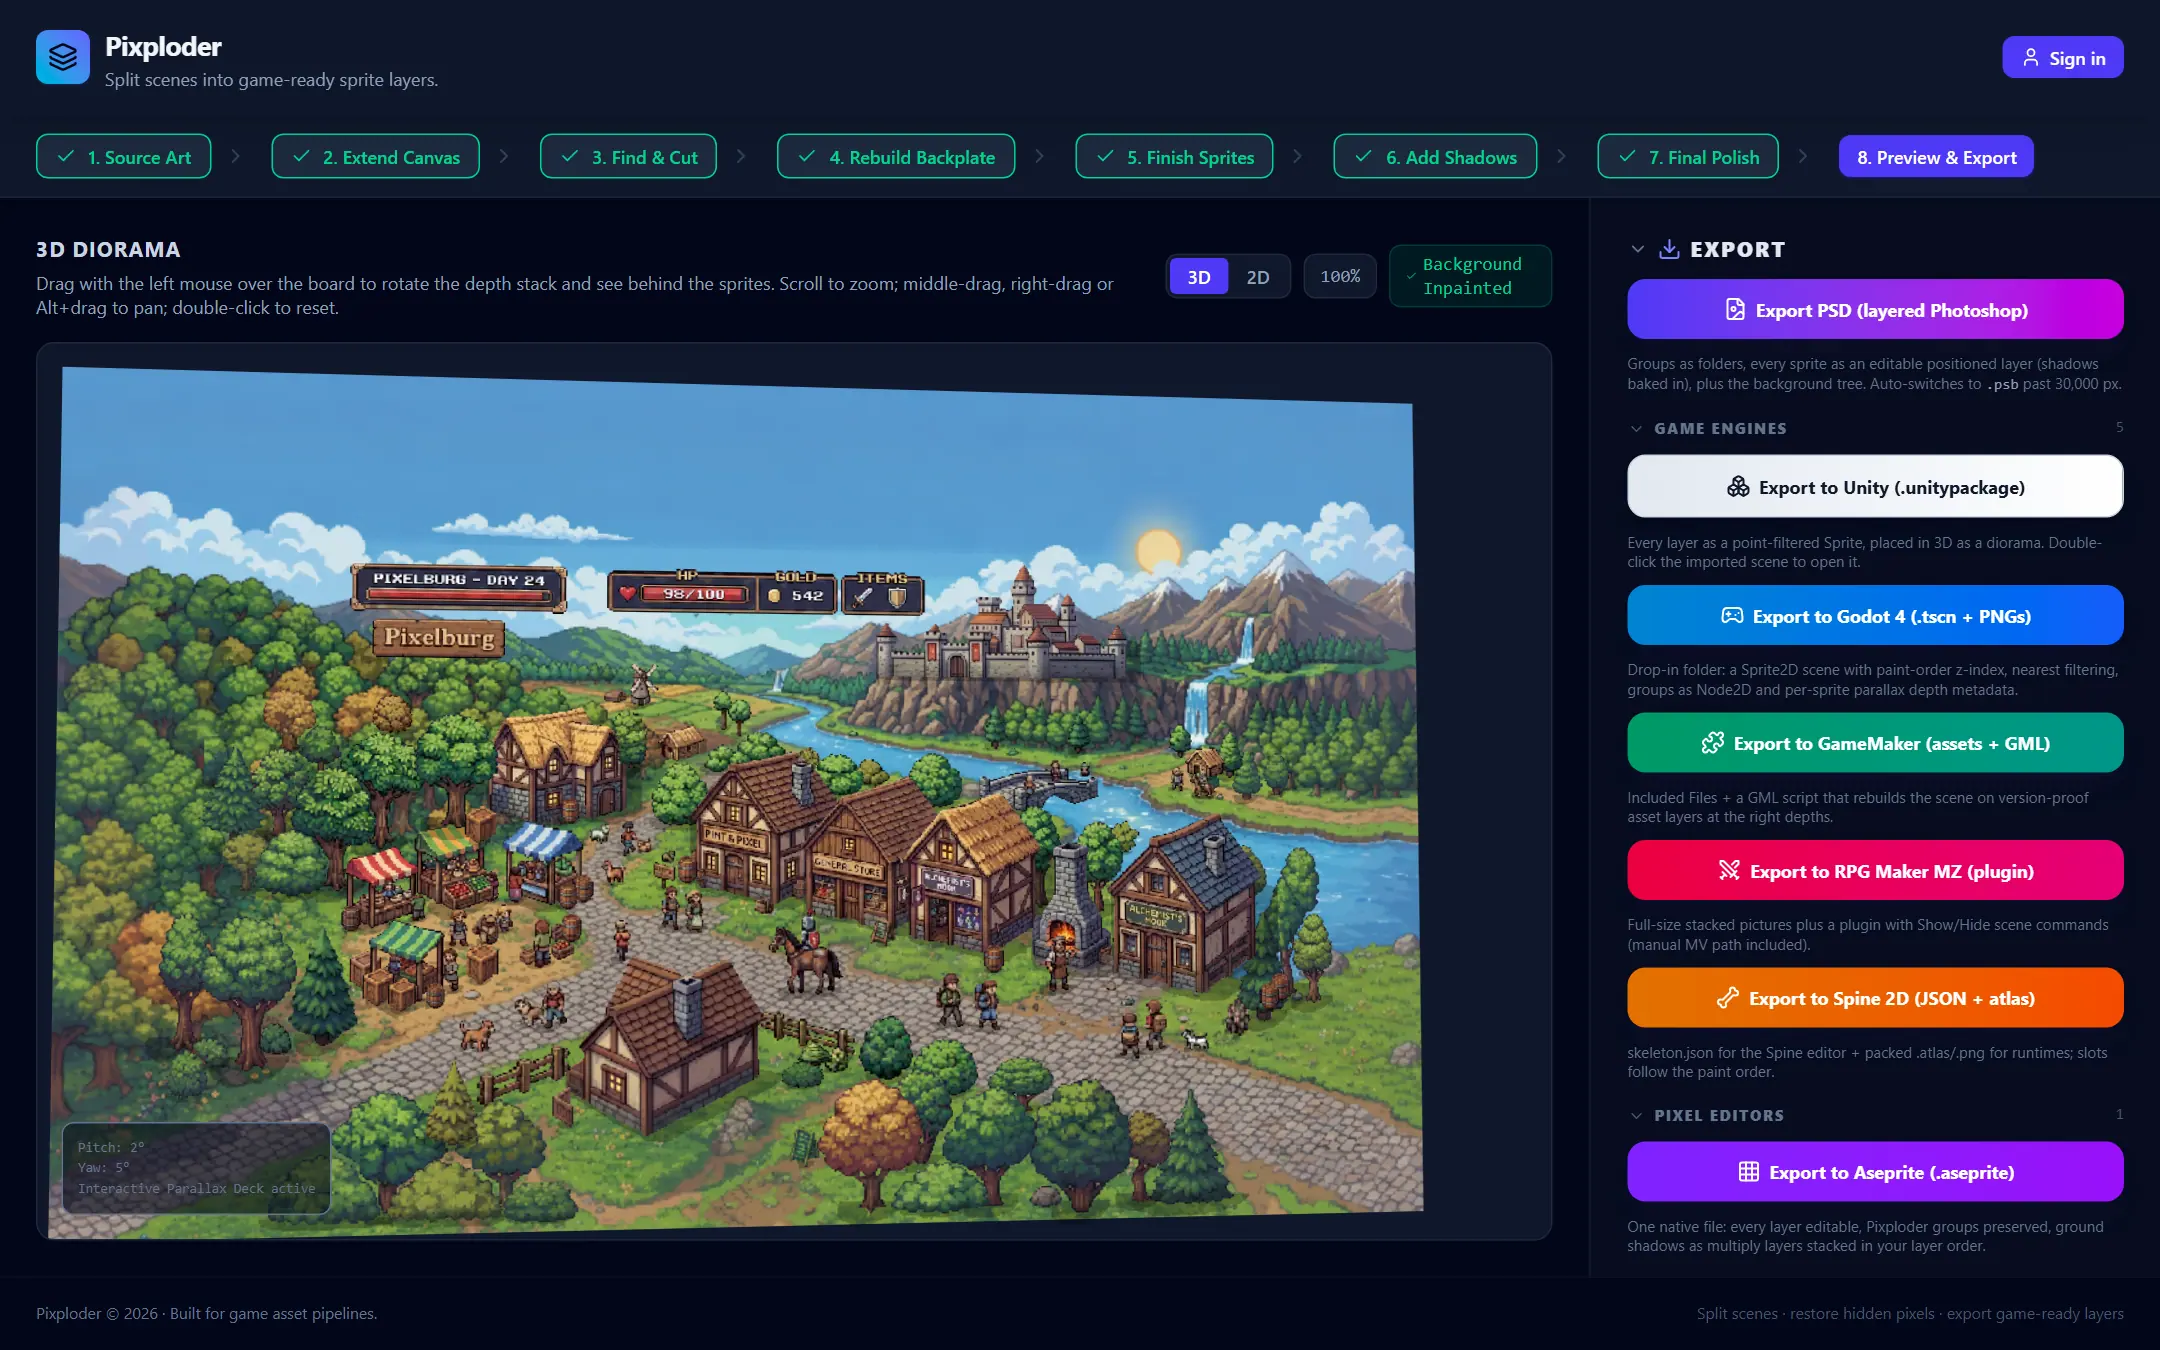
Full guide: Step 8 · Preview & Export.
The mask editor
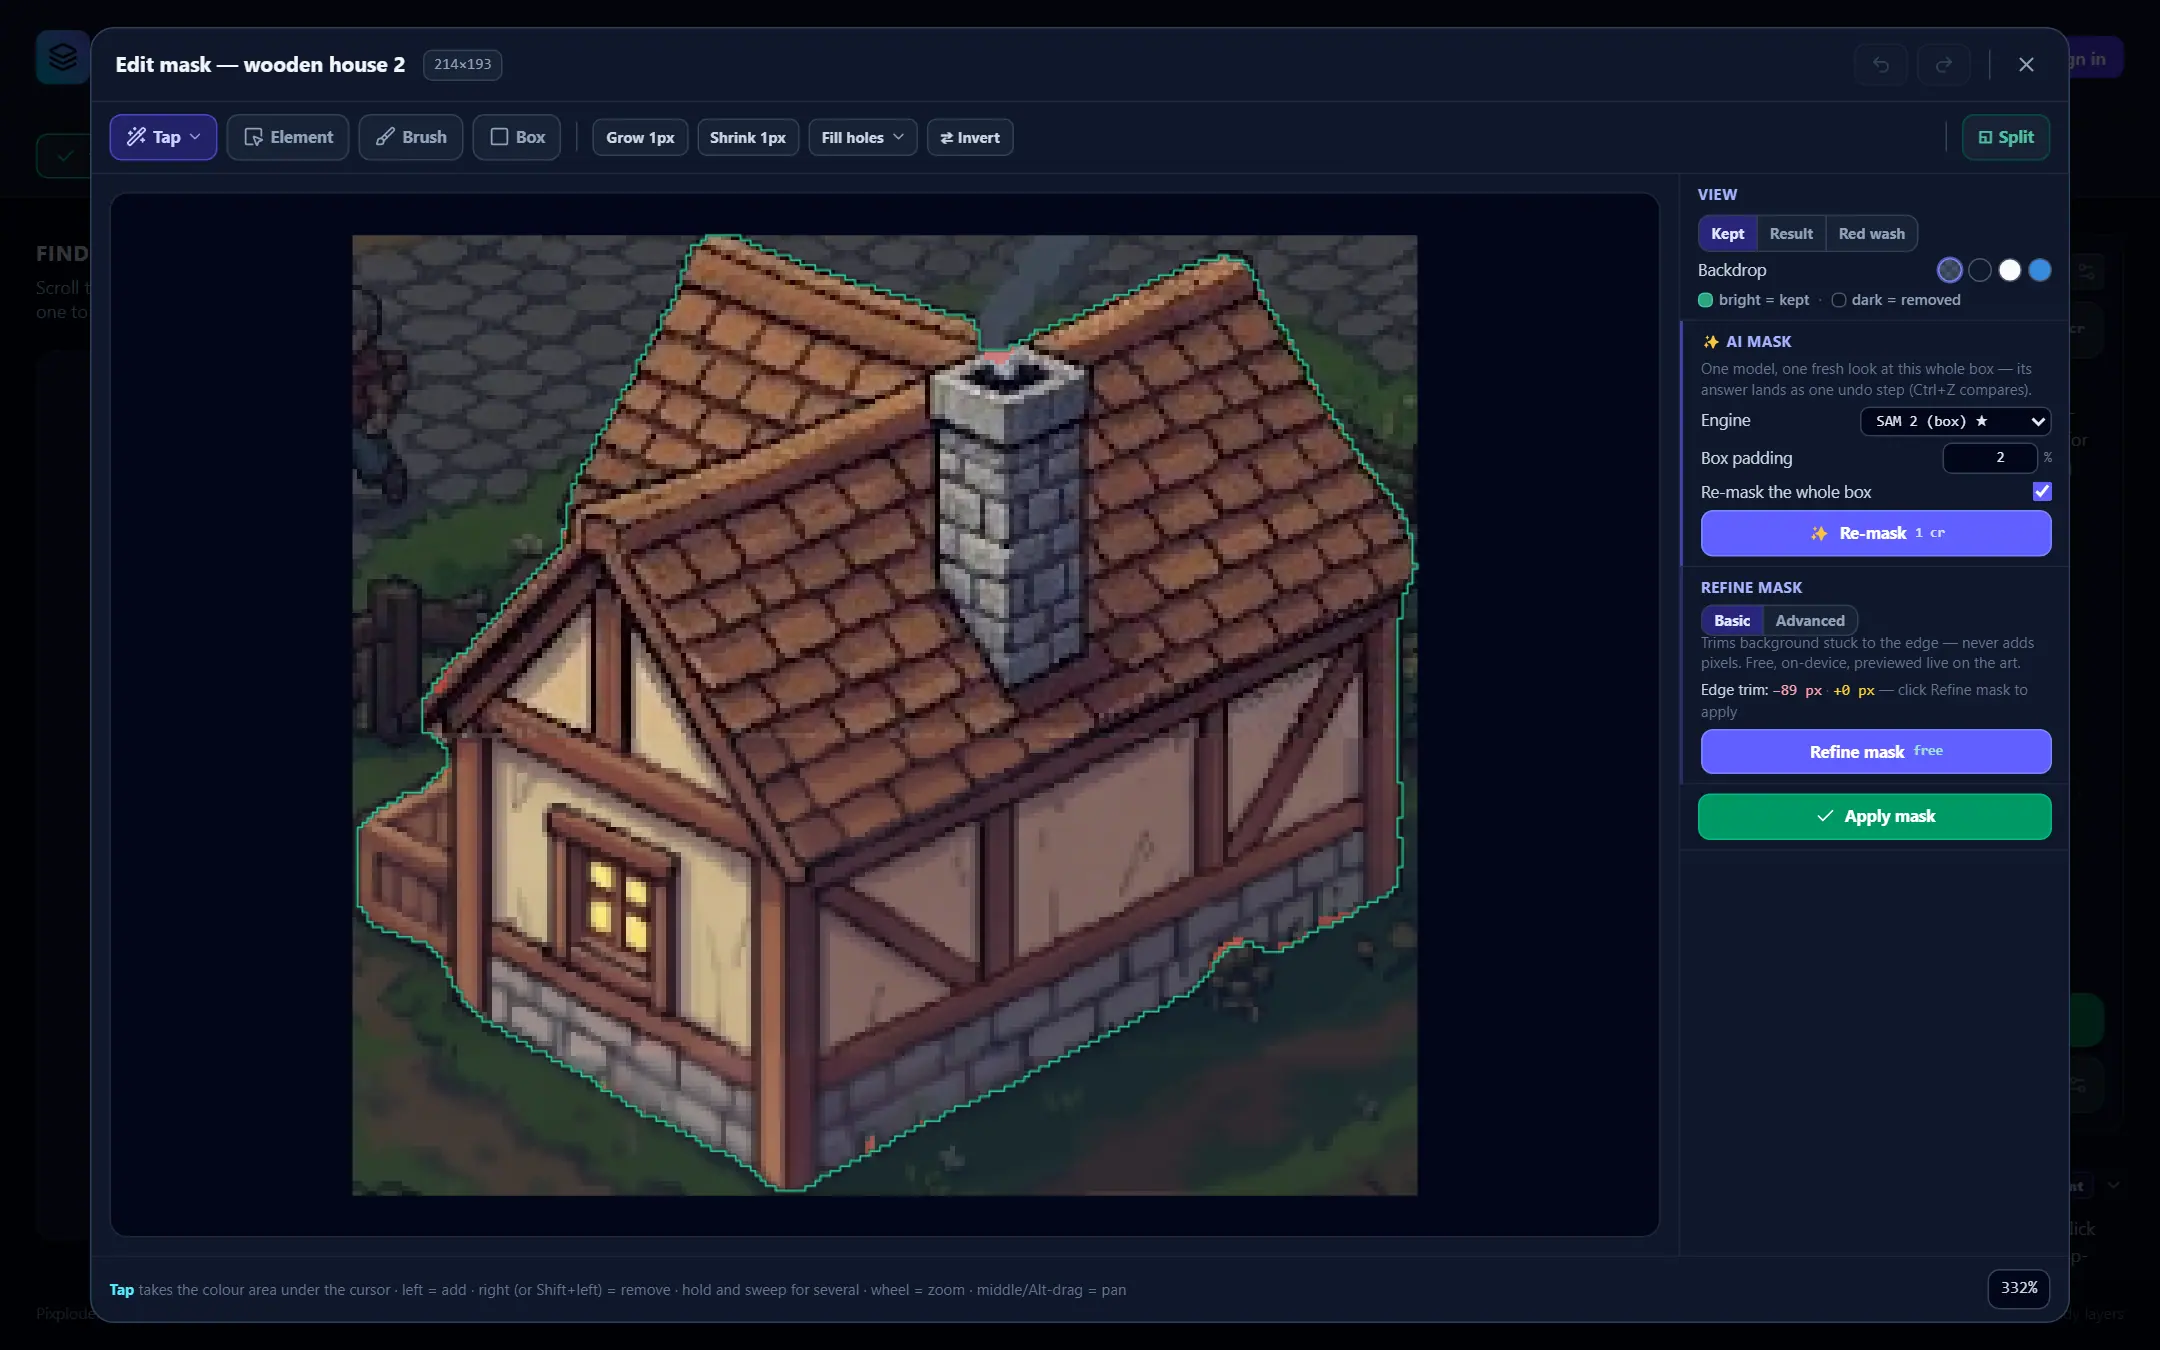
The Edit mask workspace opens over one element's own crop, always from Step 3: the brush icon on any FOUND ELEMENTS row, the Edit mask chip on a selected box, Mask — {name} in the toolbar, or releasing a New element drag. Everything in it is free except two paid actions, and both print their price on their face.
- Four tools, one polarity.
Tapis the magic wand and takes the color area under the cursor;Elementtakes a whole thing instead — a neighboring element, a split piece, or the unclaimed remainder — and saysNo element hererather than guess.Brushpaints pixel by pixel with a size and a round or square shape;Boxcommits a marquee. Left adds, right removes, on every tool. - Blunt whole-mask fixes.
Grow 1px,Shrink 1pxand⇄ Invertact on the whole mask at once.Fill holesopens a small panel with aMax hole sizecap and previews what it would add in amber before✓ Fill holeswrites it. - Two mask passes. The
✨ AI masksection asks a model for a fresh answer, with anEnginelist and aRe-mask the whole boxoption; its✨ Re-maskbutton is the paid one and prints its price.Refine masktrims the edge on your own machine —BasicorAdvanced, with aStrengthdial — and shows in rose exactly what it would remove. - Carving is a mode.
◱ Splitat the end of the toolbar swaps the side column for the split card. It carves one element into several —Auto,ColoursandGridfree on-device,AI carvepaid — showing the pieces on the art first, with nothing created until you commit. - View and commit.
Viewstays at the top of the column —Kept,ResultorRed washover fourBackdropswatches — undo and redo sit in the header (Ctrl+Z/Ctrl+Y), andApply maskat the foot writes the result back to the element —Create elementwhen you started from a drawn box.
Full guide: Mask editor.
Repairing a sprite version
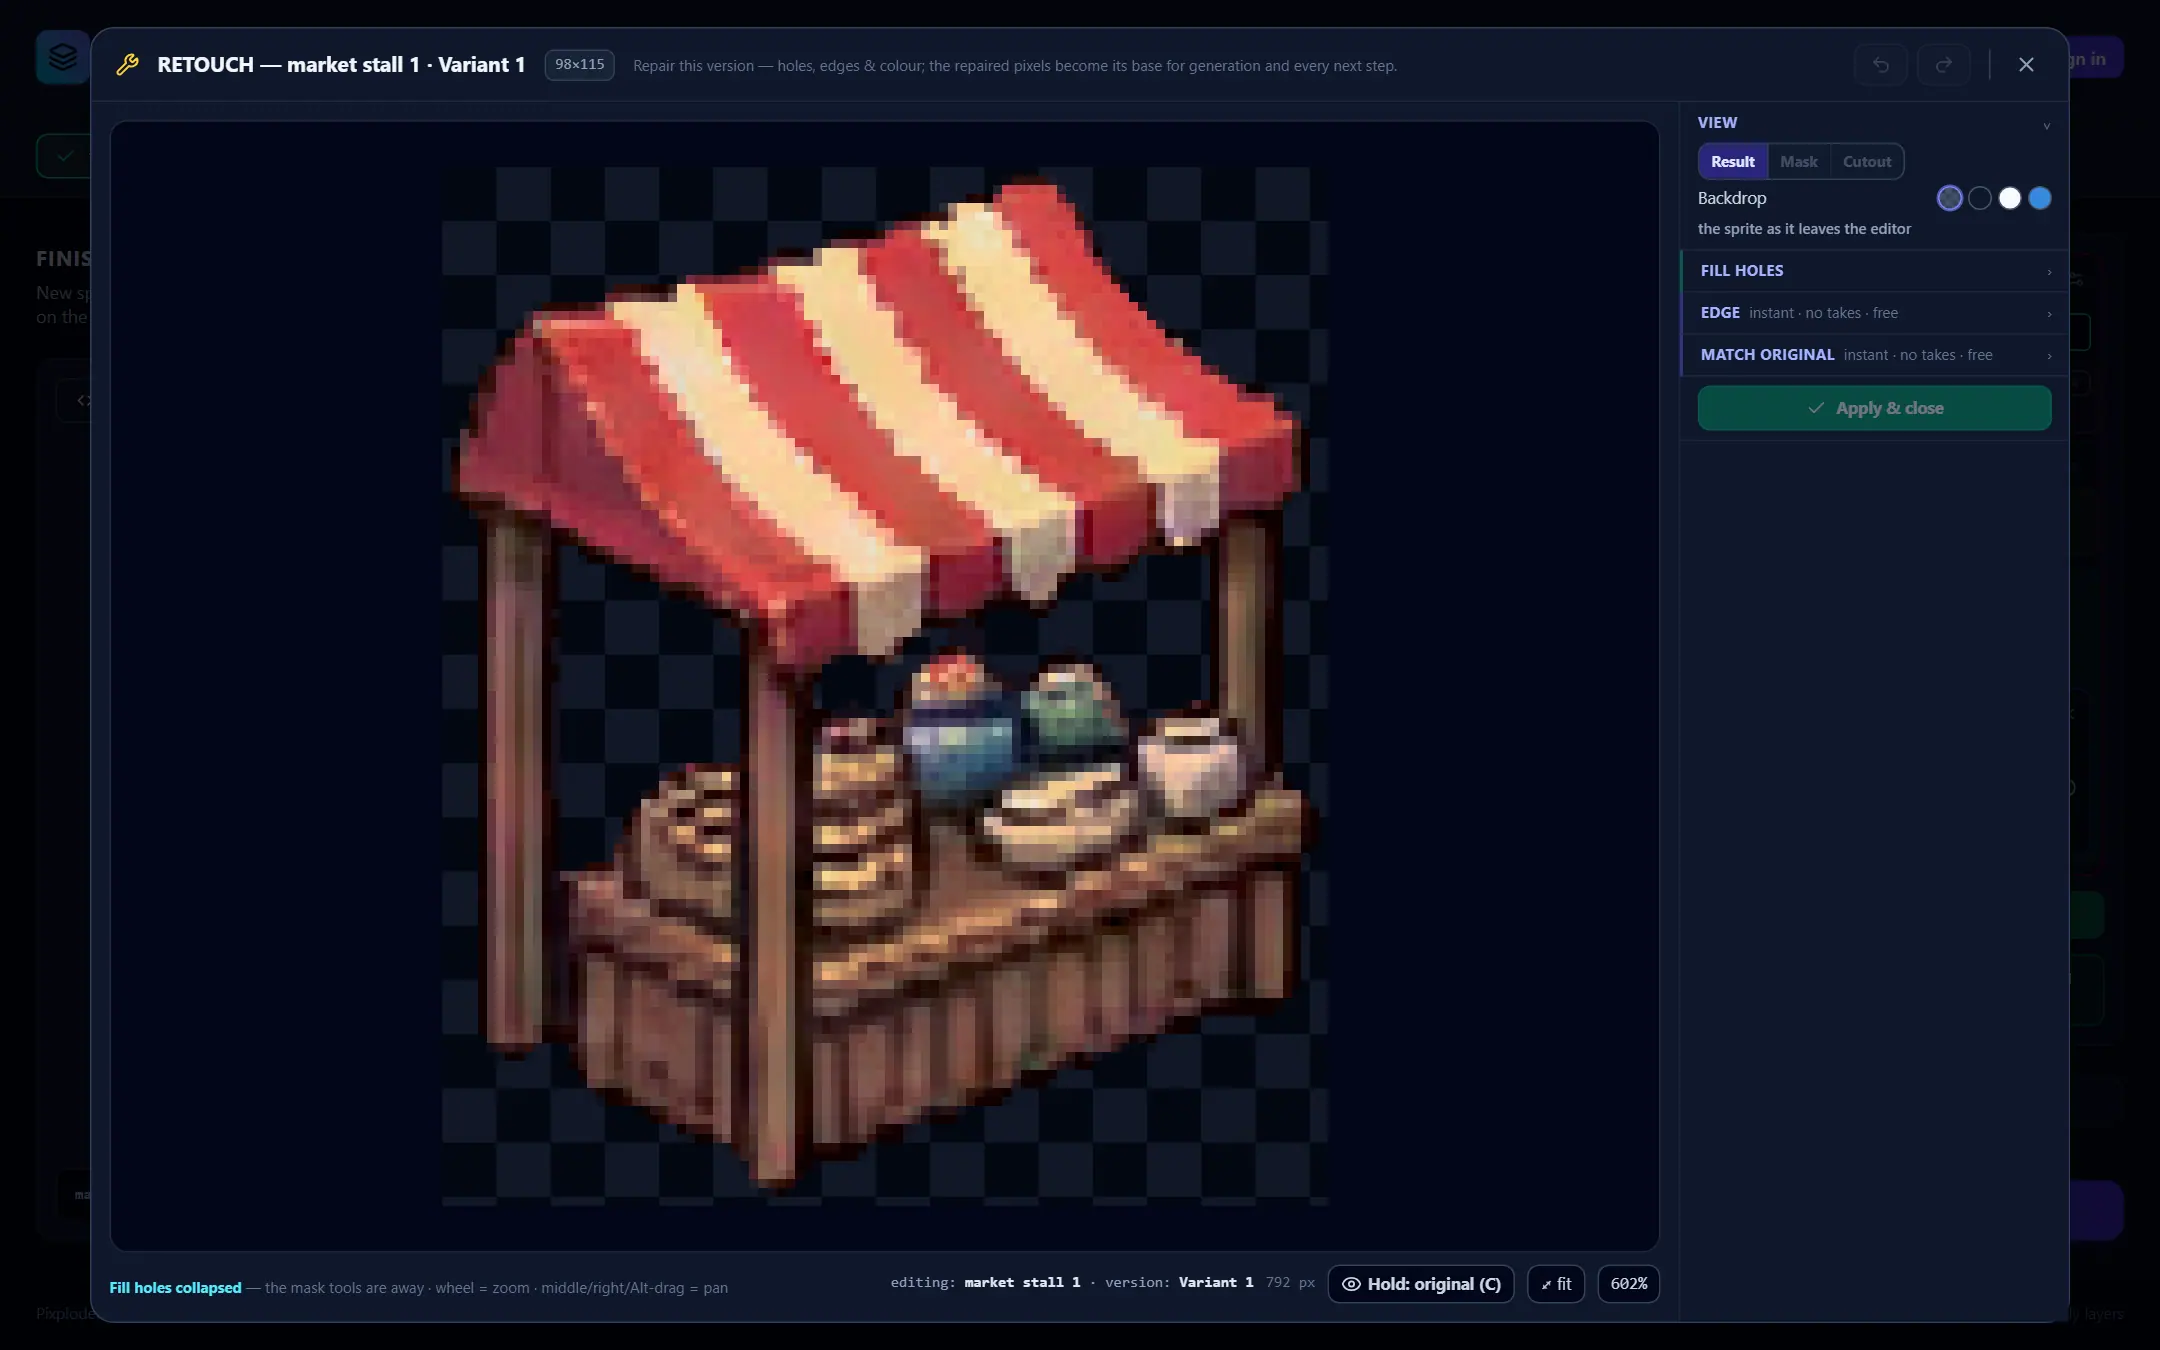
The wrench badge on a version thumbnail opens a repair window for that one version. Four blocks in one column, three of them doing work, and only one of those can spend a credit.
VIEWcaptions the canvas:Result,MaskandCutoutover fourBackdropswatches. It is the one block that opens with the window — the three that do work open closed, and folding one hides its controls and nothing else.FILL HOLES. Every enclosed hole is already detected and selected when the window opens; extend that selection withPick,Tap,Brush,EraserorBox, then pressFill maskto run one engine pass over the lot.Flat colorpaints the mask one color with an eyedropper to choose it andPeriod cloneclones the surrounding pattern into it — both instant and free; between them, where the server offers it, sits an AI inpainting engine that prints its price on its own chip and on the button.EDGE. Completes a broken outline with the sprite's own edge ink, on aREPAIR, aWIDTHand aCOLOURrow. Deterministic, free, and it never writes alpha — the silhouette cannot move.MATCH ORIGINAL. Fits this version's colors back onto the colors of the original cut-out. Four methods —Accurate,Balanced,HueandFast— plus aStrengthdial; only color moves, and puttingStrengthback to0takes the match off again. It is absent on the original itself, which is the reference.- One commit.
✓ Apply & closewrites every armed half at once, and the repaired pixels become that version's base for generation and every step after it. A dot beside the badge is the fill's only un-apply. - In bulk. Ctrl-click several sprites on the Step 5 scene and its readout grows
EdgeandMatchchips that run those same two settings blocks over the whole selection —instant · no takes · free— withUnify nandRemove from all · nin each chip's menu. A selection that disagrees is refused rather than settled by majority.
Full guide: Sprite repair.
The keyer
Sprites come back drawn on a flat magenta field, and keying is what turns that field back into clean transparency. The 🎛 drawer opens over a soloed generation — the original cut-out has nothing to key, so it carries no drawer — and it edits the same block of controls the run's own ⚙ shows.
- What counts as background.
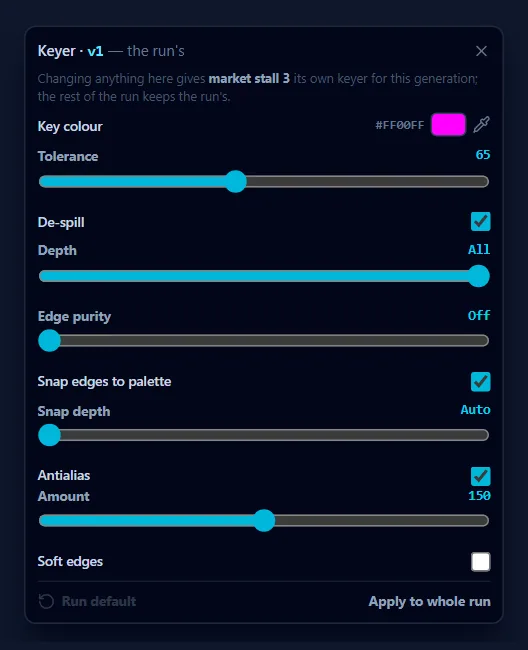
Key colouris the flat color being keyed against — magenta by default, with an eyedropper to pick a different one off the picture and a↺back to magenta.Tolerancedecides how close a pixel has to be. - Cleaning the rim.
De-spillun-mixes the key out of blended edge pixels,Depthlimits how far in from the cut it may reach, andEdge purityfinishes what de-spill leaves behind — in color only, never removing a pixel. - Edges to taste.
Snap edges to paletterecolors edge pixels to the object's own palette, with aSnap depthreach.Antialiassoftens convex corners and stair-steps by opacity alone, on anAmountslider.Soft edgeskeeps a smooth alpha matte with its ownFeather. - Per sprite or per run. Changing anything in the
🎛drawer gives that one sprite its own keyer for that generation; the rest of the run keeps the run's.Apply to whole runpromotes your settings to the generation's own, and aRun defaultbutton drops the per-sprite override again. - Nothing here is paid. Keying runs on your machine, so re-keying a finished generation costs nothing at all.
Full guide: The keyer.
Calls, sheets and generation history
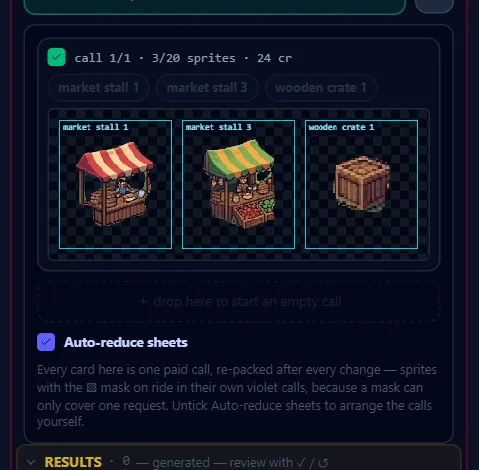
A "call" is one paid request to the AI, and several sprites ride in one. The 👁 button beside the Generate row opens the panel where that packing is visible and editable.
- One card per call. Each card names itself
call 1/3, shows how full it is asn/max sprites, prints its own price, and draws the packed picture underneath. A☑decides whether the call is in the next run; unticking one leaves its sprites on the queue and its credits uncharged. - Move sprites between calls. Each member is a chip you can drag onto another card, and a
+ drop here to start an empty callrow gives a sprite a call of its own. A call packed over the model's limit says so and offersSplit into n calls · n cr. - Let the app pack it.
Repack into n calls · n crhands the whole queue back to the packer when a smaller arrangement exists, and readsAlready the fewest callswhen none does. TickAuto-reduce sheetsand the app keeps it there permanently — re-packing after every change, at the cost of the manual drag and of theRepackbutton, which goes away while the mode is on. - Masked calls travel alone. A sprite whose
▨corner is on cannot share a request with an unmasked one, so it rides in its own violet card, and the note under the Generate button says how many do. - Finished runs are kept.
GENERATION HISTORYat the foot of the rail lists every run with its generations as a strip, its⚙drawer holding what it ran with, its keyer andRun again— a paid re-run of the same sprites on a model and a sentence you pick. A download and a delete sit on each row. - Free second cuts. When a generation was cut before a keying repair, a
Re-cut G{n}button cuts its sprites out of the same stored image again with today's code —no model call, no credits, and it asks first.
Full guide: Calls & sheets.
Export formats
The EXPORT panel fills the Step 8 rail and ships eleven formats — fold the whole panel away and its header says 11 formats — and every one is built in your browser from the scene you are looking at: paint order, approvals, shadows and the repixelize bake. None of them spends a credit.
Export PSD (layered Photoshop)is the primary button at the top: the Find & Cut tree as folders — the ones you built, and the tag heading every other top-level element sits under — every sprite as an editable positioned layer, aShadowsfolder and the background underneath. Past 30,000 px it switches to.psbon its own.Game enginesholdsExport to Unity (.unitypackage),Export to Unreal Engine (UE5 project),Export to Godot 4 (.tscn + PNGs),Export to GameMaker (assets + GML),Export to RPG Maker MZ (plugin)andExport to Spine 2D (JSON + atlas).Pixel editorsholdsExport to Aseprite (.aseprite)— one native file with every layer still editable.Universal formatsholdsTexture atlas + JSON/XML,Cropped PNGs + JSONandFull-size layers (ZIP).
Full guide: Export formats.
Projects and autosave
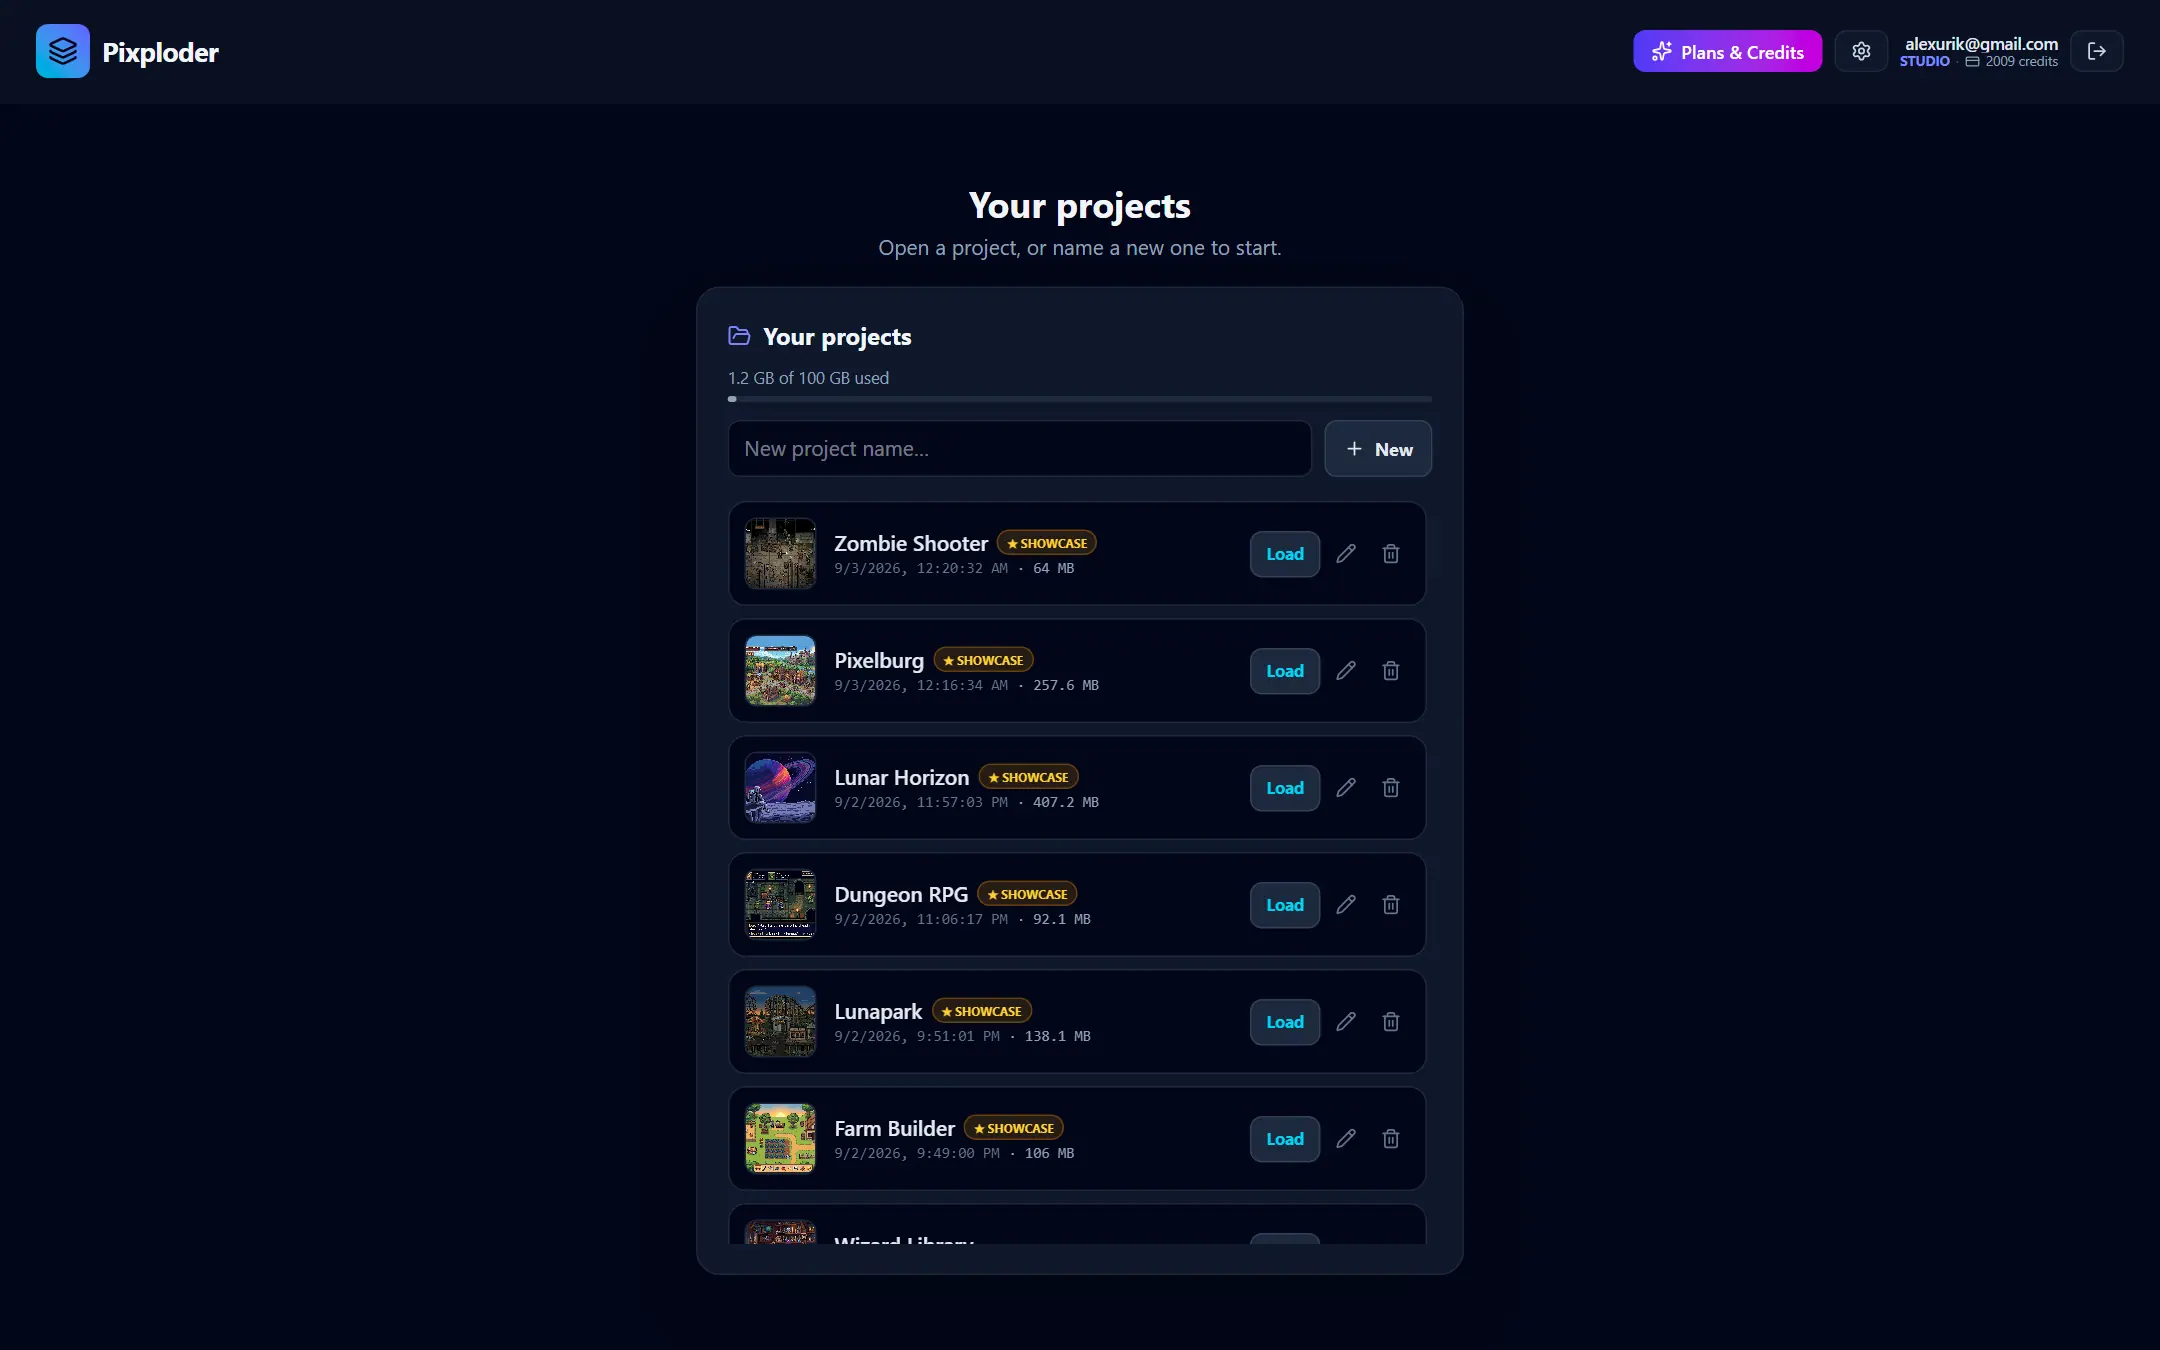
Your work lives in a named project in your account, and you never have to save it — every change is written to the cloud for you.
- The header says where you stand. The project's name sits in the editor header with a read-out beside it: amber for
unsaved changes…andsaving…, emerald forsaved, rose forsave failedwith the reason spelled out underneath. Your projects. You open or name a project before the editor appears, andProjectsin the header opens the same panel later.Newstarts an empty project,Save currentforks what is on screen into a new one.- Every row is a project. A thumbnail, its last-saved date, its stored size, a
Load, a rename and a delete — and the one you have open wears anopenbadge. - Storage is on screen. The panel prints your real usage in plain numbers — a line like "0.8 GB of 1 GB used" — over a bar that goes amber from 80 % and rose from 95 %.
- Everything travels. Every step's state is part of the project, so you can close the tab mid-pipeline and pick the same scene up later.
Full guide: Projects & autosave.
Credits and plans
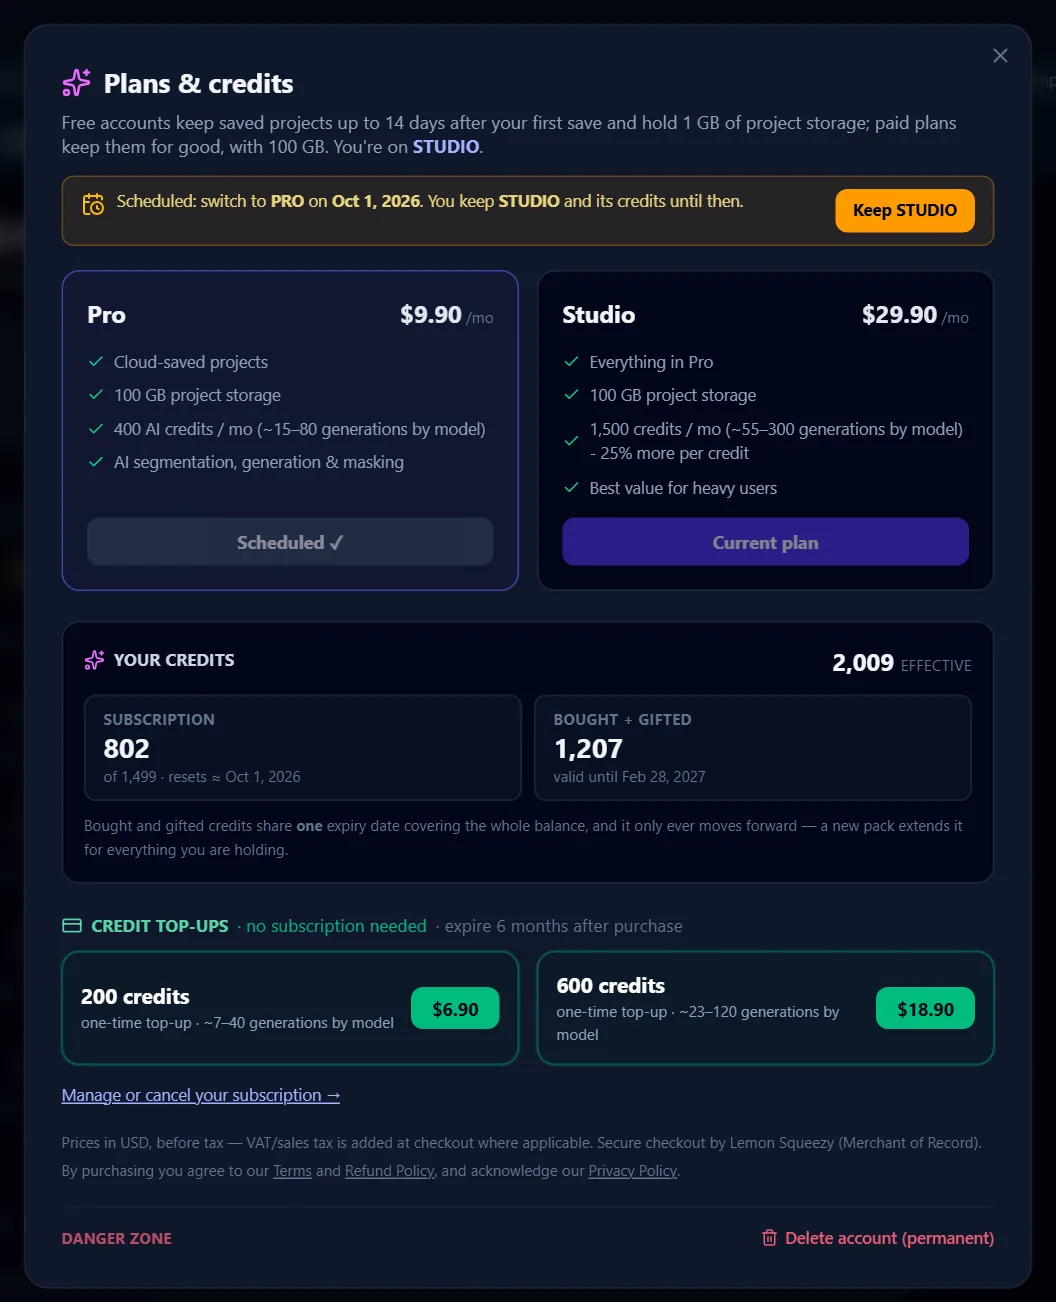
Credits are the single currency for every AI action, and they are worth the same on every plan.
- Your balance is always visible. The account block in the header prints your plan and your remaining credits, and each paid button prints its own price on its face.
- Nothing is spent silently. A confirm dialog naming the exact cost appears before the credits leave you — unless you tick
Don't ask again this session. - Local work is free. Masking, splitting, keying, outline repair, color matching, snapping, shadows, repixelizing, palette snapping, previewing and exporting never touch the balance.
- Plans and packs. The header's
Upgradebutton —Plans & Creditsonce you are on a plan — opens thePlans & creditsdialog. It lists the monthly plans with their credit allowance and their project storage, and the one-time credit packs underneath them — a free account keeps working on packs alone. Paid plans keep your projects for good; a free account keeps them for a limited window after the first save.
Full guide: Credits & plans.
Keyboard and pointer
The same gestures work on every step's canvas, so the pointer habits you build on Step 1 are still true on Step 8.
- Zoom and pan. Scroll to zoom at the cursor; middle-drag, right-drag or
Alt+drag to pan. Every viewport has a%chip that resets the zoom. The mask editor is the one exception: right-drag removes from the mask there, so panning is middle-drag orAlt+drag only. - Selecting. On Step 3 a click cycles overlapping boxes smallest first,
Ctrl-click adds one to a multi-selection, and hovering a box previews its mask. On Step 5Ctrl-click builds the bulk set the scene readout and the rail's bulk row act on. - Placing. On the Step 5 scene, drag to move, pull a corner to scale, arrow keys nudge by a pixel (
Shiftfor ten) and a double-click resets the sprite. - Undo.
Ctrl/Cmd+Zwalks back Step 3'sFOUND ELEMENTSlist, the whole of Step 4, and Step 5's fill-zone strokes — none of the three has a redo. The mask editor and the repair window each keep a realCtrl+Z/Ctrl+Yring of their own. - Comparing. Hold the
Ckey — or theHold: original (C)chip — to flash the untouched original on Steps 4, 5, 6, 7 and 8, and in the repair window. - Escaping.
Escdisarms Step 3's draw mode, clears the selection on Steps 5 and 6, and in the mask editor closes an open popover, then leaves the piece overlay, then exits◱ Split, then closes the dialog.
Full guide: Keyboard & pointer.
Tip. Want to see the whole thing working rather than read about it? The Quickstart takes one scene through all eight steps to a finished layered PSD.