Repairing a sprite version
A sprite can come back with a hole punched through it, with its outline broken where a mask bit into the object, or simply in the wrong colors — warmer, more saturated or paler than the piece you cut out of your own art. All three are repaired in place, on one version, in one window, and only the hole fill can ever spend a credit. What the window commits becomes that version's base: the picture the AI is shown on the next run, and the picture Step 6 · Add Shadows, Step 7 · Final Polish, Step 8 · Preview & Export and every export receive.
Costs. One control in this window can spend: Fill mask, and only while the AI inpainting engine is the picked one — 1 cr per press, however many holes the mask covers, and a Use 1 credit? dialog confirms it before anything leaves your balance unless you ticked Don't ask again this session on an earlier spend. Everything else is free and local: the whole mask toolbar, the two other fill engines (Flat color and Period clone), switching between banked takes, the entire EDGE outline repair, the entire MATCH ORIGINAL color match, Hold: original (C), zooming, undo, and ✓ Apply & close itself. Re-running the paid engine over the same mask serves the take you already banked instead of running it again — and instead of charging. The bulk Edge and Match chips on Step 5 · Finish Sprites spend nothing at all. See Credits & plans.
Two ways in
The window opens on one sprite, one version — never on a selection and never on the scene as a whole.
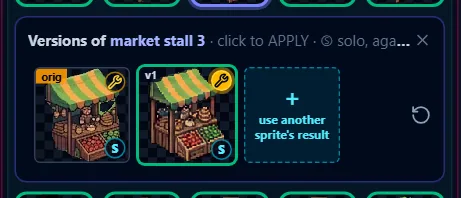
- The wrench badge on a version thumbnail. Open a sprite's version row on Step 5 · Finish Sprites — click the sprite on the scene, or tap its tile in the rail — and every thumbnail carries a small amber wrench in its top-right corner. The row's own header names it:
Versions of {name} · click to APPLY · Ⓢ solo, again for the scene · 🔧 retouch. Press the badge, not the picture: the picture applies that version, the badge opens it for repair. It works on any version, the original cut-out included. Retouchon the scene's action pill. Select exactly one sprite on the scene and the pill under its box carriesRetouchbeside✏ Fill zones…. It opens the same window on whatever version that sprite is currently applying, so you never have to find the thumbnail first. Its tooltip says which version that is —Retouch {name} — holes, outline and colour match on the shown version (v2). Free., or(original)where the sprite is still showing its cut-out.
An outlined badge means there is a repair window here — its tooltip offers the whole room, Retouch — fill the holes, repair the outline and match the original's colours in this version. A filled amber one means a repair is already applied to this version, and the tooltip enumerates which: Retouch — a fill, an edge repair and a colour match are applied to this version. Click to edit it. A borrowed ⧉ version carries no badge at all, and on a sprite that is showing one the pill's Retouch goes dim and says why: {name} is showing another sprite's result — retouch it on the sprite it was borrowed from. A copy mirrors its source, so its repair belongs on that sprite's own tile.
The window
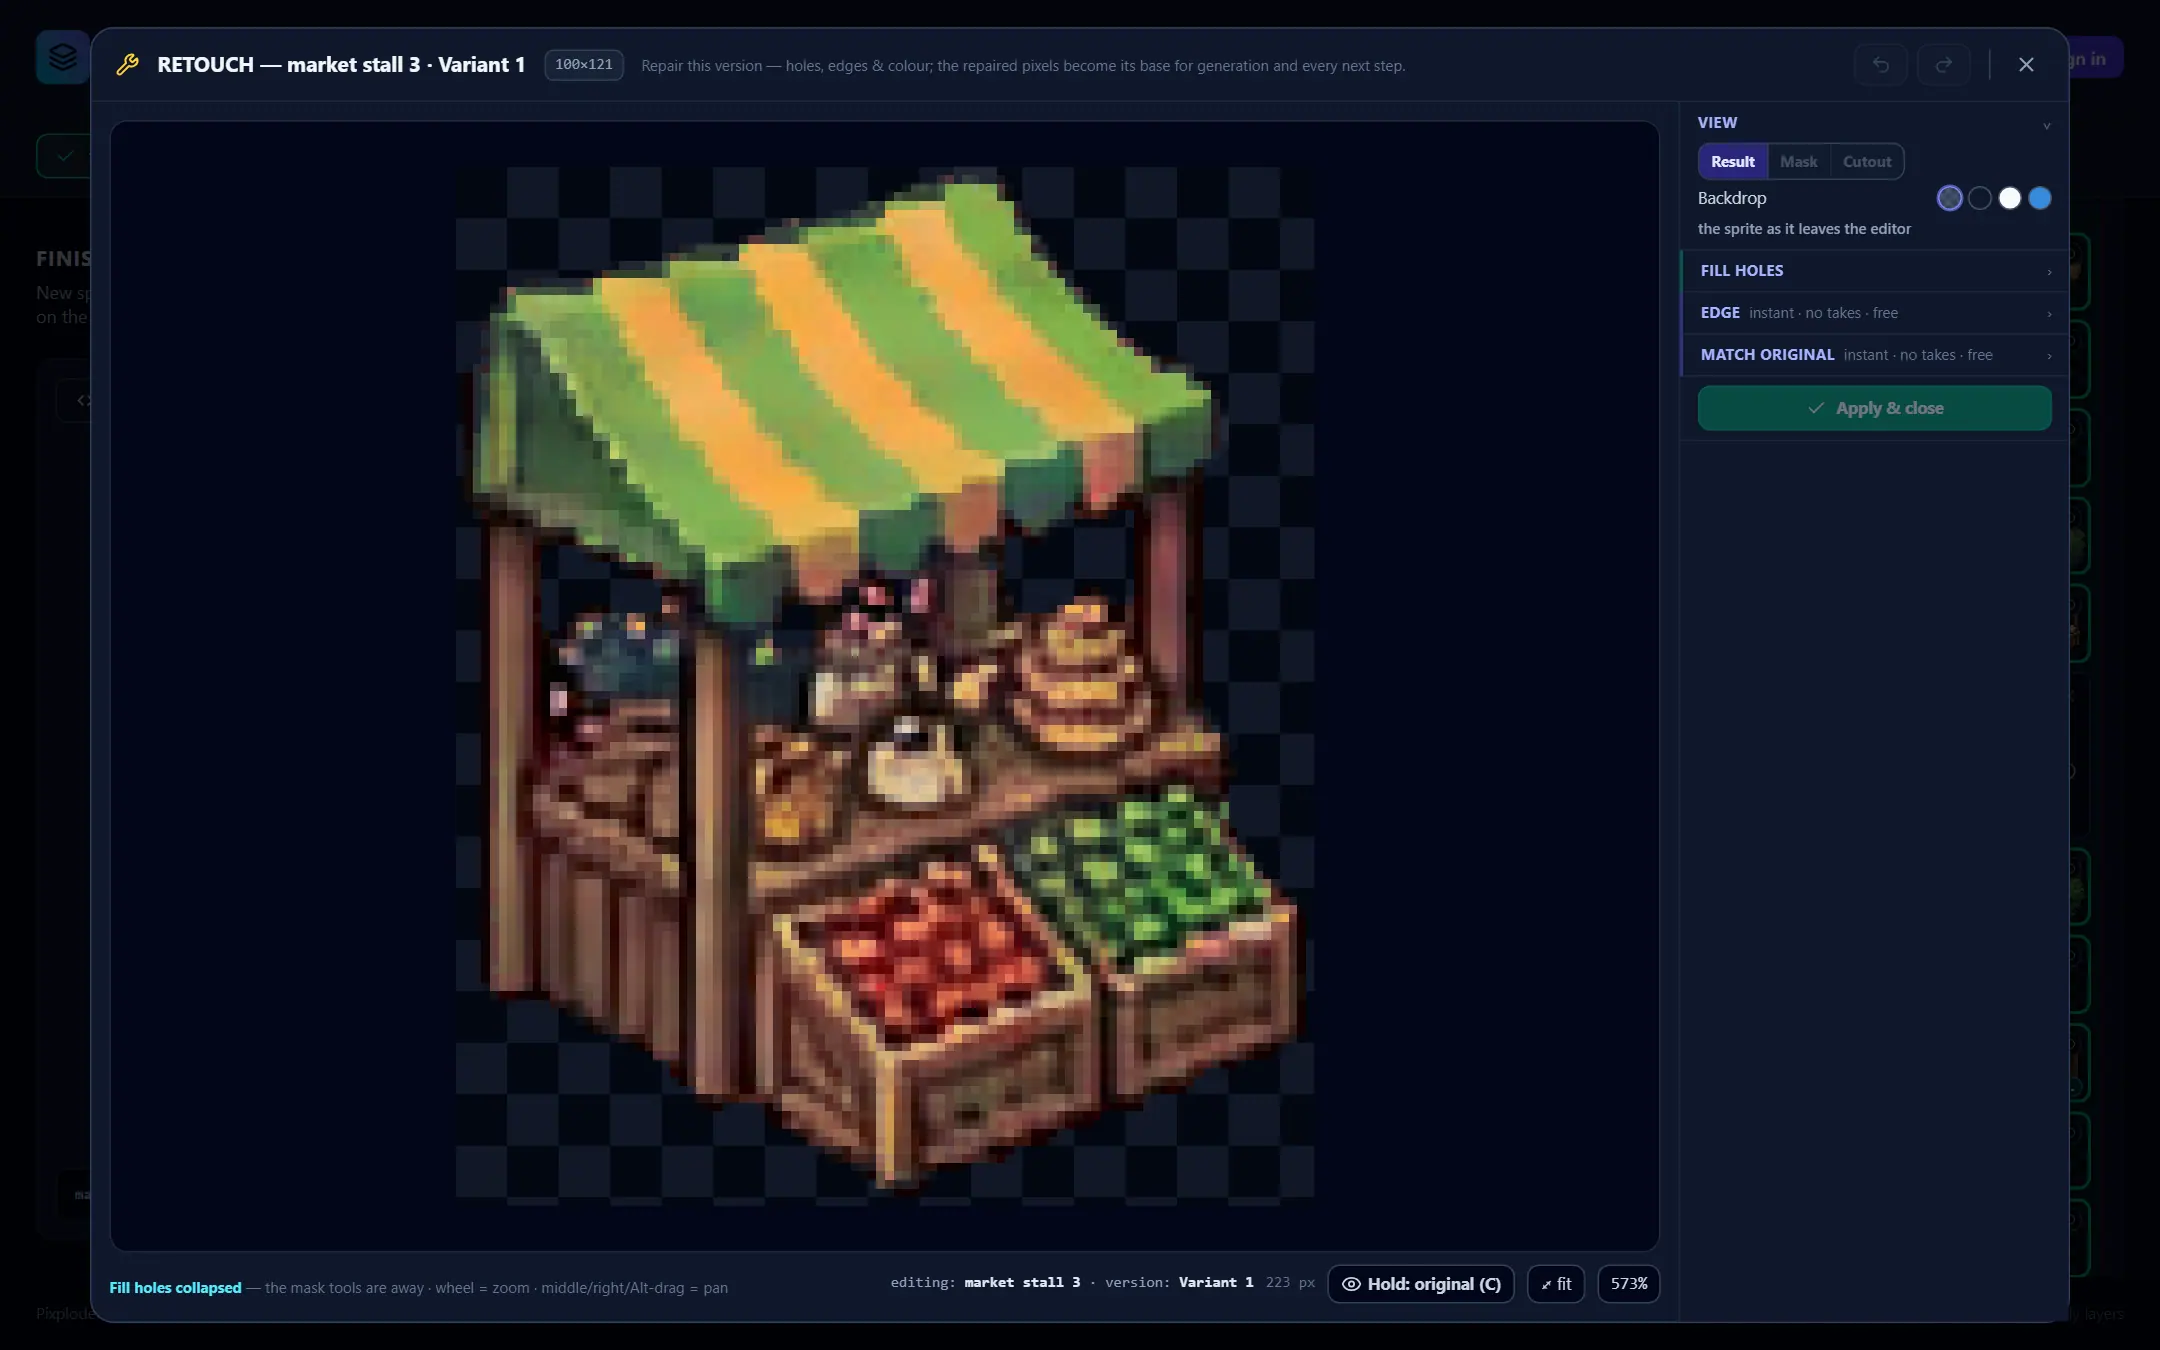
The header reads RETOUCH — {sprite} · {version} (Original for the cut-out, Variant {n} for a generation), then the crop's size in pixels, then the line Repair this version — holes, edges & colour; the repaired pixels become its base for generation and every next step. On the right of the header sit an undo and a redo arrow — Undo (Ctrl+Z) and Redo (Ctrl+Y) — Ctrl+Shift+Z does the same — and the ✕ that closes the window.
The ✕, Esc or a click on the dim margin closes without applying, and keeps your mask and your takes on the version for next time — Close without applying (Esc). Your mask and takes are kept on this version. There is no Cancel button: closing is not a discard, and the only thing a close throws away is an un-applied change.
Left of the canvas there is nothing but the picture, opened at whatever zoom fits the whole crop. Under it a status row carries, from left: a sentence about the live tool — or, while the mask half is folded away, Fill holes collapsed — the mask tools are away · wheel = zoom · middle/right/Alt-drag = pan — then editing: {sprite} · version: {version}, the mask's size as {n} px, then three controls that are always available.
Hold: original (C)shows the sprite's original cut-out — the crop every version here was generated from — for exactly as long as you hold the button or theCkey. It is a press-and-hold on purpose: a comparison you can leave switched on is one you eventually mistake for the result. HoldingCin the middle of a brush stroke shows the before-picture without dropping the stroke.⤢ fitfits the whole crop in the viewport, and the{NN}%chip beside it prints the zoom and resets it to 100 % (1:1 pixels, centered).- The wheel zooms toward the cursor, and middle-drag, right-drag or
Alt-drag pans — at any zoom, and with every block folded away. One gesture at a time: a pan cannot start on top of a stroke that is already running.
The right-hand column is four collapsible blocks: VIEW, FILL HOLES (the one that can spend), EDGE, and — on every version except the original — MATCH ORIGINAL. Each block's heading is its own toggle.
The three blocks that do work open closed. VIEW stays open, because with the mask put away the canvas is all there is to look at and VIEW is what captions it and holds the backdrop swatches. Nothing is off or lost behind a folded heading: the holes are already detected and already selected, and an edge repair or a color match the version carries is still being previewed on the canvas. Folding VIEW, EDGE or MATCH ORIGINAL hides controls and nothing else. Folding FILL HOLES does more, because that block owns the mask.
VIEW — what the canvas is showing
A three-way switch over four backdrop swatches.
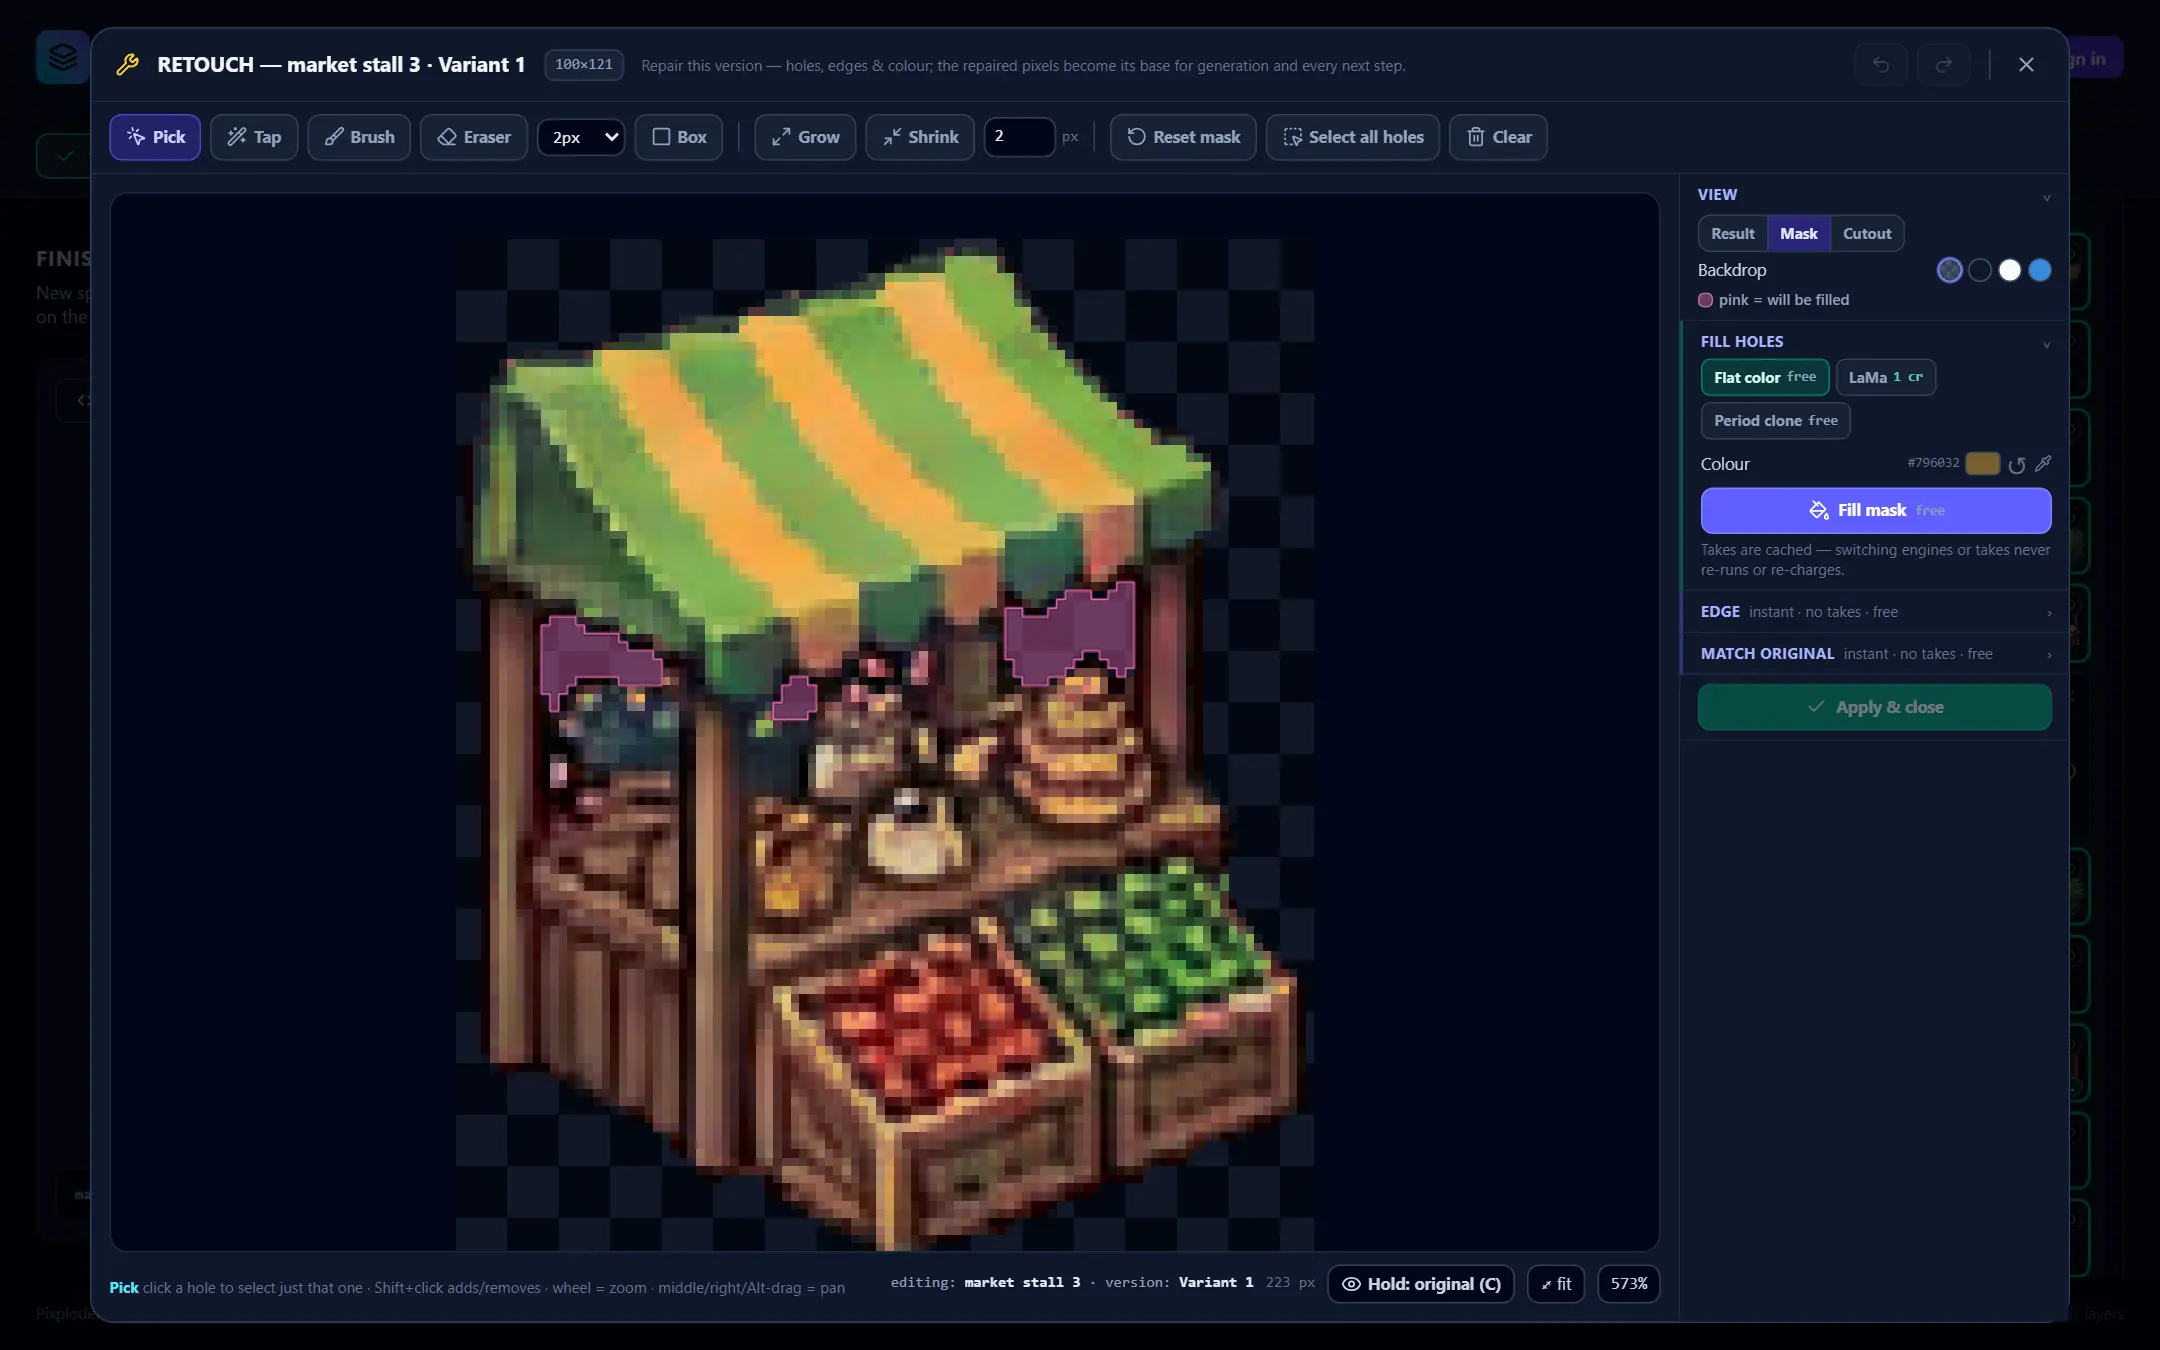
Result—the sprite as it leaves the editor. On a version that already carries a fill, this is that fill; it is also where a freshly opened window starts.Mask—pink = will be filled. The union of the holes you picked and everything you painted.Cutout—mask cut to transparency, so you can see the shape you drew.Backdrop—Transparent (checker),Dark,Light,Blue. The same four solo view offers, so you can prove an edge against whatever your game sits on.
Mask and Cutout are both pictures of the mask, so with FILL HOLES folded they are disabled and the canvas snaps to Result — their tooltip says Expand FILL HOLES to inspect the mask.
FILL HOLES — one pass over one mask
Occlusion blanking punches out every overlapping sprite and the keyer opens interior gaps, so a cut-out routinely arrives with real holes in it. This block selects them, lets you extend that selection by hand, and runs one engine pass over the union.
Every hole is detected and selected for you the moment the window opens, and reopening the window brings back the mask you left. Expanding the block brings the toolbar and your mask back exactly as they were. A hole here means an enclosed transparent region of any size — single-pixel specks included, and there is no size cap on either end — that does not touch the edge of the crop. A bite taken out of the silhouette is not enclosed and is never picked up for you, which is what Brush and Box are for.
The toolbar
The toolbar belongs to FILL HOLES and hides with it. With the block folded there is no toolbar row at all, the mask tools are inert — clicks on the canvas, B, E, [ and ] all do nothing — and no pink overlay is on the picture. Nothing on this toolbar costs anything.
Pick(the tool a window opens on) selects one detected hole per click;Shift-click adds or removes one.Tapadds the color area you point at, andShift-tap removes it — dropping any detected hole it touches. A hole's transparent pixels read as black, and a faint tint under the cursor previews what the next tap would take. Clicking the chip whileTapis already live opensTAP SETTINGS, the one panel in this window allowed to float over the art —Esc, a click outside it, or switching tools puts it away. It holdsTolerance(0–80, opening at10—higher folds in more nearby colours),Reach(Contiguousfloods outward from the click,Globaltakes every matching pixel in the frame) andSample(Pointkeys off the clicked pixel,3×3off its average, steadier on noisy edges). With the wide reach on, the chip itself readsTap · global.Brush(B) paints an area that gets filled exactly like a detected hole, andEraser(E) wipes paint back off — and drops any detected hole it touches. The dropdown beside them sets the size from a fixed ten-rung ladder,1pxto50px;[and]step through it. A fresh crop opens on the rung nearest a sixty-fourth of its short side, so a small sprite does not open under one giant stamp.Boxdrags a rectangle into the mask;Shift-drag takes one out, dropping any detected hole it touches. A click with no drag commits nothing.GrowandShrinkmove the whole mask edge by the pixel amount in the box next to them (1–64, opening at2).Reset maskre-detects every hole from this version's own pixels, selects them all, and drops your paint — and the takes with it.Select all holesre-selects the detected ones and leaves your paint alone.Clearempties the mask completely.
Ctrl+Z walks back mask edits and dials alike — so an undo pressed while the mask is folded away can move it out of sight, and the {n} px count on the status row is what tells you. The one thing it does not walk back is a take: a fill result is something you may have paid for, so an undo after a fill puts the mask back and leaves the take on its chip. Reset mask is the gesture that throws takes away, and its tooltip says so.
The engines and the takes
Two or three chips sit at the top of the block, each with its own price on its face.
Flat color(free) paints the whole mask one flat color. TheColourrow under it holds the hex readout, the swatch, a↺back to this sprite's own average opaque color (which is where it starts), and — in a browser that has one — an eyedropper that picks a color straight off the screen. Without an eyedropper the swatch itself becomes the picker.Period clone(free) clones the surrounding pattern into the mask. It is the right answer for repeating art — bricks, tiles, grids.- Between them, when the server has it enabled, sits
LaMa— an AI inpainting engine that redraws the whole mask in one pass, with1 crprinted on its own chip.
Fill mask runs the picked engine once over the whole mask and carries the same price on the button — free, or 1 cr per press however many holes the mask covers. It reads Filling… while a pass is in flight, and a pass that does not go through leaves a short rose line under the button instead of a second dialog. It stays disabled while the mask is empty and says why: Nothing is selected — pick a hole or paint an area first.
Each press banks a take, and the take chips under the button switch between them (color 1, period 2, and so on) with #{n} shown beside the row. Takes are cached — switching engines or takes never re-runs or re-charges. Pressing the same non-flat engine over the same mask a second time re-activates the take you already have instead of running — and, for the paid engine, instead of charging. The take on screen is the one Apply commits.
Tip. Try Period clone before you pay for anything. On tiled art, brickwork or a fence it is often better than an inpaint, and it is free and instant — you can bank both and compare the chips before you decide.
EDGE — complete the outline
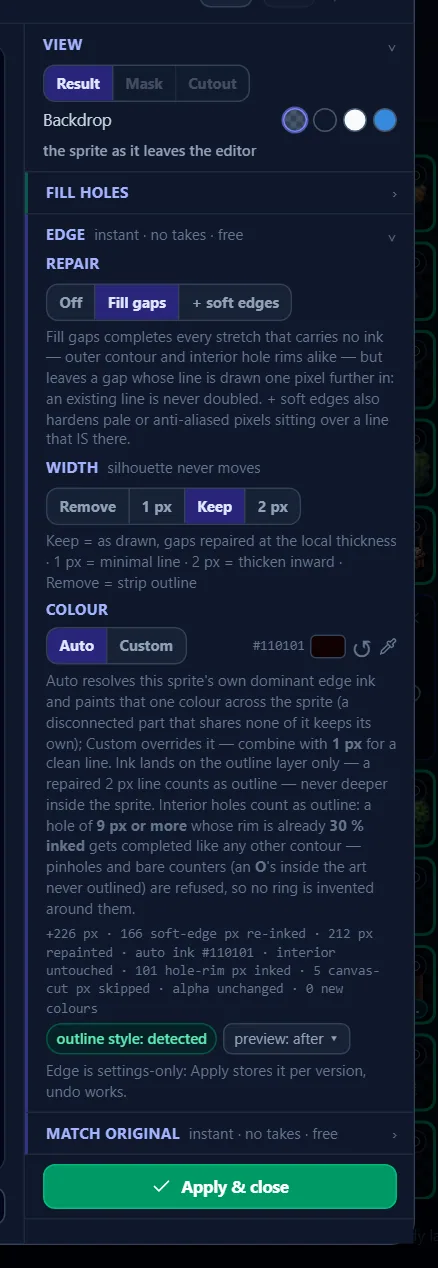
EDGE is a different animal from the block above it: it spends nothing, it recomputes the moment you touch a dial, and it stores settings rather than pictures — instant · no takes · free, as its heading says. It completes outline stretches the generation left missing, in the sprite's own ink and at the thickness the line running into them already has, and it can also even that thickness out or unify the outline to a single ink.
On a version that carries no repair yet the block opens unarmed: the segmented groups are drawn dashed, no chip shows as picked, and the measured line says so — not applied yet — pick a setting to repair this version. Touch a dial and it arms. ✓ Apply & close with the dials untouched stores no edge settings at all.
REPAIR—Off,Fill gaps(the recommended default) or+ soft edges. Both modes ask the same absolute question of every boundary pixel — does this pixel carry the sprite's own ink? — and differ by one exception.Fill gapscompletes every stretch that carries no ink, outer contour and interior hole rims alike, except where the line is simply drawn one pixel further in: an existing line is never doubled.+ soft edgesdrops that exception and also hardens the pale or anti-aliased pixels sitting on top of a line that is already there — the arcs that lit and shaded art leaves behind.WIDTH—Remove,1 px,Keep(the default) or2 px, under the promisesilhouette never moves: thickening grows inward and alpha is never written. The row says it plainly —Keep = as drawn, gaps repaired at the local thickness · 1 px = minimal line · 2 px = thicken inward · Remove = strip outline. OnKeepthe repair matches the thickness it finds, so a gap in a 2 px line comes back 2 px and nothing already drawn moves.1 pxpeels the outline to its outermost layer and collapses it to the band's darkest color;2 pxthickens inward to exactly two.Removeignores the repair mode outright — with the band stripped there is nothing left to complete, and the row saysRemove strips the outline — the repair mode does not apply.Until the pass has counted how much of this sprite is boundary,Removewaits withMeasuring the boundary share….COLOUR—Auto(the default) orCustom, both painting one ink through the same path.Autoresolves this sprite's own dominant edge ink and paints that across the sprite; a disconnected part that shares none of it keeps its own.Customoverrides every piece at once. The resolved hex is shown in the well and named on the measured line, soAutois never a mystery, and↺goes back to it — back to the resolution, not to a frozen copy of it, so the ink still follows the art after a re-cut. The eyedropper picks the ink off the sprite, and in a browser without one the well itself becomes the picker. Whatever the ink, it lands on the outline layer only: a repaired 2 px line counts as outline, and nothing deeper inside the sprite is touched.Force outline— appears only on a sprite the style gate refused, and is covered below.
There is no Advanced block and no sensitivity dial. Both repair modes now read the sprite's own ink directly, so there is nothing left to grade; three rows is the whole surface. A version saved with an old sensitivity value carries it harmlessly — it is stored, and it is ignored.
Under the dials a small mono line reports what the pass measured on the pixels, clause by clause: something like +{N} px · {N} px repainted · auto ink {hex} · interior untouched · alpha unchanged · 0 new colours. Nothing on it is asserted from the settings. It names the ink Auto resolved, counts the pixels laid inward to match a 2 px line ({N} px thickness-matched to 2 px), reports both sides of the hole decision ({N} hole-rim px inked, {N}/{M} holes refused, {N} px left alone on refused hole rims), and says edge px untouched on a run that rewrote nothing that already read as an edge. Where anything could have gone wrong it prints a ⚠ rather than a promise — ⚠ {N} interior px written, ⚠ alpha moved {N} px.
Beside the line sit two chips. One is the style verdict — outline style: detected, no outline style — repair off, no outline style — forced, outline style: checking… while it is being measured, or outline style: not measured on a crop the block stood down for. The other is preview: after ▾, which flips the canvas between the repaired pixels and the ones this version has today; it is dim when the repair changed nothing to compare. A footer line closes the block: Edge is settings-only: Apply stores it per version, undo works.
Three guards decide what the block will do.
- A sprite with no outline style is left exactly as it is. A rose notice says so at the top of the block —
No outline style detected — automatic repair is off. Force outlines it anyway.— and theForce outlineswitch (overrides the style gate) is the override. Turning it on seeds the ink resolved from the sprite's own edge pixels, printed under the switch, and you can override that like any other. If there is no edge ink to resolve at all the pass declines rather than invent one, and the line readsno ink found on this sprite — nothing was painted. - Lattice art disables
Remove. Above about 15 % boundary — railings, grids, lettering — the outline is the drawing, and stripping it would erase the art. The chip grays out and names the number it refused on:Remove disabled: {N}% of this sprite is boundary — the outline IS the drawing (cutoff ~15%). - A very large crop stands the block down rather than make the window stutter:
This crop is larger than the repair pass runs on screen — the dials are off for this version.The cap is 4,000,000 pixels, and the measured line prints the crop's own count against it.
A hole can be an outline too. The counter of an O, the gap inside a ring, the space between the beams of a trestle — the pass judges each hole once, from the art itself. A rim is completed when the hole covers at least 9 pixels (anything smaller is a keying pinhole, and ringing one draws a blob rather than a line) and the rim already carries ink around at least 30 % of itself, which is the art saying an outline belongs there. Everything else is refused, and the measured line counts the pixels it left alone. Force outline is the deliberate exception: only the pinhole rule survives it.
Note. The outline repair keeps four promises on every setting. It never moves the silhouette — transparency is never rewritten, and thickening grows inward. It never invents a color: what it paints is a color already in the sprite, or the one ink you chose. The same settings on the same pixels always give the same result. And it is free and instant, so trying it costs nothing — an untouched block stores nothing at all, and putting the dials back to Off · Keep · Auto with Force outline off takes an applied repair back off. Two of the four are measured rather than asserted: the line counts the alpha bytes the pass wrote and the colors it introduced, and prints ⚠ alpha moved {N} px in place of alpha unchanged if the first ever moves.
MATCH ORIGINAL — fit the colors to the original
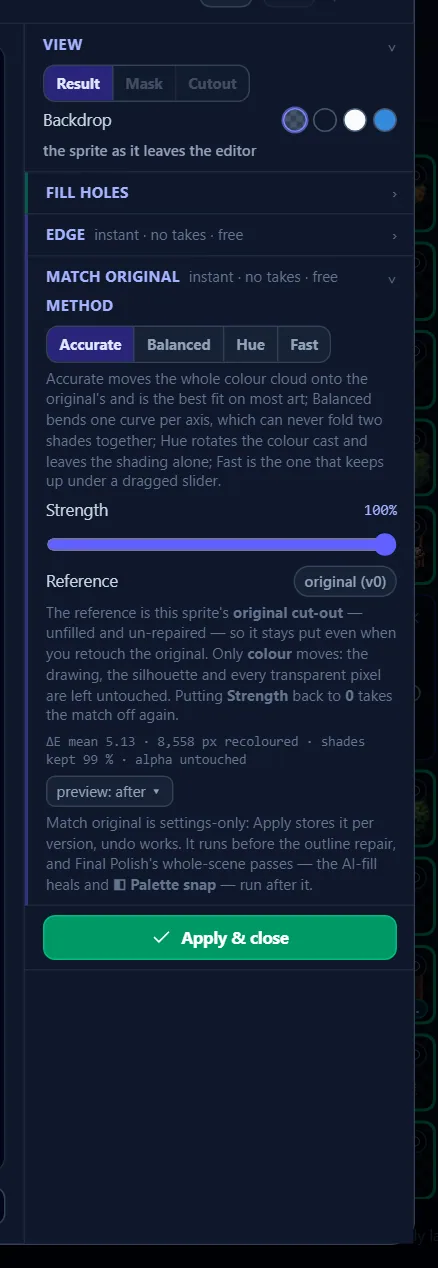
A generated version routinely comes back in the wrong colors: ochre timber where your art holds a cool gray-brown, a saturated tent where the original is a muted teal. MATCH ORIGINAL moves that version's colors onto the colors of the original cut-out of the same sprite. It is the third nature in the window and shares EDGE's terms exactly — instant · no takes · free, settings rather than pictures, dashed until you pick something, with its own measured line saying so meanwhile: not applied yet — pick a method to recolour this version.
It aims at overall resemblance — shading, brightness and the relationships between hues. It is deliberately not a quantizer: nothing here snaps your generation onto the original's list of colors, and the block reports how much of the version's own range of shades survived so you can see that for yourself.
The block is not there on the original itself. Version 0 is the reference, so there is nothing to match it to, and the heading simply does not appear.
METHOD— four chips, and the first is the default.Accuratewalks the whole color cloud onto the original's: the best overall resemblance on most art.Balancedbends one monotone curve per axis, so it can never fold two shades together, and is about twice as fast.Huerotates the hues onto the original's and rescales colorfulness and lightness while leaving the shading alone — the one to reach for when only the cast is wrong.Fastis one matrix over the cloud, and the one that keeps up under a dragged slider.Strength—0–100, opening at100, with the live value in the corner of the row.100is the full fit; lower values leave the version part-way between its own colors and the original's.0applies nothing and stores nothing — it is how you take a match back off. One drag of the slider is oneCtrl+Z, however far it travels.Reference— a chip readingoriginal (v0), and no control, because there is nothing to choose. The picture your colors are fitted to is this sprite's original cut-out before any hole fill and before any outline repair, so repairing the original itself never moves the reference under you. Only color moves: the drawing, the silhouette and every transparent pixel come through untouched.
The measured line follows the same rule as the outline repair's — every number was counted on the two pictures by the pass that just ran. It reads ΔE mean {n.nn} · {N} px recoloured · shades kept {N} % · alpha untouched, and it says which of the special cases you are in rather than showing numbers for it: reading the original…, strength 0 — nothing is applied, and nothing is stored, or nothing moved — this version's colours already sit on the original's. Beside it is the same preview: after ▾ chip, dim when the match changed nothing to compare.
Order matters, and the window runs it the way the app does. The color match runs before the outline repair, because recoloring a picture that already carries repaired outline ink drags that ink off the color the repair chose — so the canvas shows the repair derived from the recolored pixels, which is exactly what ships. Further downstream, the whole-scene ◧ Palette snap you arm on Step 7 · Final Polish runs after both, over the already-matched version.
Two ceilings stand the block down and each says which one bit: This version and its original are larger than the colour match runs on screen — {N} px, cap 4,000,000. The dials are off for this version. and This version or its original holds more separate colours than the colour match runs on screen — {N}, cap 250,000. The dials are off for this version. The second one exists because the pass costs what it costs per distinct color, not per pixel, so a small picture with a huge palette can still be too expensive. If the original cannot be decoded at all the block says The original cut-out could not be read, so there is nothing to match to. The rest of this window is unaffected., and if either side has no pixels to compare, This version or its original has no pixels to compare — the dials are off here.
Tip. Pick Fast while you drag Strength to find the amount you want, then switch to Accurate for the version you keep. Every chip re-runs instantly and none of them costs anything, so there is no reason not to compare all four with preview: after ▾.
✓ Apply & close
One press commits every half — the take you are looking at, the edge settings and the color match — and closes the window. Its tooltip enumerates exactly what will land, naming only the halves that moved: Apply this take, the edge settings and the colour match to the version and close. The thumb's dot is where you switch the fill back off., or, on a settings-only press, …and close. Nothing was filled, so no take is applied. It stays dim until there is something to apply: Run a fill, change an edge setting or pick a colour match first — there is nothing to apply yet. Whichever dial moved, Ctrl+Z walks it back before you press.
An untouched settings block writes nothing, and a block dialed back to its inert state (REPAIR Off with nothing else set, Strength 0) deletes what was stored rather than storing an "off". So a window you opened and closed without expanding anything leaves the version exactly as it would have left it with every block open — a folded door is put away, never cleared.
Where the pixels go. What this window commits genuinely becomes the version's base. The fill engines read it, the sheet the AI is sent reads it — a filled original is what goes out on every sheet run and every single-sprite re-roll, so the model is never shown the holes it is being asked to draw around — and Step 6 · Add Shadows, Step 7 · Final Polish, Step 8 · Preview & Export, the saved project and all eleven exports receive the repaired cut-out.
On the version row the wrench badge then lights amber for any of the three and names them in its tooltip. Once — and only once — a fill exists, a small dot appears beside the badge: it is the fill's own switch (Fill ON — click to un-apply, Fill OFF — click to re-apply) and the only un-apply in the app. Both directions are free. The outline repair and the color match have no dot, because they are settings — reopen the window and reset the dials to take them off.
Repairing several sprites at once
The two settings blocks — and only those two, because they are the free deterministic ones — can be driven for a whole selection without opening a window at all. Ctrl/Cmd-click two or more sprites on the Step 5 scene and the readout pinned to the bottom-left of the scene grows two split chips after the Snap {N} button: ◌ Edge {N} and ◐ Match {N}.
The glyph reads the whole selection at a glance. ◌ means no selected sprite carries that section, ● that every eligible one carries identical settings, and ◐ that it is mixed — either the values differ, or some carry it and some do not. The count is bare when the press reaches everything you selected and a rose {K}/{N} when it does not: Edge leaves out a sprite whose art has no outline style, one whose crop is over the pass's ceiling, one whose pixels could not be read, and a ⧉ copy that mirrors another sprite; Match leaves out a ⧉ copy for the same reason, and a sprite showing its original, because the original is the reference.
Pressing the left half is the one-gesture path, and it has exactly three answers. On a set where nothing is set it writes the standard settings to every eligible sprite — Fill gaps · Keep for the outline repair, Accurate at 100% for the color match. On a set that already agrees it re-applies what they share. On a mixed set it refuses: the half grays out and its tooltip reads The {N} selected do not agree — open the menu and pick, because settling a disagreement by majority would silently overwrite every sprite that disagreed. The press reads the sprites before it writes them, and says which it is doing — Measuring…, then Applying….
Both halves of Match go down when nothing in the selection is showing a generated version, and say so: None of the selected sprites is showing a generated version to recolour — Match original never applies to an original cut-out. Edge's ▾ stays live when the reason is a missing outline style — None of the selected sprites has an outline style to repair — open the menu and use Force — because Force outline inside it is the way out.
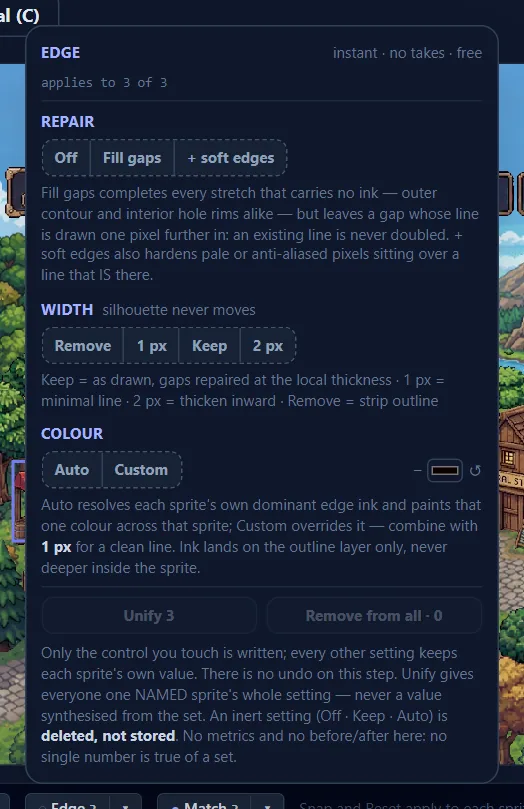
The ▾ opens the section itself — the same REPAIR, WIDTH and COLOUR rows (plus Force outline, offered only where a selected sprite has no style to repair), or the same METHOD, Strength and Reference rows, under the same instant · no takes · free heading. A line under the head names who it reaches, like applies to 2 of 3 — sign 2 has no outline style · Force overrides. Where the selection disagrees, the row draws every value in play as a hatched chip with its own count, the head carries a hatched MIXED tag — MIXED · {K} OF {N} SET when some of them carry the section and some carry nothing — and hovering that tag enumerates the set sprite by sprite. Strength writes once per drag, on release, so dragging through 0 deletes nothing and letting go at 0 is the deliberate way to take the match off a whole set. Two footer buttons take a mixed set the rest of the way: Unify {N} gives everybody the whole section of one named sprite — the first in your selection that carries it, named in the tooltip before you press, never a value synthesized from the set — and Remove from all · {K} deletes the stored settings from every selected sprite that carries them, including one the outline pass currently skips.
Every press reports itself in the emerald line beside the chips — edge → 3 sprites, edge → 2 of 3 · 1 no outline style, match → 2 of 3 · 1 showing original, edge unified → 3 sprites · from zombie 7, match cleared → 2 sprites — because a bulk gesture that reached only part of your selection has to say so. A press that leaves a section inert deletes the stored setting rather than storing it, and the line words itself as a clearing to match.
Careful. Every control in these popovers writes through to each selected sprite's own applied version the moment you touch it: Only the control you touch is written; every other setting keeps each sprite's own value. There is no undo on this step. Nothing here is a preview, and there are no metrics and no before/after — no single number is true of a set. To see what a bulk press actually stored, open one of those sprites' own repair window afterwards.