The mask editor
The mask editor is the workspace where an element's cut-out is decided by hand. It opens from Step 3 · Find & Cut, it always paints on the element's original crop rather than on any AI variant from a later step, and it commits nothing until you press Apply mask. One idea runs through the whole dialog: the mask is the pixels you are keeping. Everything bright in the default view is your element; everything dark is background you are throwing away.
Costs. Two things in here spend credits, and each prints its price on its own face: ✨ Re-mask in the ✨ AI mask section (one credit per run, on every engine the picker offers) and the paid AI carve split inside ◱ Split, whose chip and both of its run buttons print three credits per carve. Nothing else does. The four gesture tools, Grow 1px, Shrink 1px, Fill holes, ⇄ Invert, both Refine mask engines, the three local split algorithms, ✂ Split into N elements, Save box for next Segment, undo, redo and Apply mask are all free — and opening ◱ Split mode is free too, because the chip is a door, not a run button. See Credits & plans.
Four ways in
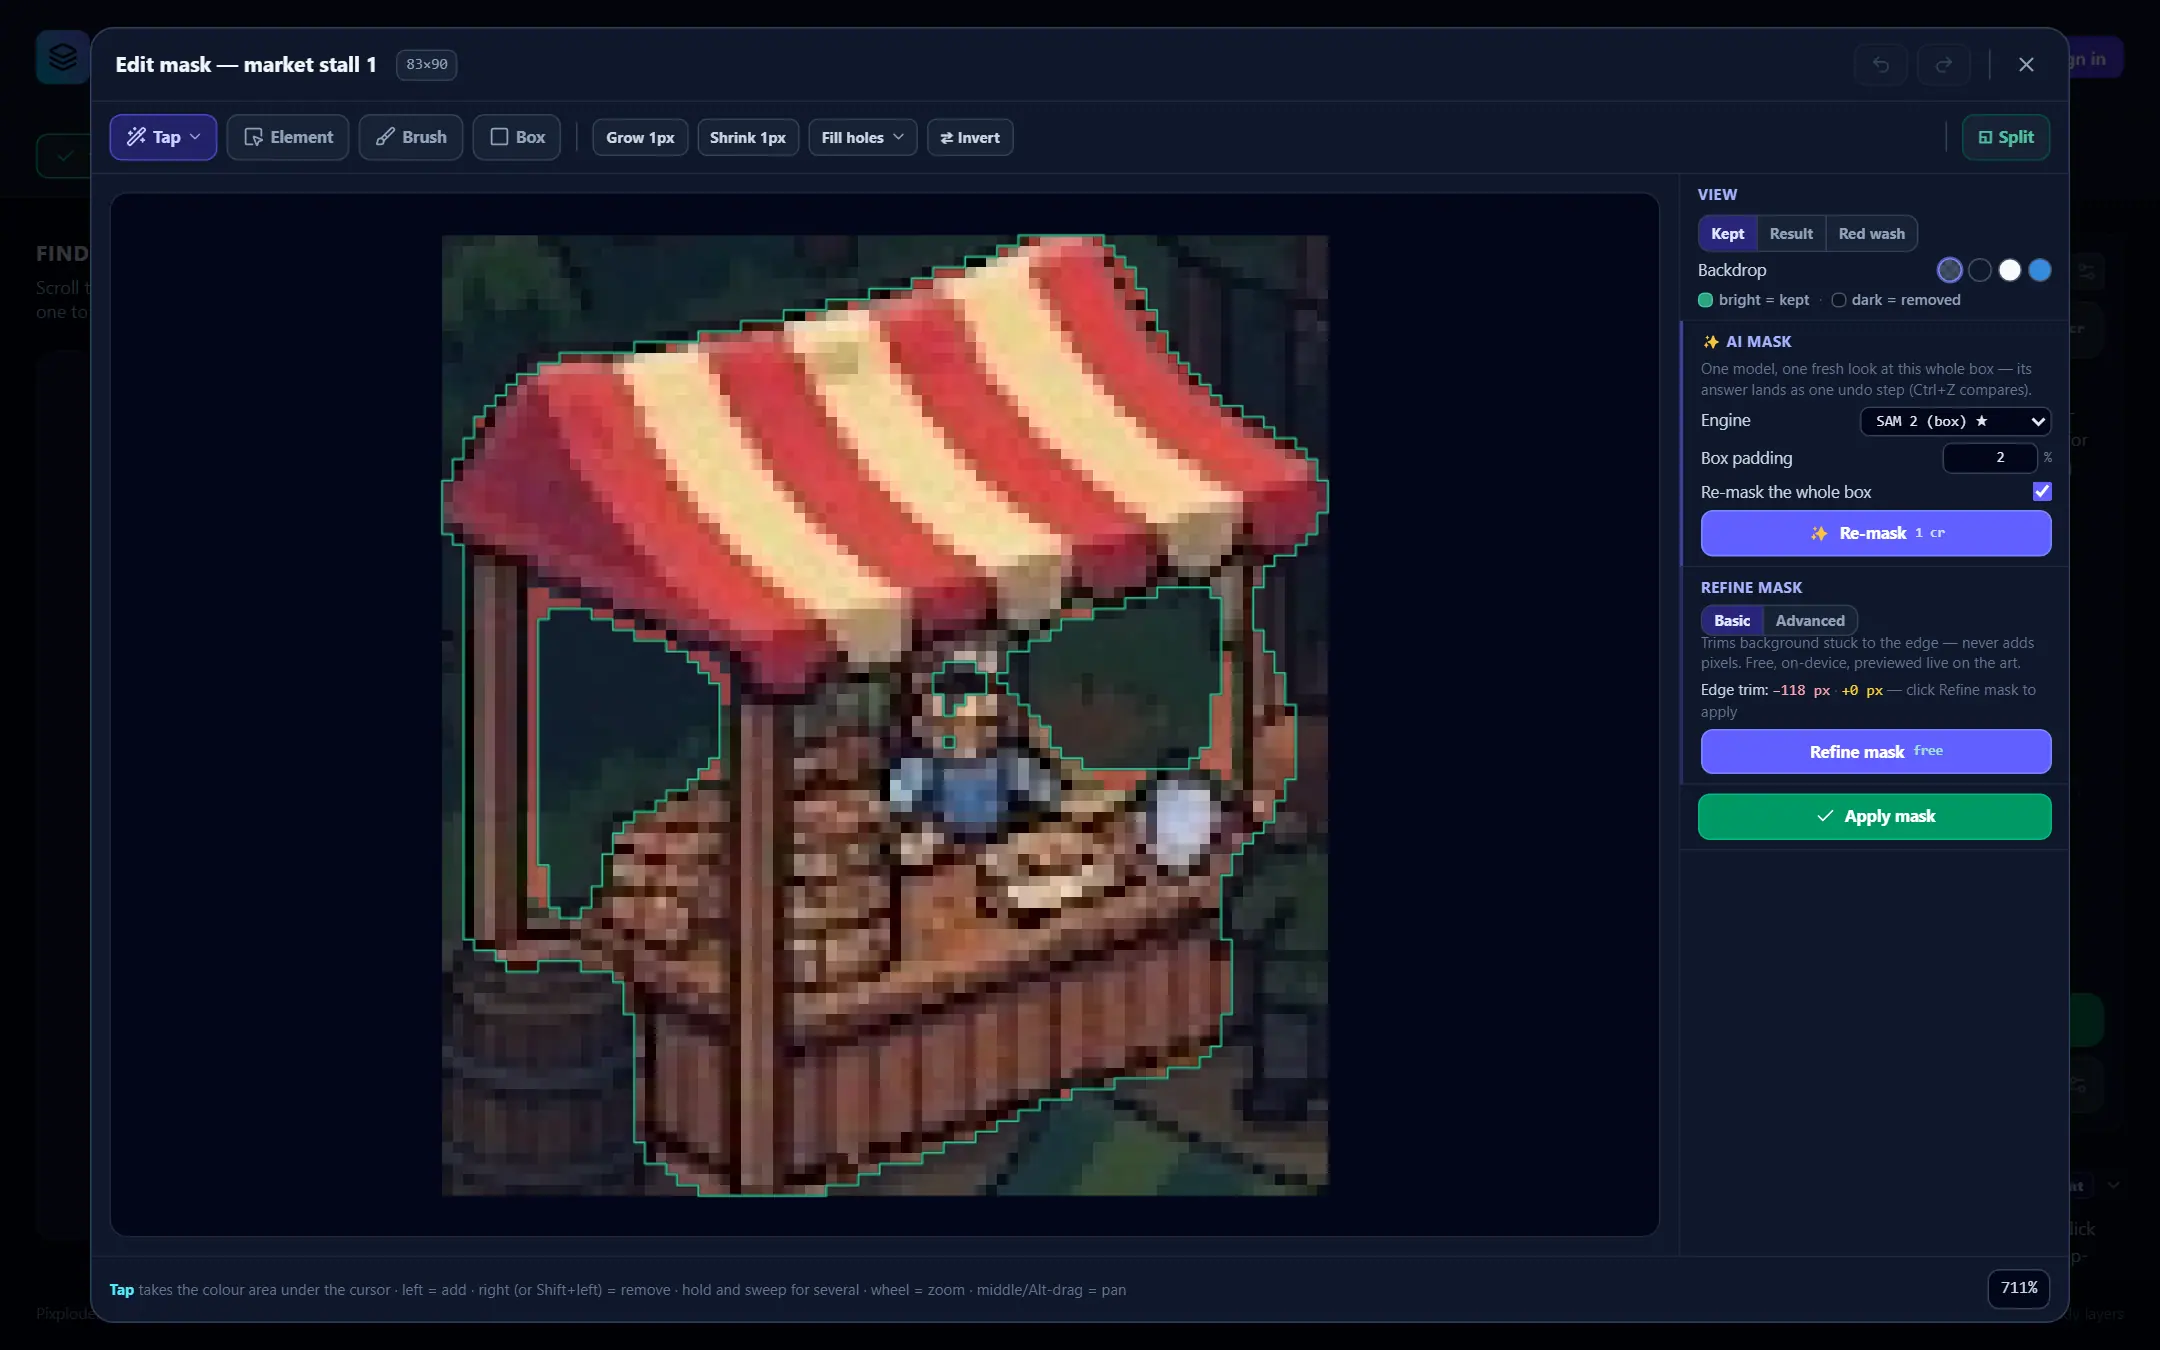
Every route lands in the same dialog:
- The brush icon on a
FOUND ELEMENTSrow. On an element that already has a mask its tooltip readsEdit mask — add or remove pixels by hand. On a box-only element there is no mask yet, so the icon is filled indigo and readsBuild this element's mask by hand — opens full-white, ready to carve. - The
Mask — <name>button above the canvas, which appears the moment a single non-group element is selected. Names longer than 16 characters are shortened on the button itself. - The
Edit maskpill in the small bar under a selected element's box on the canvas. New element. Arm the one-shot draw mode, drag a rectangle on the scene, and the editor opens on that crop with an empty mask and nothing committed yet.
Groups have no editable mask of their own — the brush icon is not offered on a folder row.
Note. There is no route into this editor from Step 5 · Finish Sprites. Step 5 has its own per-version repair window for holes, outlines and color; see Sprite repair. If you need to change an element's silhouette, come back to Step 3 and open it here.
The header
The title reads Edit mask — <name>, or New element — from your box when you started from a drawn rectangle. Beside it a small chip prints the crop size in pixels — The crop this editor is painting on, in pixels.
↩and↪are the editor's own undo and redo, with their own history that is separate from Step 3's element ring. Their tooltips name the chords:Undo (Ctrl+Z)andRedo (Ctrl+Y) — Ctrl+Shift+Z does the same. Every gesture, every whole-mask fix and every AI answer lands as exactly one entry.Save box for next Segmentappears only in new-element mode. It is free, keeps just the rectangle you drew, files it as a box-only element for the nextSegmentrun to fill in, and closes the dialog — the one other way out of the header, and only there.✕closes without applying:Close without applying (Esc), orClose without creating anything (Esc)for a new element. While an AI run is in flight it waits —An AI run is in flight — let it finish first— so a paid answer can never be orphaned by a click.
The commit is not up here. It sits at the foot of the column on the right, directly under the tools that made the mask.
One polarity, four tools
The whole editor follows one rule, and every tool obeys it:
- Left click adds to the mask.
- Right click removes, and Shift+left removes too, for trackpads without a right button.
- Alt+drag and middle-drag pan; the wheel zooms at the cursor.
There is no separate selection to convert and no floating buffer — every gesture writes the mask itself, on release, as one undo step.

Tap — the magic wand
The default tool. A click takes the color area under the cursor, every time. Hovering previews the exact region with a tint and names it in a chip at the cursor; hold the button down and sweep, and every area you cross joins the same undo step. Ctrl is still accepted and now means nothing — every tap is a color tap, so there is no ladder left for it to skip.
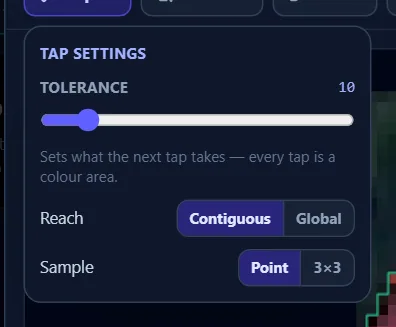
Clicking the chip while Tap is already the live tool opens Tap settings, a small panel anchored under it:
Tolerance— 0 to 80. Higher folds in more nearby colors.Reach—Contiguousfloods outward from the click;Globaltakes every matching pixel in the frame. WithGlobalon, the chip itself readsTap · globalso the toolbar tells you at a glance.Sample—Pointkeys off the exact clicked pixel;3×3keys off the average of the nine around it and is steadier on noisy edges.
Right after a tap, moving the Tolerance slider re-tunes that same tap live instead of stacking a second undo step, and the line under the slider says which of the two it is doing: Re-tuning your last tap, live — no extra undo step. or Sets what the next tap takes — every tap is a colour area. The settings survive reopening the dialog for the rest of the session.
Element — the whole-thing picker
Its full name is Select element; the chip wears the short one so the toolbar never wraps. A click takes the whole thing under the cursor, in this order: a split piece if a carve is on screen, then a neighboring element, then the unclaimed background remainder. It never falls back to a color area — where none of those is under the cursor the chip says No element here, nothing is tinted, and the click commits nothing at all. Left adds, right (or Shift+left) removes, and holding the button lets you sweep several regions into one undo step. The background remainder is add-only, since its area is by definition outside your mask already.
Picking this tool is what decodes the neighbor masks, so a loading masks… chip can appear in the toolbar for a moment. Until it clears, the cursor chip says loading masks… as well rather than claiming there is nothing there — a click made in that window still resolves once the decode lands.
Brush — pixel by pixel
While the brush is live, two extra controls sit next to it: a size picker offering 1px, 2px, 4px, 8px, 12px, 16px, 24px, 32px, 40px and 50px, and a round/square shape toggle (Round brush — a disc footprint (corners rounded off) versus Square brush — the full square block (corners included)). A fresh crop opens on the size nearest one sixty-fourth of its short side, so a small sprite starts fine and a large one starts broad. The outline under your cursor is exactly the cells a press would fill, and a stroke that starts off the edge of the crop still paints the part that lands on it.
Box — drag a rectangle
Drag a dashed marquee and release to commit it: left adds the rectangle to the mask, right (or Shift+left) removes it. Like the brush, the press may start on the dark margin outside the crop — the rectangle is clipped to the art rather than refused.
The whole-mask fixes
Four blunt operations sit past a divider, always visible, each landing as its own undo step and none of them spending a credit.
Grow 1pxdilates the whole mask by one pixel.Shrink 1pxerodes it by one.⇄ Invertswaps kept and removed across the entire mask.Fill holesis the one that asks first — its chevron says so.
Grow, Shrink and ⇄ Invert commit on the click, because a one-pixel change is its own preview and Ctrl+Z is one motion away. Fill holes opens a panel instead, because a size cap can take pixels away as well as add them.
The Fill holes panel
Max hole sizeruns from 0 to 60 pixels. At0the readout readsenclosed onlyand the pass is the classic fill: every hole fully enclosed by the mask, whatever its size. Above 0 the cap rules both ways — any region up to that many pixels, hole or loose speck, flips to the side most of its border touches, and a 50/50 tie fills. The line under the slider states whichever rule is in force, and the cap you land on is remembered for the rest of the session.- The two counts are the legend for what is drawn on the art: an amber
+ N px in M regionsfor what would join the mask, and a rose− N px in M regionsfor what would leave it. The rose line is printed even at 0, where it is always zero. ✓ Fill holeswrites exactly what the art is showing, as one undo step. It is disabled when the change set is empty.
On a very large crop the live preview switches off and the panel says crop too big to preview live — ✓ Fill holes solves on the click; the button then solves and applies in one go. Esc or a click outside puts the panel away, and it is mutually exclusive with Tap settings — opening one closes the other.
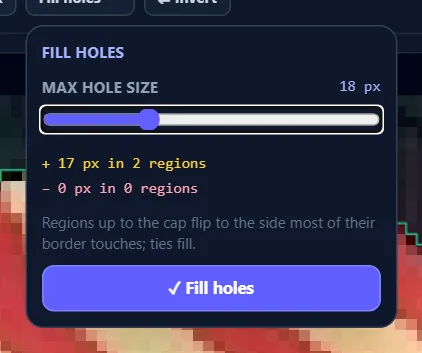
Tip. Fill holes is also the on-demand despeckle. Nudge Max hole size up a few pixels and the rose count starts reporting the loose specks it would sweep out of the background at the same time it fills the pin-holes inside your sprite.
The column
The 260-pixel column beside the art never floats and never collapses. View sits at the top and never moves, because it describes the canvas rather than a job. Apply mask sits at the foot and never moves either. What changes in between is the mode: with ◱ Split off you get ✨ AI mask and Refine mask; with it on you get an exit row and the ◱ Split card.
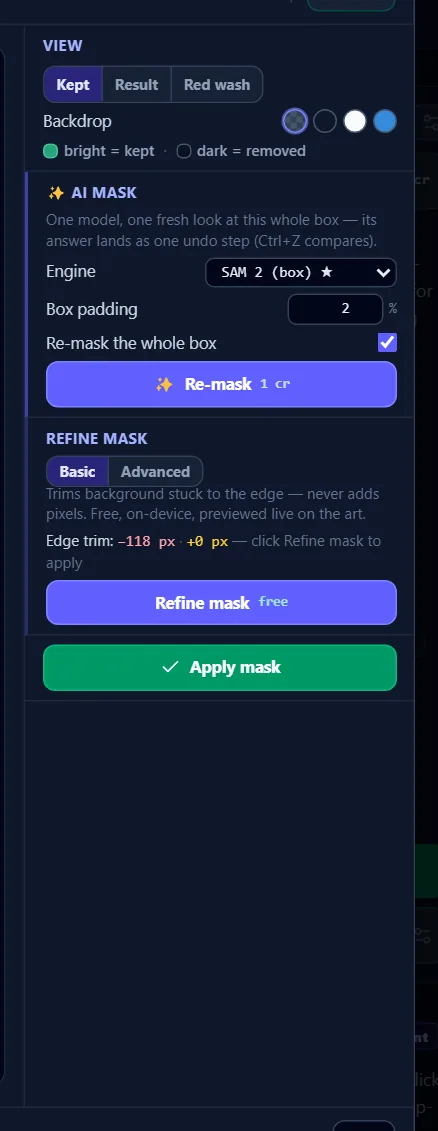
View
Keptis the default: your element stays bright, everything removed goes dark, and the mask's own contour is stroked in green. The legend under the switch readsbright = kept · dark = removed.Resultmakes removed pixels disappear entirely — the cut-out itself, over the chosen backdrop, which is exactly whatApply maskhands back.Red washis the older reading, kept for people who prefer it: red marks the removed pixels, untinted is your element.
The Backdrop swatches — Transparent (checker), Dark, Light and Blue — pick what sits under the result view, and clicking one switches to that view for you.
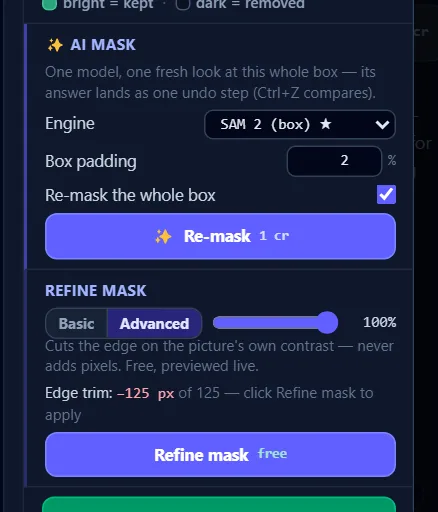
✨ AI mask — paid
One model takes one fresh look at the region, and its answer replaces your mask as a single undo step, so Ctrl+Z is the compare. Three controls:
Engine— four engines, with a ★ on the one that is the default. They all cost the same single credit, so the pick is purely about which one reads your art: different art fails different engines, and trying another when one misses is the intended move rather than a workaround.Box padding— 0 to 10 percent of the box's own size, added as air on each side so pixels sitting right on the border (thin outlines, hair, feet) are not clipped off.0sends the exact box.Re-mask the whole box— checked by default, which re-masks the entire box whatever is in it now. Uncheck it and the request narrows to the rectangle your current mask spans; an empty mask always asks about the whole box either way.
✨ Re-mask runs it and prints its price beside the label. If nothing usable comes back, the status row says That box could not be masked — try ◱ Split or the brush. and your work is left alone.
Tip. The fastest way to take in something the mask missed is to leave the editor, drag the element's corner handle until the box covers it, reopen, and press ✨ Re-mask with Re-mask the whole box still checked. Growing the box is what changes the question.
Refine mask — free
A local, on-device edge pass that removes only and never grows the mask outward. It previews itself before it runs, on the art, in the same two hues the fill panel uses: rose for what would be removed, amber for the pin-holes its own tidying would put back. The button applies exactly that preview, as one undo step, and runs on your machine — its tag says free where a price would otherwise be.
A Basic | Advanced strip picks which pass runs. Both are free and both end in the same button:
Basic— one guided pass over the whole mask, one answer, take it or leave it. Its line counts both hues:Edge trim: −N px · +N px — click Refine mask to apply. Alongside the trim it drops mask specks of three pixels or fewer and re-fills the pin-holes it punches.Advanced— a graph cut along the boundary with a strength dial on the same row, reading0%to100%(it starts at 100). It ranks every pixel it could take once, and the dial re-reads that ranking, so dragging it is instant and every setting removes a strict subset of a higher one. Its line readsEdge trim: −N px of M, whereMis everything the pass could take; drop the dial low enough to take nothing and the tail turns into— raise the strength to take something.
The card is honest about the states where it cannot preview:
| Line | What it means |
|---|---|
solving… | A solve is in flight; the counts land in a moment. |
nothing to change — edges already snapped | The pass found nothing on this mask. The button is disabled. |
held back — trimming would cut the mask apart | Basic found a trim and put it back, because applying it would have severed the mask into pieces. Reconnect the thin part with Grow 1px or the brush and it will run. |
crop too big to preview live — press Refine mask and it solves then (a second or two) | Basic is past its preview cap. Nothing is painted on the art; pressing the button solves and applies in one go. |
crop too big to preview live — press Refine mask and it solves then, at this strength | The same state on Advanced, which solves at whatever the dial is reading when you press. |
crop too big for Advanced — draw a smaller box around the edge, or switch to Basic | Past Advanced's own ceiling, where the button and the dial both go dead. Basic still covers this size. |
Ordinary sprite crops sit under every one of those ceilings — what reaches them is the whole-scene rectangle you get from New element.
◱ Split — optional
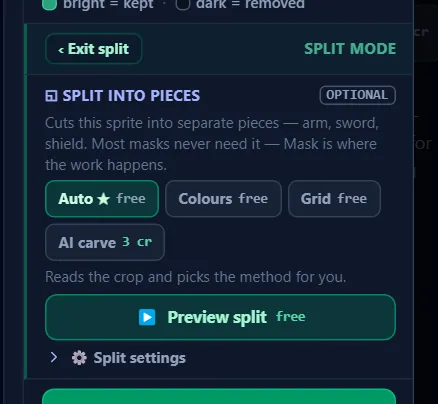
◱ Split is a mode button at the far end of the toolbar, and pressing it is free: it runs nothing, spends nothing and draws nothing on the art. It opens the surface where the four algorithms wear their prices. While the mode is on the chip stays lit, and the column below View swaps to the ◱ Split card behind an emerald exit row that reads split mode and carries ‹ Exit split. Press the lit chip again, press ‹ Exit split, or hit Esc, and the mask tools come back. Every tool in the toolbar stays fully live in the mode.
The mode is off every time the editor opens, and that is deliberately not remembered — an optional tool should not reopen itself on the next sprite.
The card is headed ◱ Split into pieces and wears an optional pill whose tooltip carries the argument: Optional — splitting is for when you want separate elements out of one sprite. While nothing is previewed, one line under the head says the same in the open: Cuts this sprite into separate pieces — arm, sword, shield. Most masks never need it — Mask is where the work happens.
Nothing is created until you press ✂.
The chip row is the billing truth
| Chip | What it does |
|---|---|
Auto ★ | Free, on-device. Reads the crop first and picks flat-panel cutting or color islands for you. The default. |
Colours | Free, on-device. Every run of touching, similar-colored pixels becomes a piece; Tolerance in ⚙ decides how similar. |
Grid | Free, on-device. Cuts along the even columns it detected — inventory bars, hotbars, tile strips. The chip disables itself when the crop has no such grid: No slot grid detected in this crop — Grid needs three or more even columns. |
AI carve | Paid, and the chip prints its price. The AI carves the crop into pieces. |
If the chip you picked last time cannot run on this crop, the row lights the one that will and an amber line under it says which and why. Your choice is untouched and comes back on the next crop that can take it.
While a ✨ Re-mask is still out, every control in this card stands down and says so in the AI section's own indigo: ✨ Re-mask is still running — these controls come back when its answer lands. Nothing in here is running, and nothing in here is spending.
Preview, then confirm
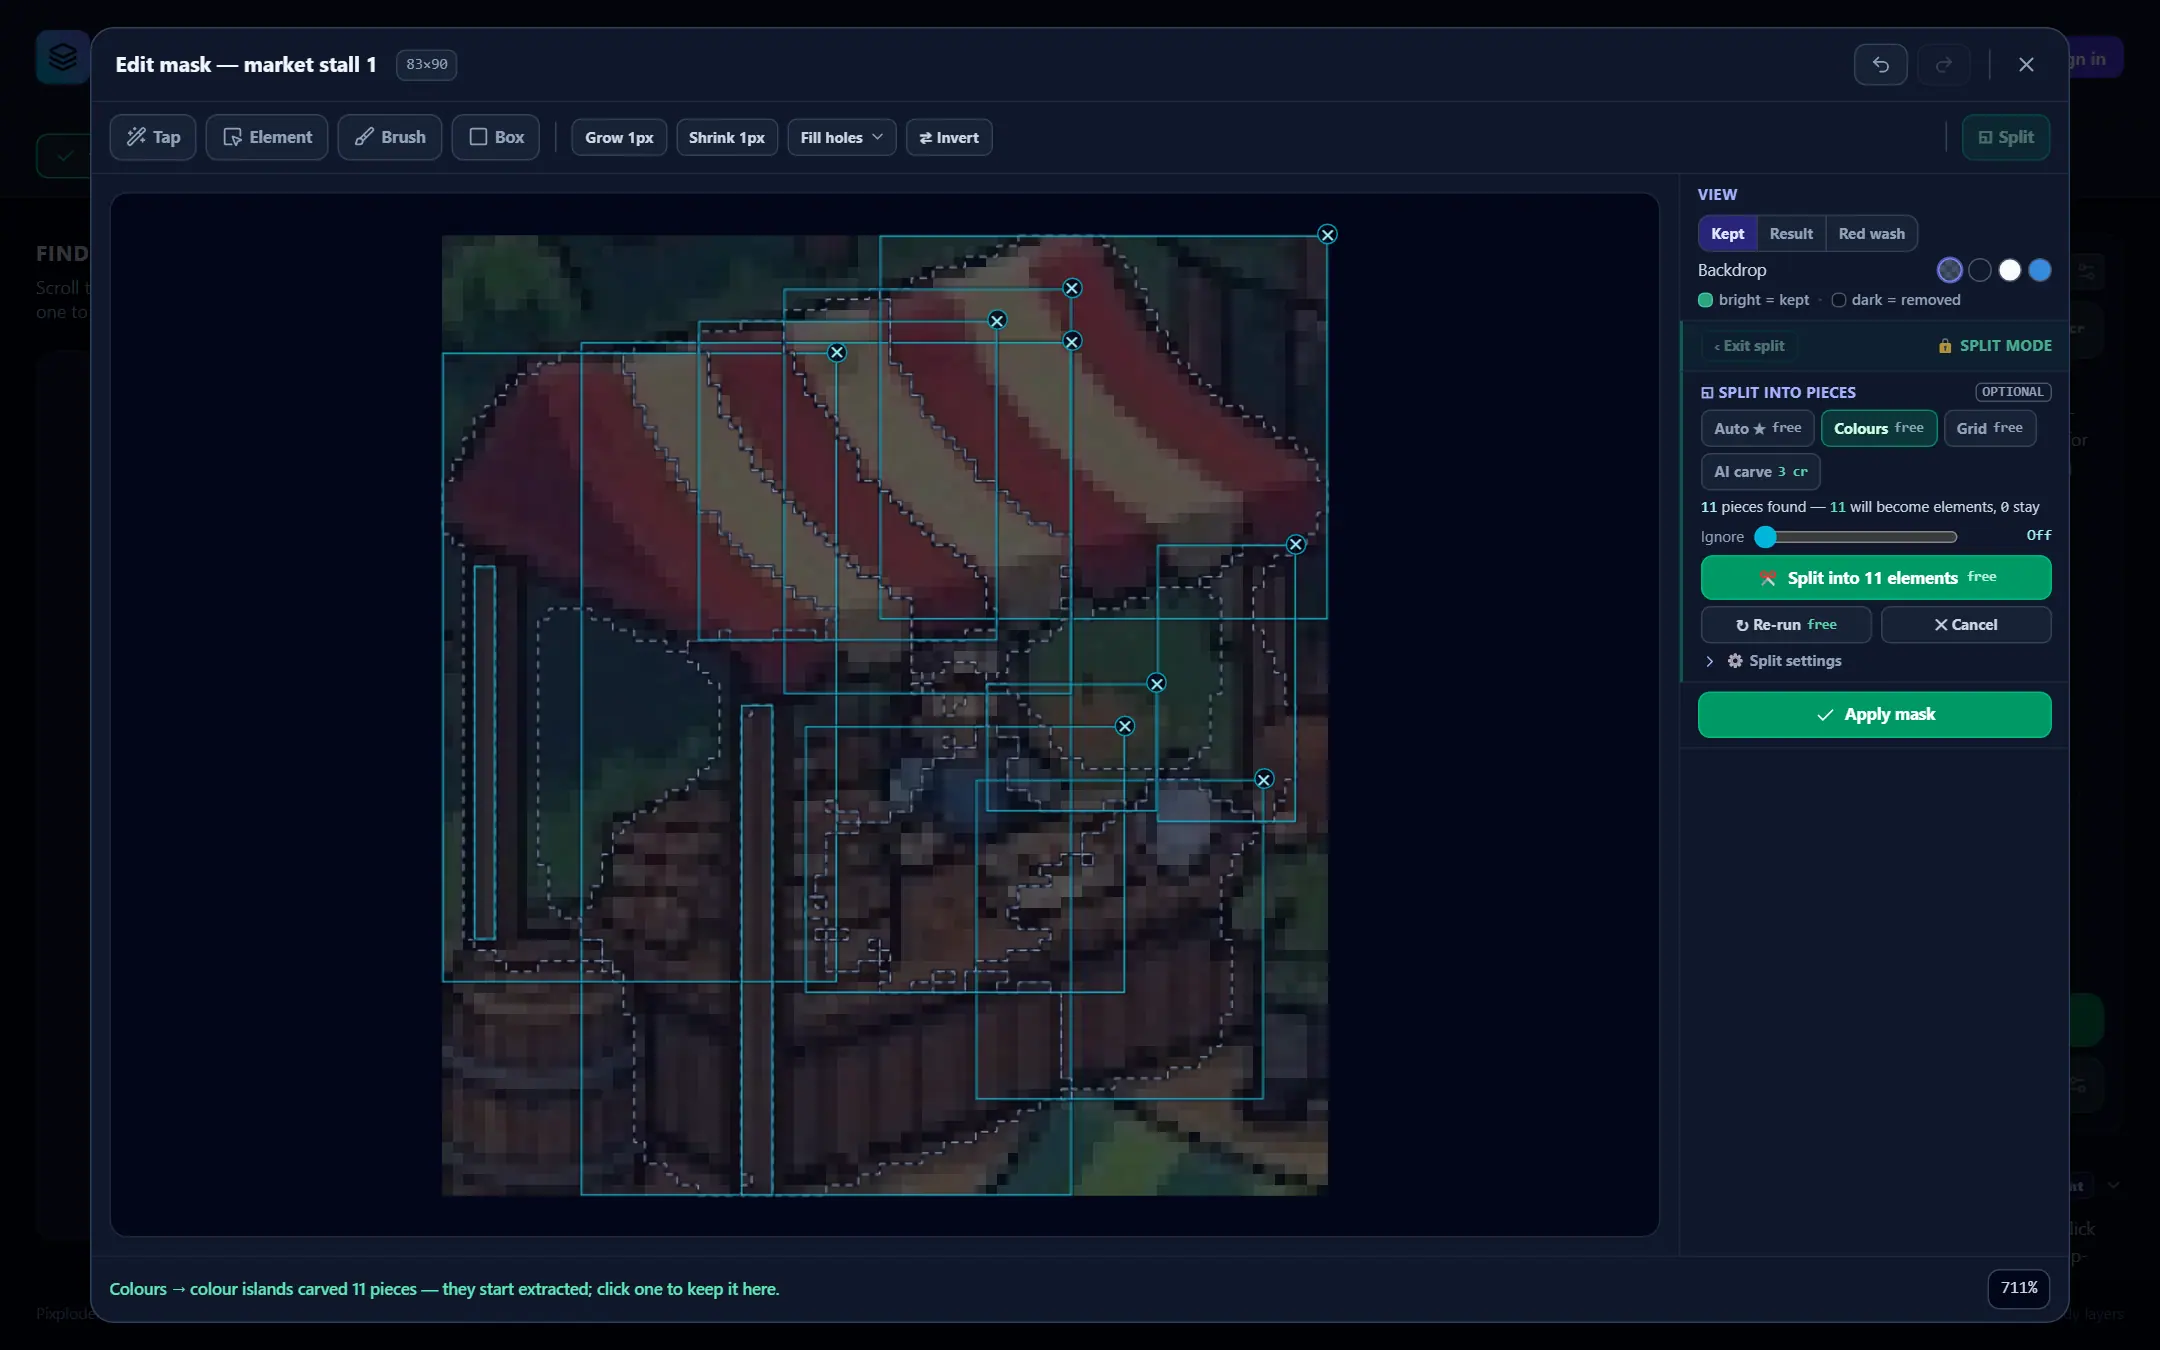
Press Preview split (or Run split preview on the paid chip) and the pieces appear on the art: each a dashed silhouette inside a thin cyan rectangle, which is the exact box ✂ would hand that new sprite. Every piece starts extracted — subtracted from your mask, so the canvas immediately shows the remainder — and the card counts them: so many pieces found, so many that will become elements, so many that stay. The status row names which algorithm actually ran and how many pieces it carved. One carve shows at most 64 pieces, and the note says so when it lands on that ceiling.
A run that finds nothing drops the card straight back to its idle state and the status row says why — the free algorithms point you at another chip or at the brush, and AI carve points at a finer Detail while there is a finer rung left. The three free algorithms also have a size ceiling of their own, because they run on your machine: on a crop past it nothing is carved and the row prints the crop's megapixels along with the two ways forward, a smaller box or AI carve.
- Click a piece body to fold it back in and keep it in this element. It loses its cyan rectangle and a small
stayschip appears at its top-left corner. - Click the
✕on its cyan box to delete it: no sprite, and its area stays out of this element. Deleted pieces join the(N ignored)tally, and clicking where one sat brings it back. Pieces too small on screen to carry an✕simply do not get one; the status line says how many, and zooming in brings them back. - The
Ignoreslider discards the smallest and thinnest pieces in bulk, through seven stops:Off,Specks,Tiny,Slivers,Junk ★,FragmentsandBig only. It measures thinness as well as area, so a long thin rail goes atJunk ★whatever its length. Nothing is deleted — sliding back toOffreturns every piece, a piece you clicked to keep stays kept at every step, and the largest piece of a carve is never hidden. ✂ Split into N elementscommits, and it is free — the carve already paid. Each extracted piece becomes its own element in a new folder named<element> splitafter the element you were editing: at the top ofFOUND ELEMENTS, or inside the same folder when the element you split already lived in one. That element joins the new folder as its last child, unless the carve claimed every pixel and there is no remainder left to file. The folder opens itself, so nothing looks like it vanished, and the whole commit is oneCtrl+Zon Step 3's element history. What✂does not do is write the remainder back: the status row says as much, andApply maskis what stores it as this element's mask.◱puts the piece overlay back on the art after you have switched to another tool,↻ Re-runcarves again with whatever chip is selected (its tag says whether that costs anything), and✕ Cancelthrows the carve away.
Whether ✕ Cancel also puts the mask back depends on what has happened since: while the carve is still the last thing you did, the mask is restored; after a later edit, or after ✂ has already handed those pixels to real elements, the pieces simply go and the mask stays exactly as it is. The button's tooltip says which of the two it will be before you press it, and a paid carve's credit stays spent either way.
⚙ Split settings holds whatever the selected chip actually has to set: a Detail ladder for AI carve running coarse · 16, normal · 32, fine · 48 and finest · 64 ★; a Tolerance of 16 ★ or 24 for Colours; and one honest line for Auto and Grid, which have nothing to tune.
Careful. The ✕ on a piece deletes it — no sprite, and its pixels stay out of this element, which is why that area goes dark. Clicking the piece body is the opposite: it keeps the piece here. The line at the bottom of the dialog restates whichever rule applies while the overlay is up.
The one time the mode holds you
While a split preview still has pieces waiting to become elements, both buttons out refuse. The chip and ‹ Exit split dim, the exit row prefixes a 🔒, and both carry the same sentence — press either and it flashes along the bottom of the dialog: Finish or cancel the split preview first — ✂ creates the elements, ✕ Cancel throws the preview away. Both of those answers are inside the mode, which is exactly why you are held there.
Esc is the deliberate exception. It will not leave the mode either, but rather than stopping dead it skips that rung and closes the dialog, so the editor is never a room you cannot Esc out of. The lock lifts the moment nothing is waiting on you — after ✂ has run, once every piece has been clicked back into the mask, or once the Ignore slider has discarded the lot. It also works the other way: whenever a carve's question opens while you are standing in the mask column — a run landing after you left, a ↻ Re-run, an undo that re-opens one — the mode switches itself on and the chip lights up unbidden.
Apply mask and Create element
The single commit sits at the foot of the column, in both modes, so the way out never disappears under a tool.
Apply maskwrites the mask back to the element and closes:Write this mask back to the element and close. The element is flipped back to showing its original crop with your hand-edited mask, and it is marked as hand-edited from then on — later automatic passes leave it alone. Any AI variants it had picked up stay in its version list and can be re-picked at Step 5 · Finish Sprites. If your edit left the mask as a small fragment inside a much larger box — the usual outcome of a✂remainder — the element is re-boxed onto what it actually keeps.Create elementreplaces it in new-element mode and mints a brand-new element from the pixels you kept, placed at the top ofFOUND ELEMENTSasSprite Nwith its rename field open. It stays disabled until you have marked something:Mark something first — the element is whatever you keep. The new element is born tight — a generously drawn rectangle is trimmed to the mask inside it.
Both wait while an AI run is in flight.
The status row, zoom and keyboard
The row along the bottom is a fixed height and always mounted, so the canvas above it never jumps. It shows exactly one line at a time, picked in this order: a refused exit from split mode, then the last AI note (click it to dismiss), then the ◱ Split mode line whenever the mode is on and the piece overlay is not the live tool, then a one-line hint for the live tool naming its polarity and its navigation.
The zoom percentage is pinned to the right of that row, and clicking it snaps back to true 1:1 pixels, centered — its tooltip reads Reset zoom to 100% (1:1 pixels, centered). The editor opens fit to the crop; the wheel zooms toward the cursor, and middle-drag or Alt+drag pans.
| Keys | What they do |
|---|---|
Ctrl+Z | Undo one editor step. Cmd+Z on a Mac. |
Ctrl+Y or Ctrl+Shift+Z | Redo. |
Esc | Steps back out of one thing at a time: an open Tap settings or Fill holes panel first, then the piece overlay, then ◱ Split mode, then the dialog itself. |
Shift + left click | Removes, exactly like a right click. On Tap and Element, pressing or releasing Shift re-resolves the hover preview even with a still cursor, so it always describes what the next click would do. |
Alt + drag, middle-drag | Pan. |
| Wheel | Zoom at the cursor. |
Esc is ignored entirely while an AI run is in flight, for the same reason the ✕ waits: a paid answer nobody sees is a credit thrown away.